
The Ultimate Blueberry Scones Recipe: Better Than Your Local Coffee Shop (No, Seriously)
We have all been there. You are standing in line at that overpriced coffee chain, staring through the glass at a blueberry scones display that looks like a collection of tanned bricks. You buy one anyway, take a bite, and realize it has the structural integrity of a sidewalk and roughly the same moisture content. Why do we do this to ourselves? Why do we pay five dollars for a mouthful of sand when we could be making buttery, flaky, purple-stained masterpieces in our own kitchens?

I remember the first time I tried to make scones. I essentially created blueberry-flavored hockey pucks. My roommate used one as a doorstop for three weeks. It was a dark day for my ego. But after years of “research” (mostly just eating far too much butter), I have finally perfected the secret to a scone that actually melts on your tongue. Are you ready to stop settling for “bakery-adjacent” cardboard and finally master the art of the perfect crumb? Let’s get to work before the berries go bad.
Why This Recipe Is the Undisputed GOAT
Why should you bother rubbing cold butter into flour when you could just buy a muffin? Because this recipe produces a texture that is bordering on spiritual. Most scones fail because they are over-mixed and under-buttered. We aren’t making bread here; we are making a pastry that is essentially a sophisticated biscuit with a high-end education.

Beyond the flavor, this recipe is a total “set it and forget it” flex for your guests. You can prep the dough, stick it in the freezer, and bake it off right when your friends arrive so your house smells like a boutique hotel in the English countryside. It is fast, it is flashy, and IMO, it’s the only way to prove you actually respect your breakfast. Ready to reclaim your kitchen throne?
The Ingredients: The Flaky Dream Team
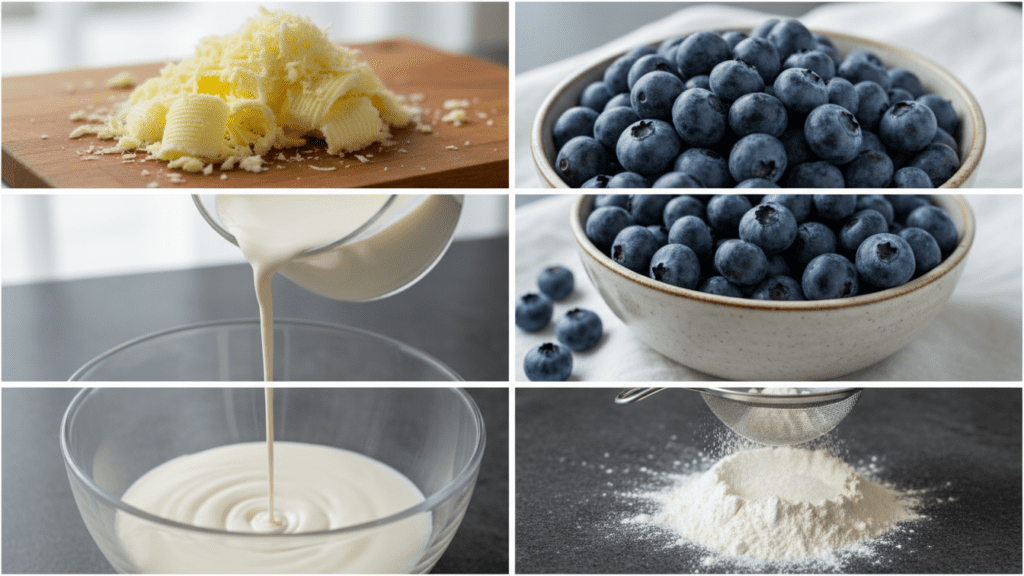
Don’t let the simplicity fool you. Since we only have a few players on the field, they all need to be All-Stars. If you use generic, room-temperature butter, we are no longer on speaking terms.
- 2 cups All-Purpose Flour: The sturdy foundation for our butter-fortress.
- 1/2 cup Granulated Sugar: Just enough to keep things interesting.
- 1 tbsp Baking Powder: We need this baby to reach skyscraper heights.
- 1/2 tsp Salt: To make the sugar actually stand up and behave.
- 1/2 cup Unsalted Butter: Bold move: it must be frozen. Not cold, frozen.
- 1/2 cup Heavy Cream: Plus a little extra for brushing. No skim milk allowed in this house.
- 1 Large Egg: To give the dough that rich, golden soul.
- 1 cup Fresh Blueberries: Or frozen, just don’t defrost them or you’ll have purple soup.
- 1 tsp Vanilla Extract: Because we aren’t savages.
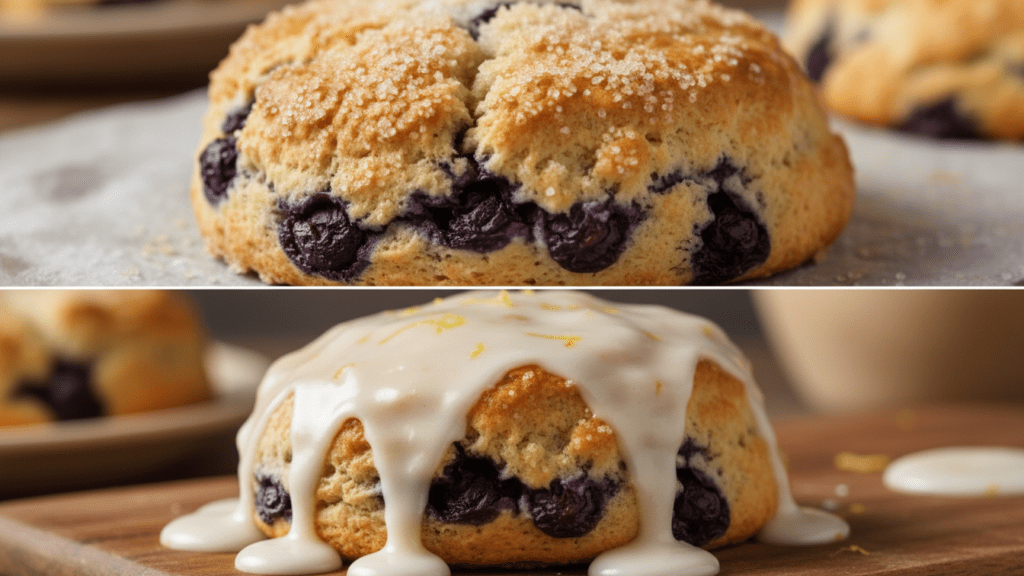
- Coarse Sanding Sugar: For that mandatory “crunch” on top.
The Arsenal: Tools & Kitchen Gadgets
You don’t need a professional bakery, but a few specific tools make the difference between a flaky cloud and a lead weight.
- Large Stainless Steel Mixing Bowl: Keeps the dough cool while you work.
- Box Grater: The “cheat code” for getting butter into the flour without melting it.
- Pastry Brush: To paint on that liquid gold (cream) before baking.
- Baking Sheet with Parchment Paper: Essential! If they stick to the pan, your morning is ruined.
- Bench Scraper or Sharp Knife: For those clean, professional-looking wedges.
- Digital Kitchen Scale: Because “eyeballing” a cup of flour is why your baking is inconsistent.
Step-by-Step Instructions: The Path to Flaky Glory
Step 1: The Butter Sacrifice
Start by taking your frozen butter and grating it with your box grater into a small bowl. Stick that bowl back in the freezer while you prep the rest. Bold move: don’t touch the butter with your hands. Your body heat is the enemy of flakiness.
Step 2: The Dry Marriage
In your large mixing bowl, whisk together the flour, sugar, baking powder, and salt. Make sure it’s well-combined so you don’t hit a “baking powder bomb” later. TBH, the better you whisk here, the less you have to stir later.
Step 3: The Integration
Toss the frozen butter shreds into the flour mixture. Use a fork or your bench scraper to toss them until every bit of butter is coated in flour. It should look like coarse breadcrumbs. Now, gently fold in those blueberries. Handle them like they are delicate secrets.
Step 4: The Liquid Convergence
In a separate small bowl, whisk the heavy cream, egg, and vanilla. Create a well in the center of your flour mountain and pour the liquid in. Use a spatula to fold it together until a shaggy dough forms. FYI, if it looks a little dry, that’s perfect. Do not over-mix!
Step 5: The Shaping Ritual
Turn the dough onto a floured surface. Gently pat it into an 8-inch disk about an inch thick. Don’t knead it! Use your bench scraper to cut the disk into 8 even wedges, like a delicious, berry-filled pizza. Arrange them on your baking sheet, leaving at least two inches of space for their inevitable growth spurt.
Step 6: The Final Glow-Up
Brush the tops with a little extra heavy cream and a literal mountain of coarse sugar. Slide the tray into a preheated 400°F oven. Bake for 18-22 minutes until the edges are golden brown and the centers are set. Let them cool for 10 minutes on the pan unless you enjoy third-degree berry burns.
Calories & Nutritional Info
I’m going to be honest with you: this is a buttery, cream-filled treat. It’s for the soul, not the step-tracker.
- Calories: ~340 kcal per scone.
- Protein: 5g (Hey, there’s an egg in there!).
- Total Fat: 18g (The “happy” kind of fats… mostly).
- Carbohydrates: 42g.
- Fiber: 2g (Blueberries are doing their best!).
Common Mistakes to Avoid (The Cheeky Guide)
- Using Warm Butter: This is the cardinal sin. Warm butter leads to flat, greasy puddles. Freeze your butter!
- Over-mixing the Dough: If you stir until it’s smooth, you’ve made bread. Scones should be shaggy and “ugly” before they bake.
- Fresh vs. Frozen Berries: If you use frozen, do not thaw them. They will bleed and turn your dough into a swampy mess.
- Opening the Oven: Every time you peek, you lose the steam that helps them rise. Trust the timer.
Variations & Customizations
Feeling a little adventurous with your dough? Try these three spins:
- The Lemon Flex: Add the zest of two lemons to the sugar and replace the vanilla with lemon extract. It’s like a sunshine-filled morning.
- The Keto-ish Alternative: Use almond flour and a sugar-free sweetener. FYI, they won’t be as tall, but they’ll hit the spot.
- The Savory Twist: Skip the sugar and blueberries. Add 1 cup of sharp cheddar and some chopped chives. IMO, it’s the ultimate dinner roll upgrade.
FAQ: Everything You’re Dying to Know
Why are my scones so flat?
Your baking powder is likely expired or your butter was too soft. Cold ingredients create the steam that pushes the dough up!
Can I make these ahead of time?
Absolutely. Shape them, put them on the tray, and freeze them. You can bake them straight from frozen; just add 2-3 minutes to the bake time.
Can I use whole wheat flour?
You could, but you shouldn’t. It makes the scones heavy and dense. If you must be “healthy,” swap out only half the flour.
Why is my dough so sticky?
You might have used a large egg or heavy-handed cream. Just add a tablespoon of flour at a time until you can handle it.
Do I have to use heavy cream?
Yes. Skim milk lacks the fat to create that tender, crumbly texture. Don’t fight me on this.
How long do they stay fresh?
Scones are best eaten within 24 hours. After that, they turn back into bricks. To revive them, pop them in the toaster oven for 3 minutes.
Can I use dried blueberries?
Sure, but soak them in a little hot water for 10 minutes first so they aren’t like little rocks in your pastry.
Final Thoughts
There you have it—a blueberry scones recipe that will make everyone forget you ever struggled with a microwave. It’s buttery, it’s bursting with fruit, and it’s the perfect way to survive a boring Tuesday with your sanity intact.
Go ahead, grab a whisk and start your butter-grating journey. Just don’t blame me when your neighbors start showing up at your door every time they smell the oven. And hey, if you never buy a store-bought “scone” again after tasting this, I won’t be surprised. Happy baking! 🙂