🍲 The “No-Can-Do” Manifesto: Mastering the Ultimate Refried Beans Recipe
Let’s be brutally honest: if your only experience with refried beans involves a can opener and a metallic-tasting “log” of brown mush, you haven’t lived. We’ve all been there—peeling back that tin lid to reveal a substance that has the structural integrity of wet cement and the flavor profile of a damp cardboard box. It’s a culinary tragedy! But then, you walk into a real-deal taqueria and taste beans so creamy, so smoky, and so savory that you start questioning every life choice you made before that moment.
I once served a bowl of these to a friend who claimed they “didn’t do legumes.” After three helpings and an aggressive amount of tortilla chip dipping, they asked for the brand of the “fancy dip.” The look of pure shock on their face when I told them it was just pinto beans and a bit of kitchen magic was the highlight of my weekend. Are you ready to stop settling for lukewarm shelf-stable sludge and start building a legendary Mexican masterpiece?
🏆 Why This Recipe Is the Actual GOAT
Why should you bother simmering and mashing when you could just “convenience” your way through dinner? Because this refried beans recipe delivers a velvety, melt-in-your-mouth experience that a factory simply cannot replicate. We are talking about deep, earthy flavors built through aromatic infusion and the perfect amount of sizzle.
This recipe is awesome because it’s a high-impact, low-cost flex. It impresses guests because it tastes like you have a secret Mexican abuela hidden in your pantry, when in reality, you just know how to handle a skillet effectively. Plus, it’s the ultimate culinary “glue”—it holds your tacos together, elevates your nachos, and acts as the perfect pillow for your fried eggs. It’s the undisputed champion of side dishes, IMO.
🧂 The “Bean-There-Done-That” Ingredient List

Success depends on the quality of your aromatics and the type of fat you use. Don’t go “low-fat” here, or your beans will lack joy and your life will lack flavor.
- 2 Cups Dried Pinto Beans: (Or two 15oz cans if you’re in a rush, but dried is better, TBH).
- 1 Large White Onion: Halved for the boil, diced for the fry.
- 4 Cloves Garlic: Smashed and peeled (measure with your heart, but use at least four).
- ¼ Cup Lard or Bacon Grease: Authenticity requires animal fat, but high-quality avocado oil works for the plant-based crowd.
- 1 Teaspoon Cumin: For that essential earthy warmth.
- 1 Teaspoon Smoked Paprika: A little smoky secret for depth.
- Sea Salt: To taste (beans need more salt than you think!).
- Reserved Bean Liquid: The “liquid gold” that controls the texture.
- Optional: A sprig of Epazote or a bay leaf for the boiling phase.
Key Substitutions
- Fat Swap: Use coconut oil or olive oil for a vegetarian miracle, though you’ll lose that traditional porky funk.
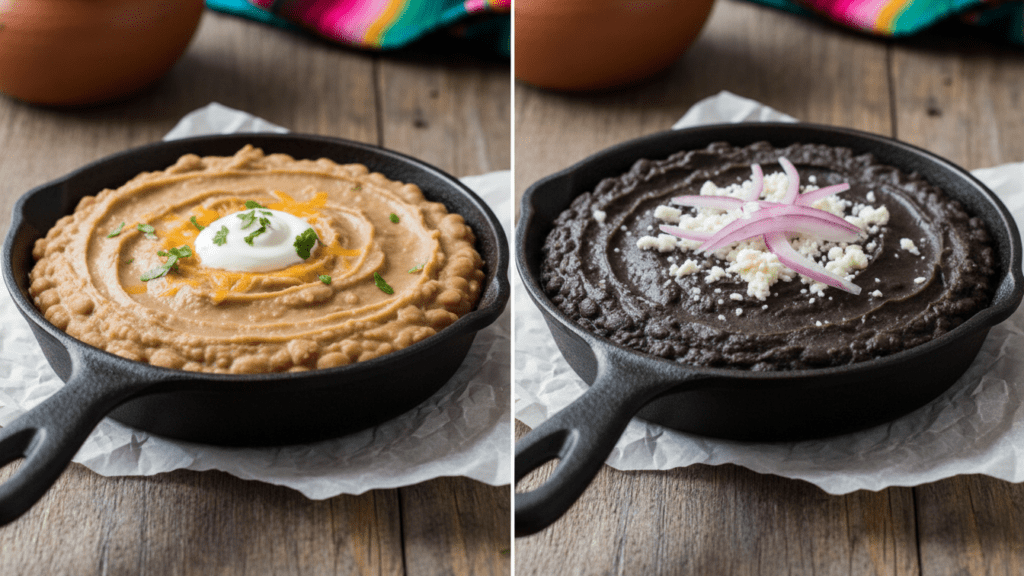
- Bean Swap: Black beans make incredible refried beans too—just expect a darker, moodier vibe.
- Spice Swap: Toss in a diced Jalapeño during the sauté if you want your beans to fight back.
🔪 Tools & Kitchen Gadgets Used
You don’t need a professional laboratory, but a few basics will keep you from having a kitchen-induced breakdown.
- Large Heavy-Bottomed Pot: For the initial bean softening. Check out enameled Dutch ovens here!
- Cast Iron Skillet: The absolute MVP for the “refrying” stage. Grab a pre-seasoned one here!
- Potato Masher: To achieve that perfect “chunky-smooth” consistency. Get a sturdy masher here!
- Fine Mesh Strainer: To separate your beans from their bath.
- Immersion Blender: If you want your beans “silky smooth” like a five-star puree. Check them out on Amazon!
👩🍳 Step-by-Step Instructions: The Path to Creamy Glory
Follow these steps precisely. Bean cooking is a delicate dance between heat and hydration. Patience is your best friend.
1. The Great Soak
Rinse your dried pinto beans and pick out any weird-looking pebbles. Submerge them in water overnight. If you forget this step, you’ll be boiling them until the next lunar eclipse.
2. The Initial Simmer
Drain the soaking water. Place beans in a heavy pot with the halved onion, two garlic cloves, and a bay leaf. Cover with two inches of water. Simmer until the beans are so tender they practically sigh when you touch them (usually 1.5 to 2 hours). DO NOT throw away that cooking liquid!
3. The Aromatic Sizzle
Heat your lard or bacon grease in a cast iron skillet over medium heat. Add the diced onion and cook until it’s translucent and slightly golden. Toss in the remaining minced garlic and cook for exactly one minute.
4. The “Refry” Ritual
Using a slotted spoon, add the beans to the skillet. You will hear a beautiful sizzle—that is the sound of success. Add the cumin, smoked paprika, and salt.
5. The Mash-Up
Grab your potato masher and start crushing. Add splashes of the reserved bean liquid as you go. You control the destiny of this texture. Want it chunky? Stop early. Want it smooth? Keep mashing and adding liquid until it looks like velvet.
6. The Final Simmer
Let the mashed beans simmer in the skillet for 5-10 minutes. This allows the flavors to get acquainted and the texture to thicken. FYI, the beans will thicken more as they cool, so leave them a little “looser” than you think you need.
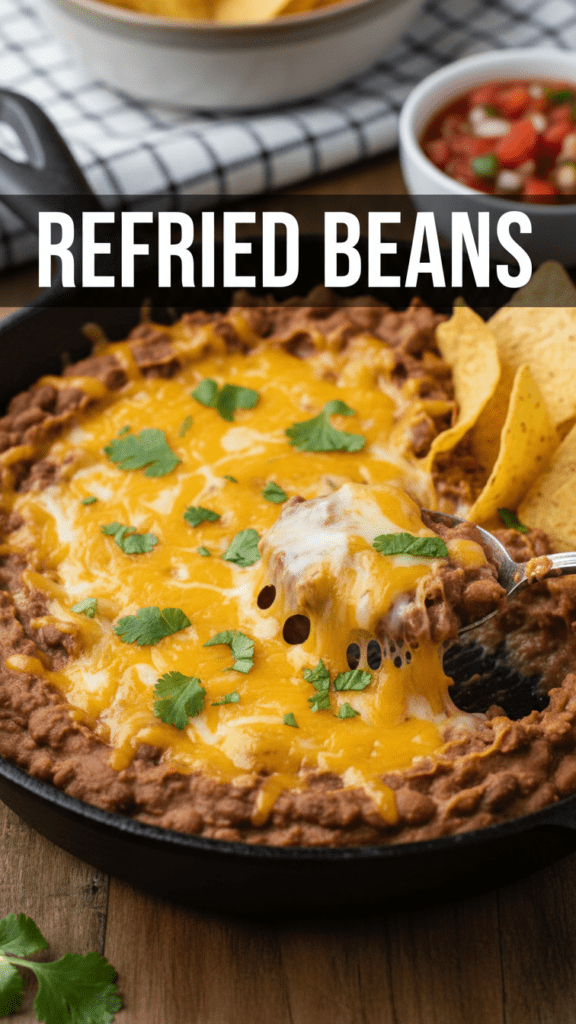
7. The Garnish
Top with crumbled cotija cheese, fresh cilantro, or a squeeze of lime. Serve them hot and watch them disappear faster than your paycheck on a Friday.
📊 Calories & Nutritional Info (The Justification)
Since beans are “magical fruit,” we can legally pretend this is a health food. Right?
- Estimated Calories Per Serving: $\approx$ 210–260 kcal.
- Protein: A solid 8-10g per serving.
- Fiber: Massive amounts to keep your digestive system very, very busy.
- Iron & Magnesium: High levels for that “I’m a responsible adult” energy.
- Mood: 100% improved after the first savory bite.
🚨 Common Mistakes to Avoid (The Bean Fails)
Avoid these if you want people to actually keep talking to you after dinner.
- Discarding the Cooking Liquid: That water is full of starch and flavor. If you use plain tap water to thin your beans, they will taste like sadness. Save the liquid!
- Salting Too Early: Some say salting dried beans at the start makes them tough. Salt at the end to stay safe.
- Fear of Fat: If you don’t use enough fat, you’re just making mashed beans, not refried beans. Embrace the lard.
- The “Dry Bean” Disaster: If your beans look like parched earth, add more liquid. They should be creamy and glistening. 🙂
✨ Variations & Customizations
Because you’re the boss of this legume circus.
1. The Keto-Friendly Swap
Legumes are tricky for Keto, but you can swap half the beans for sautéed cauliflower rice blended into the mix. It lowers the carb count while keeping the “mush” factor high.
2. The “Fire-Breather” Version
Sauté three Chiles de Árbol in the fat before adding the beans. Remove them before mashing, or crush them in if you really want to feel the burn.
3. The Cheesy “Bean Dip” Upgrade
Fold in a cup of shredded Monterey Jack at the very end. It turns a side dish into a party-starting dip that will have people fighting over the last chip.
❓ FAQ Section: Your Bean Queries Answered
Why are they called “refried” beans?
It’s actually a translation quirk! The Spanish name is frijoles refritos, which means “well-fried” beans, not that they are fried twice.1
Can I use canned beans for this?
Yes, IMO, you can totally use canned beans if you’re in a “dinner needs to be ready in ten minutes” crisis. Just rinse them well and sauté them with extra aromatics.
Are refried beans actually healthy?
They are packed with fiber and protein. If you use a healthy fat like avocado oil and watch the salt, they are a nutrient-dense powerhouse.
How do I make them vegan?
Just swap the lard for refined coconut oil or avocado oil. You’ll lose the porky depth, but a dash of liquid smoke can bridge the gap!
Why are my beans gritty?
You likely didn’t cook the dried beans long enough. They need to be completely soft before they ever touch the frying pan.
Can I freeze refried beans?
Absolutely. They freeze beautifully for up to three months. Just add a splash of water when reheating to bring back the creaminess.
What’s the best way to reheat them?
Reheat them in a skillet over low heat with a splash of water or broth. The microwave works, but the edges can get weird and crusty.
🥂 Final Thoughts: Go Forth and Mash!
You’ve done it. You’ve successfully navigated the world of “Authentic Mexican Sides” without having a public breakdown. You are now a titan of the cast iron and a hero of the dinner table. Go ahead, have that second serving—it’s mostly fiber, after all. Just don’t tell me if you still have a hidden can of “the brown stuff” in your pantry; I have a reputation to maintain. 🙂