
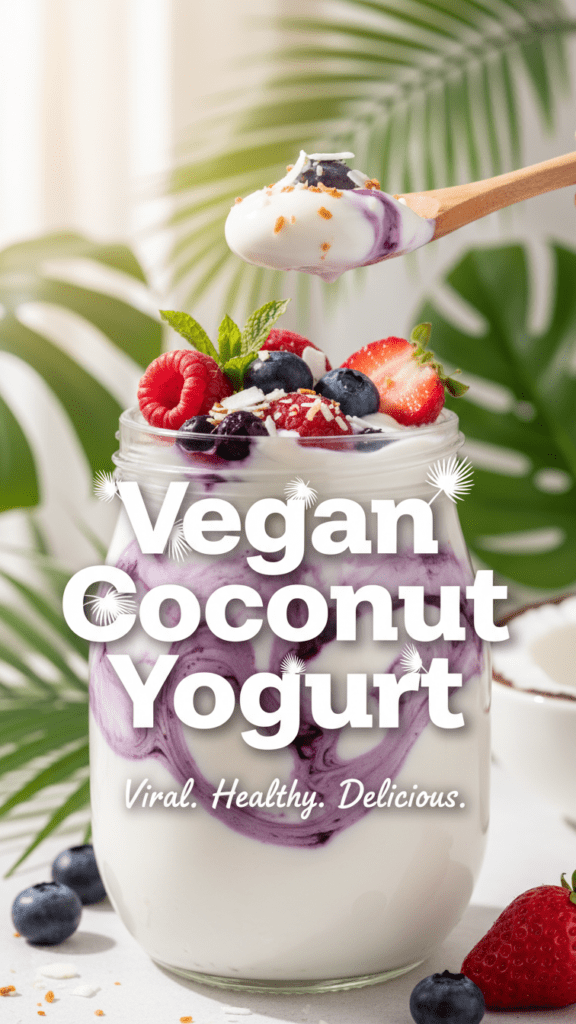
Homemade Vegan Coconut Yogurt: Because Your Gut Deserves a Vacation
Ever walked into a high-end grocery store, picked up a tiny jar of artisanal vegan coconut yogurt, and nearly fainted at the $9 price tag? We’ve all been there, clutching our wallets and wondering if this specific blend of bacteria and coconut water contains actual gold flakes. It’s a tragic scene, really. You want the probiotics and the creamy goodness, but you also want to be able to afford your rent this month. But what if I told you that you could play God in your own kitchen and create a yogurt so thick, tangy, and lush that the store-bought stuff starts looking like watery disappointment?
Why This Yogurt Is the Actual G.O.A.T.
Most plant-based yogurts have the structural integrity of a melted popsicle and a flavor profile that screams “I’m trying too hard.” This recipe changes the game. We are skipping the weird gums, the processed thickeners, and the industrial stabilizers. Why settle for a chemical cocktail when you can have a fermented masterpiece made with exactly two ingredients?
You’ll love this because it’s impressively low-maintenance. You essentially stir some things together, walk away for a day, and return to find a creamy reward waiting for you. It’s the ultimate “stealth health” food—it makes you look like a domestic wizard while you’re actually just letting microorganisms do all the heavy lifting. TBH, once you taste the fresh zing of a home-fermented batch, those plastic tubs at the store will lose their luster forever. 🙂
The Ingredient Lineup: Keep It Simple, Stupid


Don’t panic—you don’t need a lab coat or a degree in microbiology for this. We are keeping it clean and minimal.
- 2 cans Full-Fat Coconut Milk (This is non-negotiable. If you buy the “light” version, you’re just making fermented water. Look for a brand with the fewest additives possible).
- 2 Probiotic Capsules (Ensure they are high-quality and dairy-free. Look for strains like Lactobacillus acidophilus).
- 1 tsp Maple Syrup or Cane Sugar (Optional; this isn’t for you, it’s “bacteria food” to help the fermentation kick off).
- Agar Agar or Tapioca Starch (Optional; only if you want that “stand-your-spoon-up-in-it” thickness).
Key Substitution: if you can’t find probiotics, you can use 2 tablespoons of a previous batch of yogurt as a starter. It’s the gift that keeps on giving!
Tools & Kitchen Gadgets: Your Fermentation Station
You can’t build a probiotic empire with dirty spoons. Assemble these tools to ensure your kitchen doesn’t become a breeding ground for the wrong kind of “science project.”
- Sterilized Glass Jars (Mason jars are the gold standard here).
- Whisk or Silicone Spatula (To get that coconut cream perfectly smooth).
- Cheesecloth or a Clean Coffee Filter (To let the yogurt breathe without inviting fruit flies to the party).
- Rubber Band (To secure your “breathing lid”).
- Wooden or Plastic Spoon (Some say metal reacts with the probiotics; let’s not tempt fate).
- Yogurt Maker or an Oven with a Pilot Light (You just need a consistently warm, cozy spot).
Step-by-Step: The Path to Probiotic Perfection
Ready to become a fermentation master? Follow these steps, stay patient, and try not to name your bacteria (it makes it harder to eat them later).
Step 1: The Sterilization Ritual
First, sterilize your jars. Pour boiling water into your glass jars and over your whisk. If you introduce bad bacteria now, they will win the war against the good ones, and your yogurt will end up smelling like a locker room. We want “tangy,” not “terrifying.”
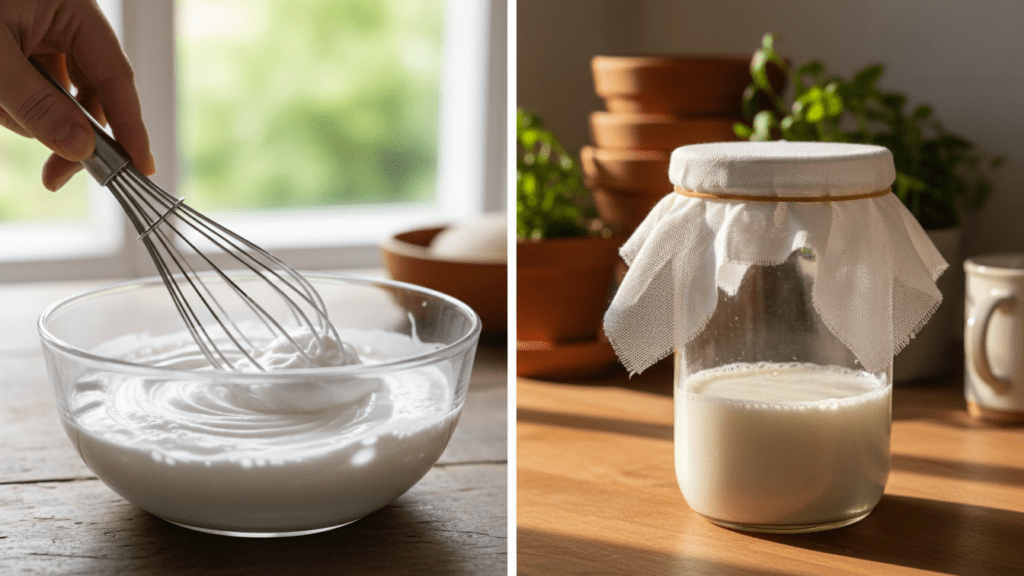
Step 2: The Creamy Meltdown
Open your coconut milk cans. Usually, the cream separates from the water—this is normal. Dump everything into a bowl and whisk until it’s a smooth, liquid dream. If you’re using a thickener like tapioca starch, heat a little milk, dissolve the starch, and then mix it back in.
Step 3: Seeding the Colony
Crack open your probiotic capsules and sprinkle the powder into the milk. Do not throw the actual plastic capsule in; that’s not part of the flavor profile. Use your wooden spoon to stir gently. If you add the probiotics while the milk is hot (if you heated it), you will kill them. Keep it lukewarm!
Step 4: The Waiting Game
Pour the mixture into your sterilized jars. Cover the top with cheesecloth and secure it with a rubber band. Place the jars in a warm spot (about 100°F–110°F). IMO, the top of a refrigerator or inside an oven that’s turned off with the light on works perfectly.
Step 5: The Taste Test
Let it sit for 24 to 48 hours. The longer it sits, the tangier it gets. Give it a tiny taste with a clean spoon after 24 hours. Once it hits that perfect level of “zing,” you’ve officially succeeded.
Step 6: The Cold Snap
The yogurt will be a bit thin while it’s warm. Move it to the fridge for at least 6 hours. The coconut fats will firm up, and you’ll be left with a thick, scoopable delight.
Calories & Nutritional Info (Per 1/2 Cup Serving)
Since we are using full-fat coconut, this is a calorie-dense, high-fat treat. It’s healthy, but it’s not water.
- Calories: 210 kcal
- Total Fat: 20g
- Carbohydrates: 6g
- Fiber: 0g
- Protein: 2g
- Probiotics: Billions (approximately).
Common Mistakes to Avoid (The “Moldy Jar” Hall of Shame)
Don’t let your fermentation journey end in disaster. Avoid these classic blunders.
- Using Dirty Tools: I’ll say it again: sterilize everything. One stray crumb can ruin the whole batch.
- Disturbing the Peace: Don’t keep opening the jar to look at it. Let the bacteria work in peace.
- Wrong Temperature: If it’s too cold, nothing happens. If it’s too hot, you cook the probiotics. Keep it cozy, not scorching.
- Ignoring the Smell: It should smell sour and fresh. If it smells like a dumpster or has pink/green fuzz, throw it away immediately. Don’t be a hero.
Variations & Customizations
Once you master the basic ferment, try these three twists to keep your breakfast exciting.
- The Tropical Dream: Stir in pureed mango and a squeeze of lime after the yogurt has finished fermenting. It’s a vacation in a bowl.
- The Keto-Powerhouse: Keep it plain, but top with hemp seeds and crushed walnuts. It’s the ultimate high-fat, low-carb fuel.
- The Vanilla Bean Deluxe: Add the seeds from a vanilla pod and a drop of stevia before the chilling phase. It tastes like melted ice cream, but it’s actually good for you.
FAQ: Your Fermentation Fears Answered
Why is my yogurt watery? Coconut milk varies by brand. If yours is thin, you might need an added thickener like agar agar or more starch next time. Also, make sure you used full-fat canned milk, not the stuff in the carton!
Can I make this without a yogurt maker? Absolutely. Many people use the Instant Pot “Yogurt” setting or just a warm spot in their kitchen. As long as it stays around 100°F, you’re golden.
Is there a specific probiotic brand I should use? Not necessarily, but ensure it contains live active cultures and no dairy fillers. The more strains, the better the tang.
Why does my yogurt smell like vinegar? You probably let it ferment too long. It’s still safe to eat, but it might be a bit “aggressive” for your morning granola. Shorten the ferment time next time.
How long does homemade coconut yogurt last? It stays fresh in the fridge for about 7 to 10 days. Just use a clean spoon every time you scoop some out!
Can I use coconut water instead? You can, but that creates a “kefir” drink, not a thick yogurt. For the creamy stuff, stick to the canned milk.
Why did my yogurt turn pink? Pink or gray colors usually indicate a contamination of bad bacteria. If it’s not white or off-white, do not eat it. Clean your jars better next time!
Final Thoughts
There you have it—you are now a certified probiotic overlord. Making your own vegan coconut yogurt isn’t just about saving money; it’s about taking control of what goes into your body (and showing off to your friends). Go forth, ferment your coconut milk, and try not to feel too smug when you realize your homemade batch is better than the $9 artisanal version. If you manage to save some for tomorrow’s breakfast without eating the whole jar tonight, you have more willpower than me. Happy culturing!

