
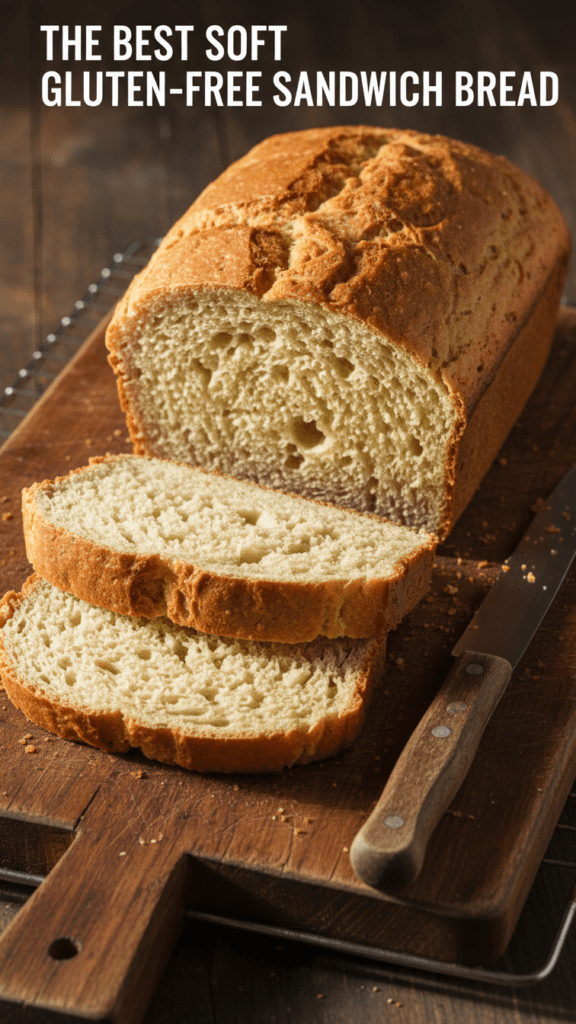
The Ultimate Gluten-Free Sandwich Bread: Soft, Fluffy, and Not a Cardboard Brick in Sight
Let’s be brutally honest for a second: we’ve all been there. You crave a simple, satisfying sandwich—maybe a classic PB&J, maybe a fancy avocado toast. Then you remember your digestive system has officially declared war on wheat. You head to the store, grab a loaf of “gluten-free” bread, and it looks suspiciously like a sponge, tastes like sweetened packing peanuts, and crumbles into a thousand pieces the moment you try to spread anything on it. You take a polite bite, trying to smile while your soul quietly yearns for actual bread. It’s a culinary tragedy, really.

I first mastered this recipe for a friend who thinks “gluten-free bread” is just a fancy word for “starchy sadness.” One bite of this golden-crusted, airy miracle later, and she was literally making a second sandwich, questioning her entire identity as a brick-bread survivor. This isn’t just a “safe option” for the Celiac crowd; it is objectively elite bread. If you want to shut down the skeptics and reclaim your sandwich-making dignity without the bloating, you’re in the right place. Ready to ruin standard supermarket gluten-free loaves for yourself forever? Let’s get into the mix.
Why This Recipe is the Absolute G.O.A.T. of Home Baking
Why should you bother baking gluten-free sandwich bread when you could just eat a lettuce wrap? Because your taste buds actually have standards, and “lettuce” isn’t a substitute for real bread. First off, this recipe achieves the “holy grail” of gluten-free baking: a light, tender crumb that holds together, a golden-brown crust that isn’t too hard, and a flavor that actually tastes like… well, bread! We’re not making doorstops here; we’re making a vehicle for your favorite fillings.

Secondly, it is ridiculously easy to assemble. If you can use a whisk and press a button on an oven without losing a finger, you’ve already won. It’s a one-bowl wonder that makes you look like a Michelin-star baker while your kitchen stays relatively intact. Plus, it impresses guests every single time—nothing says “I have my life together” like a perfectly domed loaf of homemade bread. TBH, it’s the most empowering thing you can do with a bag of gluten-free flour. 🙂
The Grocery List: Clean, Simple, and Wheat-Free

Don’t overcomplicate your life by searching for rare starches harvested under a blue moon. We are using powerhouse pantry staples that actually work together to create magic.
- Gluten-Free All-Purpose Flour Blend: 2.5 cups (about 360g). Ensure it contains Xanthan Gum, or add 1 teaspoon if it doesn’t.
- Warm Water: 1 cup. Not boiling, not cold—think “nice baby bath” temperature.
- Active Dry Yeast: 1 packet (2.25 tsp). The tiny workers that do the heavy lifting for that fluffy texture.
- Granulated Sugar: 2 tablespoons. Yeast loves sugar; it’s their version of an energy drink.
- Olive Oil (or other neutral oil): 1/4 cup. Adds moisture and richness.
- Apple Cider Vinegar: 1 tablespoon. This helps create a better crumb and activates the baking soda.
- Baking Powder: 1 teaspoon. An extra lift for that perfect rise.
- Sea Salt: 1 teaspoon. It makes the flavors pop, trust me.
Tools & Kitchen Gadgets You Need
To make this the smoothest baking experience of your life, snag these basics. I’ve linked my favorites so you can treat your kitchen to the upgrades it deserves!
- Standard Loaf Pan (8.5 x 4.5 inches): Essential for that classic bread shape. Grab this non-stick one on Amazon here.
- Large Glass Mixing Bowl: For combining all your ingredients with enthusiasm. Check out this sturdy set on Amazon.
- Stainless Steel Whisk: Perfect for getting that flour and leavening agent perfectly mixed. Try this ergonomic model.
- Rubber Spatula: For scraping down the bowl and spreading the dough. Get a heat-resistant one here.
- Digital Kitchen Scale: Because “one cup” of flour is an existential crisis. Get a reliable scale here.
Step-by-Step Instructions: How to Win at Baking
Follow these steps precisely. IMO, the order of operations is the difference between a gourmet loaf and a dense, flavorless brick.
1. The Yeast Awakening
In your large mixing bowl, combine the warm water, granulated sugar, and yeast. Stir gently and let it sit for about 5-10 minutes. If it doesn’t look like a bubbly, frothy swamp, your yeast is dead. Start over. It happens to the best of us. 🙂
2. The Wet Wonders
Once your yeast is active, whisk in the olive oil and apple cider vinegar into the bubbly mixture. This is your wet foundation.
3. The Flour Fall
Add the gluten-free all-purpose flour blend, baking powder, and sea salt directly into the wet ingredients in the bowl. Whisk vigorously, or use a rubber spatula, until everything is just combined. Do not over-mix! Gluten-free dough doesn’t develop gluten, so you’re mostly just trying to combine the ingredients evenly. The dough will be thick and sticky, not elastic like regular bread dough.
4. The Loaf Pan Love
Grease your loaf pan thoroughly with oil or baking spray. Scrape the thick, sticky dough into the prepared pan. Use your rubber spatula (or wet hands, if you’re feeling brave) to smooth the top. It won’t look pretty yet, but trust the process.
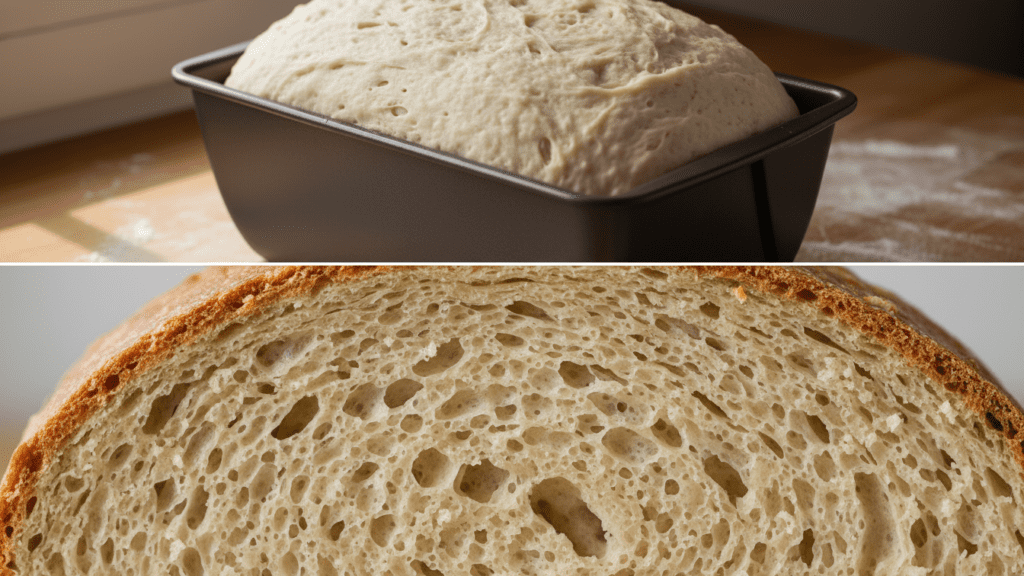
5. The Rise to Glory
Cover the loaf pan loosely with plastic wrap or a clean kitchen towel. Place it in a warm, draft-free spot for about 30-45 minutes. The dough should rise significantly, almost reaching the top of the pan. This is where the magic happens. While it rises, preheat your oven to 375°F (190°C).
6. The Golden Window
Uncover the risen loaf and place it in the preheated oven. Bake for 40-50 minutes. You are looking for a deep, golden-brown crust and a hollow sound when you tap the top. If it looks pale, give it another 5 minutes. TBH, the smell alone will make you swoon.
7. The Final Flex
Remove the bread from the oven. Immediately, turn the loaf out onto a wire cooling rack. This is crucial! If you leave it in the pan, the bottom will get soggy. Let it cool completely before slicing. If you cut it while warm, it will be gummy. This is the hardest part of the recipe, IMO. Seriously, resist the urge.
Calories & Nutritional Info
For those of you who track your stats like a part-time job, here is the lowdown per slice (makes 12 slices per loaf):
- Calories: ~150 kcal
- Net Carbs: ~25g (Energy for your brain!)
- Protein: ~2g (Basically a rounding error, but hey!).
- Fat: ~4g (Mostly healthy fats from olive oil).
- Fiber: ~2g (Depending on your flour blend).
Common Mistakes to Avoid: Don’t Be That Person
Even a recipe this simple can go sideways if you get cocky. Avoid these blunders to keep your kitchen dignity.
- Using Cold Water for Yeast: You will murder the yeast. Check the temp; it should be lukewarm (105-115°F / 40-46°C).
- Not Using Xanthan Gum: This is the glue that holds gluten-free bread together. Ensure your blend has it or add it manually.
- Cutting While Warm: The absolute worst offense. It will be gummy and dense. Let it cool completely.
- Over-mixing the Batter: While not as disastrous as with wheat flour, over-mixing can still result in a tougher texture. Mix just until combined.
- Not Greasing the Pan Properly: Gluten-free bread loves to stick. Grease it thoroughly. 🙂
Variations & Customizations
Feeling adventurous? Here are three ways to flip the script on this gluten-free sandwich bread:
The Seeded Sensation
Add 1/4 cup of mixed seeds (chia, flax, sesame, poppy) to the dry ingredients for extra texture and nutrition. Sprinkle some on top before baking too!
The Herbaceous Hero
Mix in 1-2 tablespoons of dried Italian herbs or fresh chopped rosemary for a savory twist. Imagine this as garlic bread!
The Sweet Swirl
Swirl in 2 tablespoons of cinnamon sugar before baking for a sweet, breakfast-ready loaf. Perfect for toast or French toast.
FAQ Section: You Asked, I Answered
Why is my gluten-free bread gummy? You probably cut it while it was still warm. Gluten-free bread needs to cool completely to set its internal structure. Also, you might have used too much liquid.
Can I make this vegan? Yes! This recipe is already naturally vegan, assuming your sugar isn’t processed with bone char. No substitutions needed for the main ingredients.
How do I store homemade gluten-free bread? Keep it in an airtight container at room temperature for 3-4 days. It dries out faster than regular bread, so you might want to slice and freeze it.
Can I use a bread machine for this recipe? Some bread machines have a gluten-free setting, but this recipe is specifically designed for oven baking. Results may vary in a bread machine.
Why did my bread not rise? Your yeast was probably dead (check water temperature and freshness) or your baking powder was expired. Make sure your rising spot is warm.
What kind of gluten-free flour blend is best? IMO, King Arthur Gluten-Free Measure for Measure Flour or Bob’s Red Mill 1-to-1 Baking Flour work consistently well.
Can I use this for grilled cheese? Absolutely! This bread toasts beautifully and holds up well to melted cheese. It’s truly a game-changer for grilled cheese sandwiches.
Final Thoughts
There you have it. A gluten-free sandwich bread recipe that actually respects your time and your taste buds. It’s fluffy, it’s fresh, and it’s the only loaf that makes me feel like I’m winning at adulthood on a random Wednesday. Once you make this, you’ll realize that store-bought gluten-free loaves are just a sad, expensive lie. Go forth, bake some bread, and enjoy the arrangement. Just don’t be surprised when your “gluten-eating” friends start asking for slices. 🙂

