
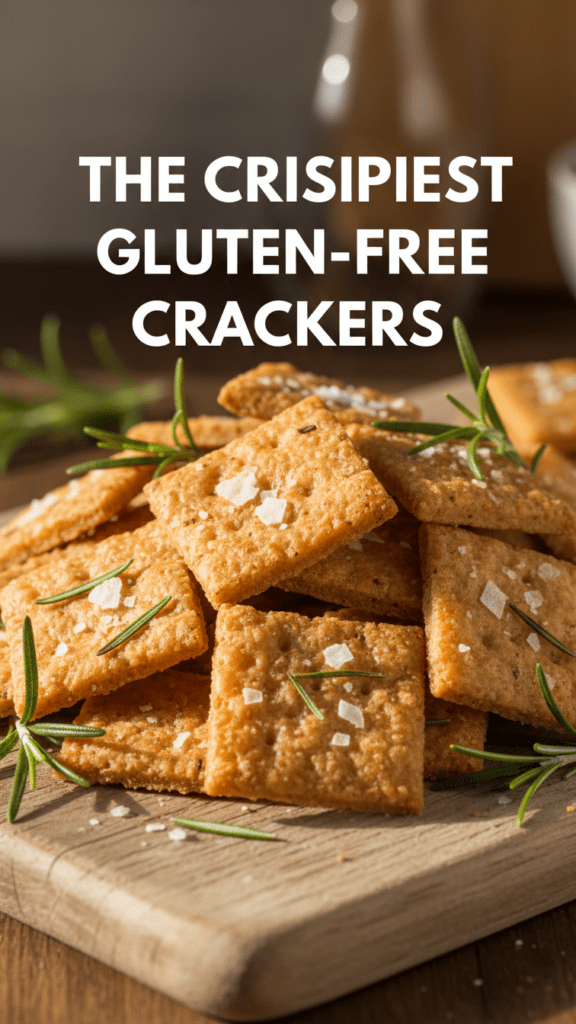
The Ultimate Gluten-Free Crackers: A Crunch That Won’t Break Your Heart (Or Your Gut)
Let’s be brutally honest for a second: we’ve all been there. You’re at a fancy wine and cheese night, staring longingly at a platter of artisanal crisps, but then you remember—your digestive system has officially declared war on wheat. You head home, buy a $12 box of store-bought gluten-free crackers, and take a bite. It has the structural integrity of a dry sponge and the flavor profile of a dusty attic. It’s a culinary tragedy, really.
I first whipped these up for a friend who thinks “gluten-free” is just a fancy word for “tastes like sadness.” One bite of these golden-brown, salt-flecked masterpieces later, and she was literally scraping the crumbs off the cooling rack, questioning her entire identity as a grain-lover. This isn’t just a “safe option” for the Celiac crowd; it is objectively elite snacking. If you want to shut down the skeptics and reclaim your kitchen dignity, you’re in the right place. Ready to ruin standard supermarket snacks for yourself forever? Let’s get to the rolling.
Why This Recipe Is the G.O.A.T. of Pantry Staples

Why should you bother rolling out dough for gluten-free crackers when you could just eat cheese with a spoon like a savage? Because your taste buds deserve a party, not a chore. First off, the flavor profile is a masterpiece of nutty depth—think the earthy richness of almond flour playing tag with the savory punch of sea salt and garlic. It isn’t just “good for a diet”; it’s a vibrant, complex comfort food that gets better with every dip.
Secondly, it is ridiculously easy to assemble. If you can use a rolling pin and a pizza cutter without losing a finger, you’ve already won. It’s a one-bowl wonder that makes you look like a Michelin-star chef while you’re actually just clearing out your pantry staples. Plus, it impresses guests every single time. There is something profoundly satisfying about serving a snack that feels like a total indulgence but consists entirely of gut-friendly goodness. Ready to become the neighborhood snack legend?
The Grocery List: Clean, Simple, and Wheat-Free

Don’t overcomplicate your life by searching for rare starches harvested under a blue moon. We are using powerhouse pantry staples that actually work together to create magic.
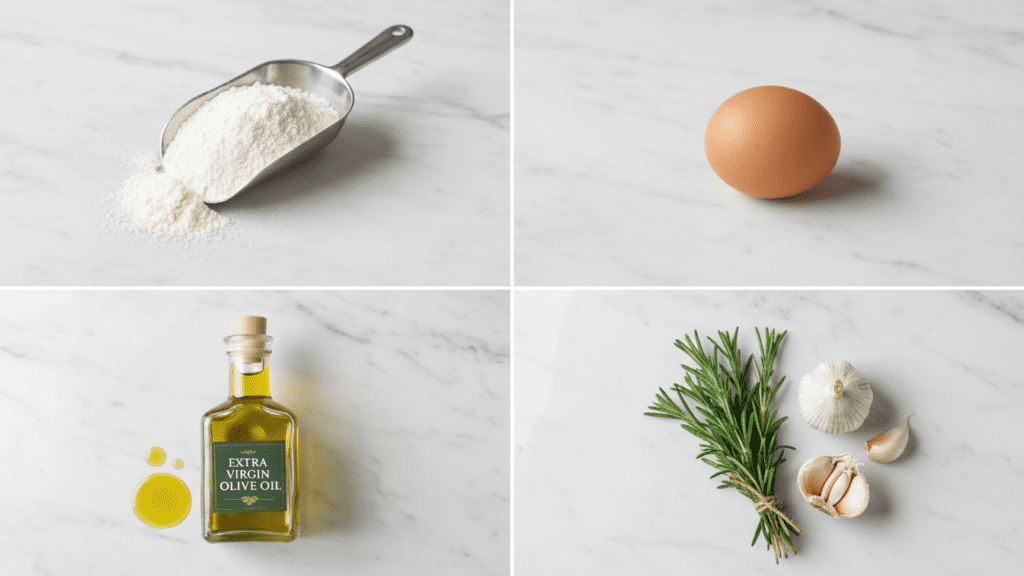
- Almond Flour: 2 cups, super-fine blanched. This is the foundation of our crunch empire.
- Large Egg: 1, whisked. This is the “glue” holding your snack dreams together.
- Olive Oil: 1 tablespoon. For that rich, buttery mouthfeel without the actual butter.
- Sea Salt: 1/2 teaspoon for the dough, plus more for the “sparkle” on top.
- Garlic Powder: 1/2 teaspoon. Because “subtle” isn’t in our vocabulary.
- Dried Rosemary: 1 teaspoon, crushed. This makes them taste like they cost $15 at a boutique market.
- Cold Water: 1-2 teaspoons, only if the dough is acting like a moody teenager and won’t stick together.
Tools & Kitchen Gadgets You Need
To make this the smoothest process of your life, snag these basics. I’ve linked my favorites so you can treat your kitchen to some upgrades!
- Parchment Paper: Non-negotiable. If you try to do this on a bare tray, you will never see those crackers again. Check out this heavy-duty roll on Amazon here.
- Large Rolling Pin: For that perfectly even thinness that leads to maximum snap. Grab this professional-grade pin here.
- Pizza Cutter: The secret to getting straight lines without the drama. Try this ergonomic stainless steel model.
- Large Baking Sheet: Essential for even heat and zero sticking. Get a professional-grade sheet here.
- Fine Mesh Sifter: For ensuring your almond flour is cloud-like and clump-free. Try this stainless steel set.
Step-by-Step Instructions: How to Win at Snacking
Follow these steps precisely, and please, for the love of all things savory, do not skip the “thinness” check. FYI: the thinner the dough, the louder the crunch!
1. The Flour Awakening
In a large mixing bowl, combine your almond flour, garlic powder, sea salt, and crushed rosemary. Whisk them until the lumps have vanished and the herbs are evenly distributed. If you see a giant clump of flour, squash it. We have no room for negativity here.
2. The Liquid Marriage
Add the whisked egg and the olive oil to the dry mix. Use a fork to stir until a dough starts to form. If it feels too dry and crumbly, add a teaspoon of cold water. You want it to feel like play-dough—firm, but not sticky.
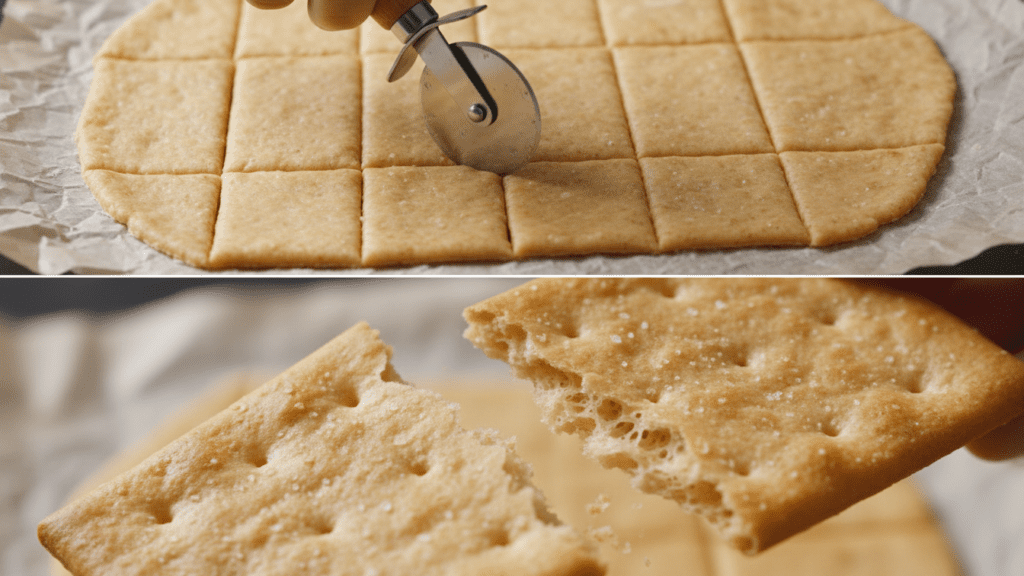
3. The Great Pressing
Place the dough ball between two large sheets of parchment paper. This is the secret to a mess-free kitchen. Use your rolling pin to roll the dough out into a large rectangle. You want it to be about 1/8th of an inch thick. If it’s too thick, you’re making tiny biscuits, not crackers. TBH, go as thin as you dare.
4. The Slicing Ritual
Remove the top layer of parchment. Use your pizza cutter to slice the dough into squares, diamonds, or chaotic hexagons. Don’t worry about moving them; they can stay exactly where they are. Sprinkle a little extra sea salt over the top and gently press it in.
5. The Golden Window
Slide the parchment (with the dough) onto your baking sheet. Bake at 325°F (160°C) for 12-15 minutes. Watch them like a hawk. Almond flour goes from “perfectly golden” to “burnt offering” in approximately six seconds.
6. The Patience Test
Remove from the oven and let them cool completely on the tray. This is the hardest part. If you eat them hot, they’ll be soft. As they cool, they find their backbone and get that signature snap. Serve with hummus, goat cheese, or just eat them straight off the tray. I’m not your boss. 🙂
Calories & Nutritional Info
For those of you who track your macros like a part-time job, here is the lowdown per serving (approx. 10 crackers):
- Calories: ~160 kcal
- Net Carbs: ~3g (The holy grail of keto-friendly snacking!)
- Protein: ~6g (Thanks, almond power!)
- Fat: ~14g (Mostly the “good” heart-healthy kind).
- Fiber: ~3g (Keeping things moving, if you know what I mean).
Common Mistakes to Avoid: Don’t Be That Person
Even a recipe this simple can go sideways if you get cocky. Avoid these blunders to keep your kitchen dignity.
- Rolling Unevenly: If one side is thick and the other is thin, half will burn while the rest is raw. Keep it level.
- Using Almond Meal: Meal is too coarse and will make your crackers taste like sand. Stick to super-fine flour.
- Skipping the Rest: I’ll say it again: let them cool. Heat is the enemy of the crunch.
- Ignoring the Oven: Every oven is a liar. Check them at the 10-minute mark to be safe.
- Crowding the Dough: If the edges look dark but the middle is pale, your dough was too thick in the center. Roll it out further.
Variations & Customizations
Feeling adventurous? Here are three ways to flip the script on these gluten-free crackers:
The Everything Bagel Flex
Skip the rosemary and top the dough with Everything Bagel seasoning. It turns your humble cracker into a brunch-worthy masterpiece that pairs perfectly with cream cheese.
The Spicy Siren
Add a 1/4 teaspoon of cayenne pepper and a teaspoon of smoked paprika to the dough. It creates a smoky heat that hits the back of your throat in the best way possible. 🙂
The Cheesy Vegetarian Swap
Fold in 1/4 cup of finely grated Parmesan cheese into the dry mix. It adds a salty, Umami depth that will make you forget that “Cheez-Its” ever existed.
FAQ Section: You Asked, I Answered
Are gluten-free crackers actually healthy? Compared to the processed stuff in the red box? Absolutely! These are packed with healthy fats and protein. Just don’t eat three batches in one sitting.
Can I make these vegan? Yes! Swap the egg for a flax egg (1 tbsp flax meal + 3 tbsp water). The crackers will be slightly more fragile, but just as delicious. IMO, they get a bit nuttier too.
How do I store homemade crackers? Keep them in an airtight container at room temperature for up to a week. If they lose their snap, just pop them in a 300°F oven for 2 minutes to crisp them back up.
Why are my crackers soft? You probably didn’t roll them thin enough or let them cool long enough. Thin is win when it comes to homemade snacks!
What is the best flour to use? Super-fine blanched almond flour is the undisputed champion. Avoid coconut flour for this recipe unless you want a dry, crumbly mess.
Can I use a different oil? Sure! Avocado oil or melted coconut oil works perfectly. Just avoid low-quality vegetable oils if you want that premium flavor.
Do I need a food processor? Nope! A simple bowl and fork get the job done. This is low-tech, high-reward baking at its finest. 🙂
Final Thoughts
There you have it. A gluten-free crackers recipe that actually respects your time and your taste buds. They’re smoky, they’re fresh, and they’re the only reason I’m willing to attend a social gathering on a random Tuesday. Once you make these, you’ll realize that store-bought “health snacks” are just a sad, overpriced lie. Go forth, roll some dough, and enjoy the snap. Just don’t be surprised when your “gluten-eating” friends start raiding your snack stash. 🙂

