

The Ultimate Gluten-Free Bread: A Loaf That Actually Doesn’t Taste Like Sadness
Let’s be brutally honest for a second: we’ve all been there. You walk past a bakery, the intoxicating scent of yeast and toasted grains hits you like a warm hug, and then you remember—your digestive system has officially declared war on wheat. You head home, pull a slice of store-bought gluten-free bread from a $9 loaf that’s the size of a deck of cards, and toast it until it’s effectively a shingle. You take a bite, and it has the structural integrity of a dry sponge and the flavor profile of a dusty attic. It’s a culinary tragedy, really.
I first whipped this up for a friend who thinks “gluten-free” is just a fancy word for “culinary disappointment.” One bite of this golden-brown, soft-centered masterpiece later, and she was literally scraping the crumbs off the cooling rack, questioning her entire identity as a grain-lover. This isn’t just a “safe option” for the Celiac crowd; it is objectively elite bread. If you want to shut down the skeptics and reclaim your kitchen dignity, you’re in the right place. Ready to ruin standard supermarket loaves for yourself forever? Let’s get to the proofing.
Why This Recipe is the G.O.A.T. of Gluten-Free Bread

Why should you bother whisking your own dough when you could just buy a frozen loaf of disappointment? Because your taste buds deserve a party, not a funeral. First off, the flavor profile is a masterpiece of balance—think the earthy depth of sorghum playing tag with the subtle sweetness of honey and the savory punch of real yeast. It isn’t just “good for a diet”; it’s a vibrant, complex comfort food that gets better with every toasted slice.
Secondly, it is ridiculously easy to assemble. If you can use a whisk and a measuring cup without losing a finger, you’ve already won. It’s a one-bowl wonder that makes you look like a Michelin-star baker while you’re actually just clearing out your pantry staples. Plus, it impresses guests every single time. There is something profoundly satisfying about serving a loaf that feels like a total indulgence but consists entirely of gut-friendly goodness. Ready to become the neighborhood bread legend?
The Grocery List: Clean, Simple, and Wheat-Free

Don’t overcomplicate your life by searching for rare starches harvested under a blue moon. We are using powerhouse pantry staples that actually work together to create magic.
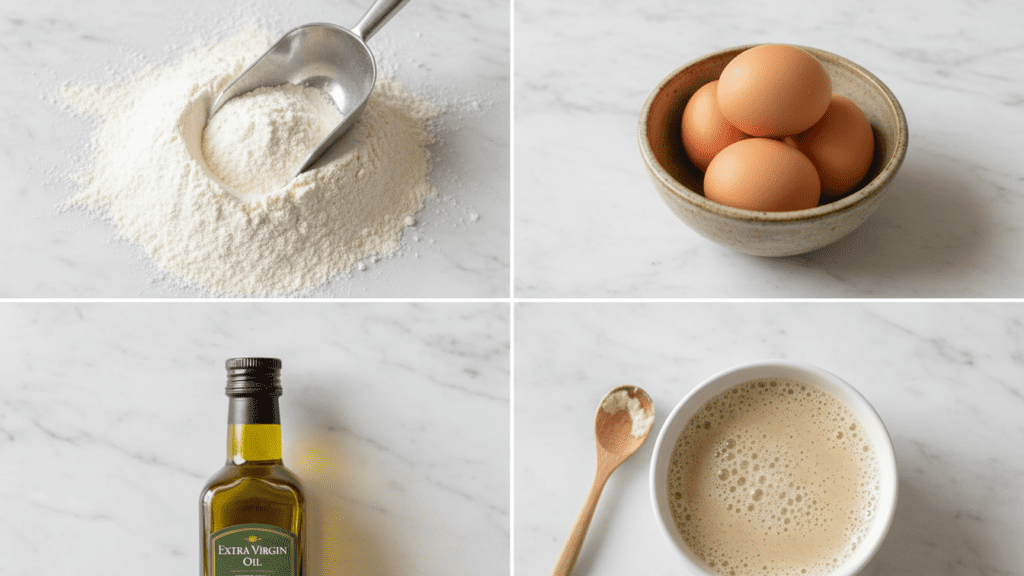
- Gluten-Free All-Purpose Flour Blend: 3 cups. Ensure it contains Xanthan Gum, or add 1.5 teaspoons if it doesn’t.
- Warm Water: 1.5 cups. Not boiling, not cold—think “nice baby bath” temperature.
- Active Dry Yeast: 1 packet (2.25 tsp). The tiny workers that do the heavy lifting.
- Honey or Maple Syrup: 2 tablespoons. Yeast loves sugar; it’s their version of an energy drink.
- Eggs: 3 large ones at room temperature. These provide the structure that gluten usually handles.
- Olive Oil: 1/4 cup. This ensures the crumb stays moist and doesn’t turn into sawdust.
- Apple Cider Vinegar: 1 teaspoon. This is the secret weapon for a better rise and a slight sourdough-ish tang.
- Sea Salt: 1 teaspoon. Because unseasoned bread is a sin.
Tools & Kitchen Gadgets You’ll Actually Use
To make this the smoothest baking experience of your life, snag these basics. I’ve linked my favorites so you can treat your kitchen to some upgrades!
- 9×5 Inch Non-Stick Loaf Pan: Essential for that classic shape and zero sticking. Check out this professional-grade pan on Amazon.
- Stand Mixer with Paddle Attachment: Because nobody has time for manual labor. This KitchenAid is the industry standard.
- Instant-Read Thermometer: To ensure your water is exactly 110°F. Grab this digital one for precision.
- Silicon Spatula: Perfect for scraping every last drop of dough gold. Try this heat-resistant set.
- Wire Cooling Rack: The secret to preventing a soggy bottom. Get a sturdy one here.
Step-by-Step Instructions: How to Win at Baking
Follow these steps precisely, and please, for the love of all things fluffy, do not skip the “rest” phase. FYI: the dough needs its beauty sleep!
1. The Yeast Awakening
In the bowl of your stand mixer, combine the warm water, honey, and yeast. Stir gently and let it sit for about 10 minutes. If it doesn’t look like a bubbly, frothy swamp, your yeast is dead. Start over. It happens to the best of us. 🙂
2. The Liquid Marriage
Add the olive oil, apple cider vinegar, and eggs to the frothy yeast mixture. Turn the mixer on low for 30 seconds just to introduce everyone. At this point, it looks a bit weird—trust the process.
3. The Big Flour Drop
Slowly add the gluten-free flour blend and sea salt. Crank the mixer up to medium and let it rip for 3-5 minutes. Gluten-free dough should look more like thick cake batter than traditional stretchy bread dough. If you try to knead this by hand, you’re going to have a very sticky, very bad time.
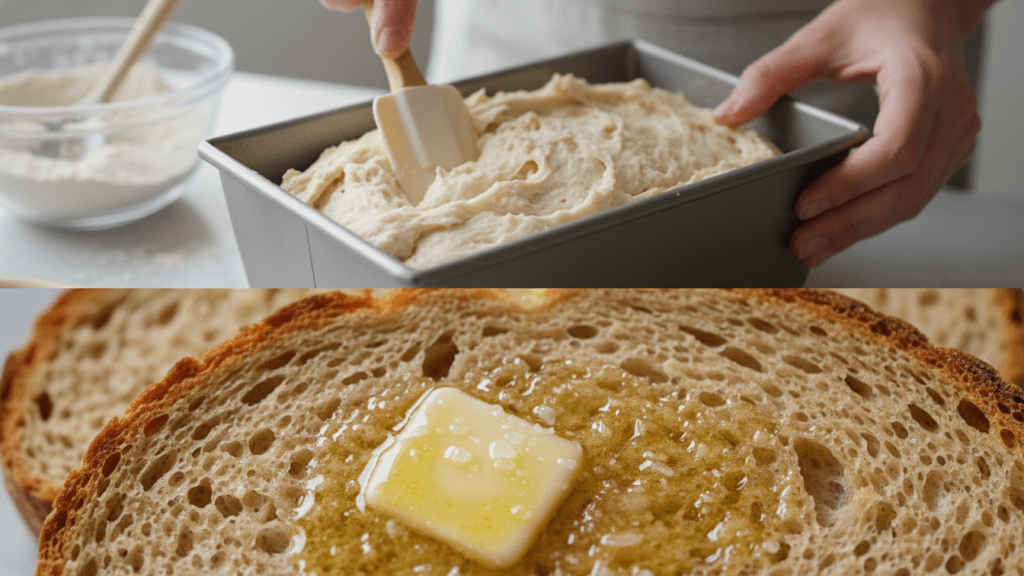
4. The Architecture
Scrape the dough into your greased loaf pan. Smooth the top with a wet silicon spatula (this prevents the dough from clinging to your tools like a needy ex).
5. The Rising Ritual
Cover the pan with a clean kitchen towel and place it in a warm, draft-free spot. Let it rise for 45-60 minutes. We want the dough to reach the top of the pan, but not overflow like a science fair volcano.
6. The Golden Window
Preheat your oven to 350°F (175°C). Slide the loaf onto the center rack. Bake for 45-50 minutes. The top should be a deep, golden brown, and the loaf should sound hollow when you tap it. If you have a thermometer, the internal temp should be 205°F.
7. The Patience Test
Remove from the oven and let it sit in the pan for 10 minutes. Then, move it to the wire cooling rack. Do not slice it yet. If you cut into hot gluten-free bread, the steam escapes, and the crumb turns gummy. Wait at least an hour. TBH, this is the hardest part of the recipe.
Calories & Nutritional Info
For those of you who track your macros like a part-time job, here is why your body will love this loaf:
- Calories: ~160 kcal per slice (serves 12).
- Net Carbs: ~24g (The fuel for your soul).
- Protein: ~4g (Thanks, eggs!).
- Fat: ~6g (Heart-healthy olive oil fats).
- Fiber: ~2g (Depending on your flour blend).
Common Mistakes to Avoid: Don’t Be That Person
Even a recipe this simple can go sideways if you get cocky. Avoid these blunders to keep your kitchen dignity.
- Using Cold Eggs: Cold eggs will shock the yeast and kill the rise. Warm them up in a bowl of water first.
- Slicing Too Soon: I’m serious. The bread finishes “cooking” as it cools. Wait the hour.
- Using Boiling Water: You’ll murder the yeast. Check the temp with your thermometer.
- Measuring Flour by Volume: Scooping flour packs it down. Use a kitchen scale for 450g of flour if possible.
- Skipping the Vinegar: It provides the lift and shelf life. The vinegar is mandatory.
Variations & Customizations
Feeling adventurous? Here are three ways to flip the script on this gluten-free bread:
The Seeded Artisan
Add 1/4 cup of sunflower seeds, flax seeds, and chia seeds to the dough. It adds a nutty crunch and makes you feel like you’re eating at a $20-a-plate brunch spot.
The Herb & Garlic Flex
Stir in 1 tablespoon of dried rosemary and 1 teaspoon of garlic powder. It turns your basic loaf into the ultimate sidekick for a bowl of pasta or soup. 🙂
The Cinnamon Raisin Hug
Add 1/2 cup of raisins and 1 tablespoon of cinnamon to the mix. Top the loaf with a sprinkle of coarse sugar before baking for a breakfast treat that rivals any bakery.
FAQ Section: You Asked, I Answered
Is gluten-free bread better toasted? Honestly, yes. IMO, all gluten-free bread levels up significantly when toasted. It brings out the nutty flavor and fixes any lingering crumb issues.
Can I make this bread vegan? It’s tricky because the eggs provide the structure. You can try flax eggs or aquafaba, but the loaf will be much denser and won’t rise as high.
How do I store my homemade loaf? Since it has no preservatives, it only lasts about 2 days on the counter. Slice it and freeze it immediately for best results. It toasts perfectly from frozen!
Why did my bread collapse in the middle? This usually happens if it over-proofed. If the dough rises too fast and high, the structure can’t support itself. Watch the timer.
What is the best flour blend to use? Look for a high-quality “1-to-1” or “Measure for Measure” blend. King Arthur and Bob’s Red Mill are the gold standards in my kitchen.
Can I use a bread machine? Absolutely. Just make sure your machine has a “Gluten-Free” setting, as this dough only needs one rise and no traditional kneading.
Why is my bread gummy? You probably sliced it while it was still warm. Patience is a flavor, my friend. Let it cool completely!
Final Thoughts
There you have it. A gluten-free bread recipe that actually respects your time and your taste buds. It’s smoky, it’s fresh, and it’s the only loaf that makes me feel like I’m winning at adulthood on a random Tuesday. Once you make this, you’ll realize that store-bought frozen loaves are just a sad, expensive lie. Go forth, whisk that batter, and enjoy the golden glory. Just don’t be surprised when your “gluten-eating” friends start raiding your freezer. 🙂

