
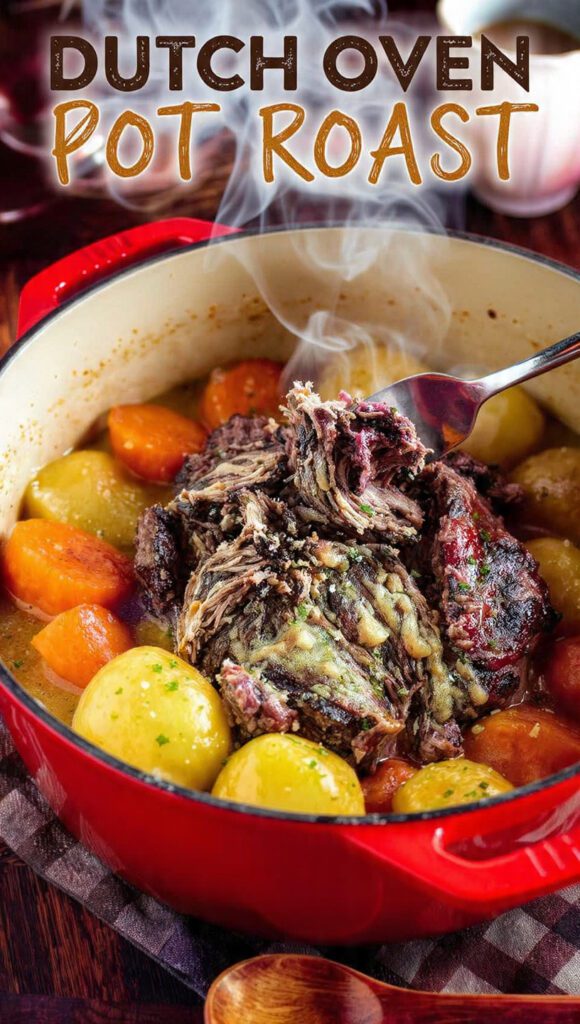
🍷 The Unstoppable Dinner: The Best Tender Dutch Oven Pot Roast
Let’s be honest: your Dutch oven is probably sitting there looking pretty, waiting for its next starring role. And what’s more worthy of that heavy, enameled beauty than the ultimate comfort food champion? This Dutch oven pot roast recipe is the gold standard of Sunday dinner. We’re talking about a roast that’s impossibly tender, swimming in a rich, savory gravy, and surrounded by perfectly cooked root vegetables. Forget those dry, sad roasts of the past—this method guarantees deep flavor and melt-in-your-mouth beef every single time. Ready to put your Dutch oven to work and become a braising legend?
✨ Why This Dutch Oven Roast is Superior

Why go through the effort of oven-braising when you have a slow cooker? Because the Dutch oven provides superior, consistent heat distribution and allows you to build deeper, richer flavor layers right on the stovetop before the long, gentle oven finish.1 This recipe is awesome because:
- The Searing is Perfected: The thick bottom of the Dutch oven holds high heat perfectly, creating an aggressive, deep brown sear on the roast—the foundation of true flavor.
- Rich, Reduced Gravy: We deglaze with red wine and slowly reduce the broth in the oven, creating a concentrated, savory gravy that tastes like it cooked all week.
- Effortless Oven Finish: Once the lid is on and the roast is in the oven, you don’t have to touch it for hours. It’s the ultimate set-it-and-forget-it, hands-off dinner.
It’s a complete meal that makes your whole house smell like a warm hug. Who needs a fancy restaurant when you have this masterpiece?
🥕 The All-Star Ingredients Lineup
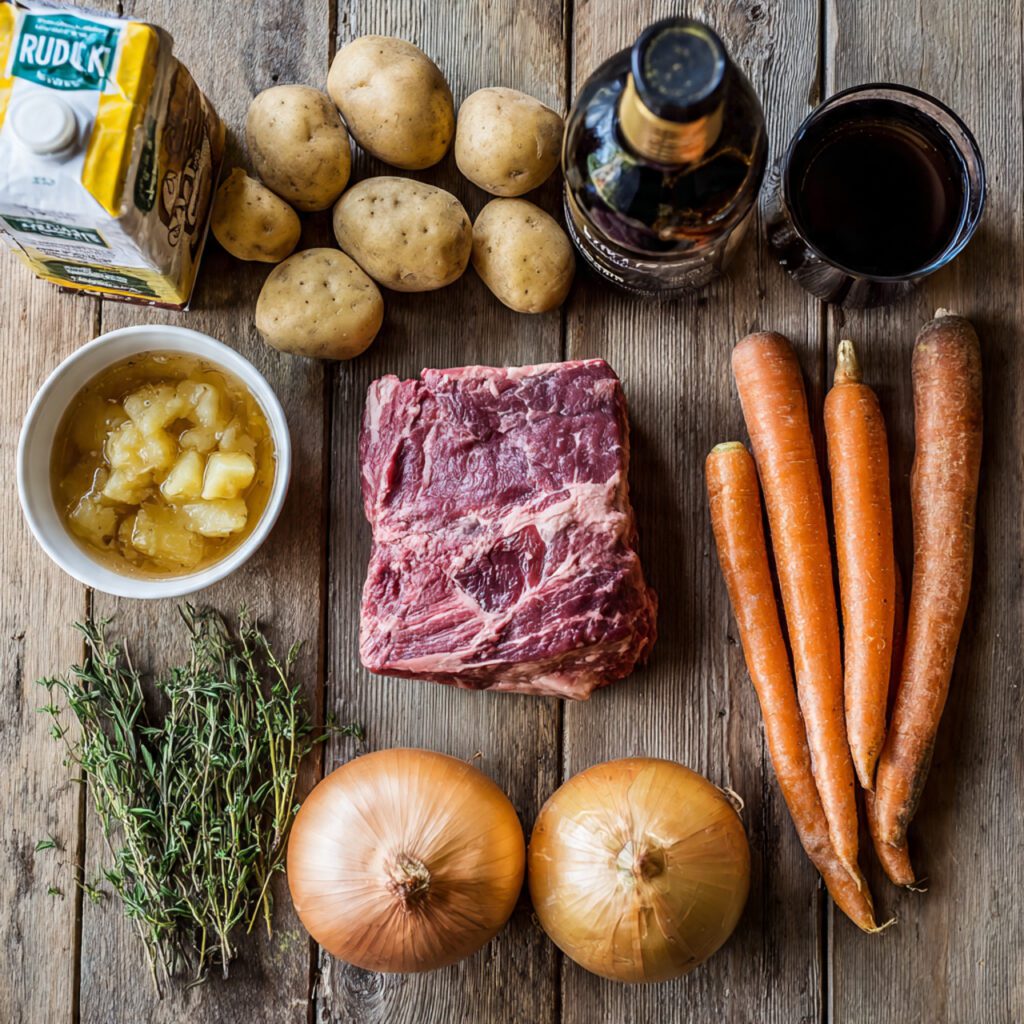

Stick to simple, high-quality ingredients. The chuck roast is the hero; don’t substitute it with a leaner cut!
H3 The Beef & Aromatics
- 3-4 pound Chuck Roast: Tied, trimmed, and patted dry. Essential for melt-in-your-mouth tenderness.
- 2 tablespoons Olive Oil: For searing.
- 1 large Yellow Onion: Roughly chopped.
- 4 cloves Garlic: Smashed and peeled.
- 1 cup Dry Red Wine (Optional but Recommended): Cabernet or Merlot works beautifully. (Substitution: Use 1 cup extra beef broth and 1 tablespoon balsamic vinegar.)
H3 The Liquid & Seasoning
- 3 cups Beef Broth (or stock): Low sodium. Stock yields a better gravy.
- 1 tablespoon Tomato Paste: Adds a savory, umami base.
- 1 teaspoon Dried Thyme: Classic herb pairing for beef.
- 1 teaspoon Dried Rosemary: Earthy and aromatic.
- 1 Bay Leaf: Don’t forget to fish this out before serving!
- Salt and Freshly Ground Black Pepper: Generous seasoning for the beef and broth.
H3 The Veggies
- 4 medium Carrots: Peeled and cut into large 2-inch chunks.
- 4 medium Russet or Yukon Gold Potatoes: Cut into large 2-inch chunks.
🛠️ Tools & Kitchen Gadgets Used
Your Dutch oven is the true star, but a few extras make the process smoother.
- 5-7 Quart Enameled Cast Iron Dutch Oven: The MVP. Required for the stovetop searing and oven braising.
- Tongs: For handling the roast during the high-heat searing.
- Cutting Board and Sharp Knife: For uniform chopping.
- Wooden Spoon or Spatula: For scraping up the precious brown bits.
- Meat Thermometer (Recommended): For checking internal temperature.
🚀 Step-by-Step Instructions: Deep Flavor, Effortless Finish
Follow these steps exactly. The two secrets are the aggressive sear and the low oven temperature.
H3 Sear and Deglaze (The Flavor Foundation)
- Pat and Season: Pat the chuck roast completely dry. Generously season all sides with salt and pepper.
- Sear the Roast: Heat the olive oil in the Dutch oven over medium-high heat until shimmering. Carefully place the roast in the pot. Sear for 3-4 minutes per side until a deep, dark brown crust forms. Remove the roast and set it aside.
- Sauté Aromatics: Reduce the heat to medium. Add the onions and smashed garlic to the pot. Cook for about 5 minutes, scraping up the brown bits from the bottom with your wooden spoon. This step is critical!
- Flavor Paste and Wine: Stir in the tomato paste, rosemary, and thyme. Cook for 1 minute. Pour in the red wine (if using). Bring the mixture to a simmer and let it reduce by half, continuing to scrape the bottom.
H3 Braise Low and Slow
- Add Broth and Roast: Pour in the beef broth and add the bay leaf. Return the seared roast to the pot. The liquid should come about halfway up the sides.
- Oven Time: Cover the Dutch oven tightly with the lid. Transfer the pot to a preheated oven at 325°F (160°C) and braise for 3 hours. Do not peek! You lose heat and steam when you lift the lid.
H3 Add Veggies and Finish
- Add the Veggies: After 3 hours, remove the pot from the oven. Add the potatoes and carrots to the pot, nestling them around the roast and submerging them in the liquid. Re-cover the pot.
- Finish Cooking: Return the pot to the oven and cook for another 1 to 1.5 hours, or until the roast is fork-tender and the vegetables are tender. The internal temperature of the beef should be around $200^{\circ}\text{F}$.
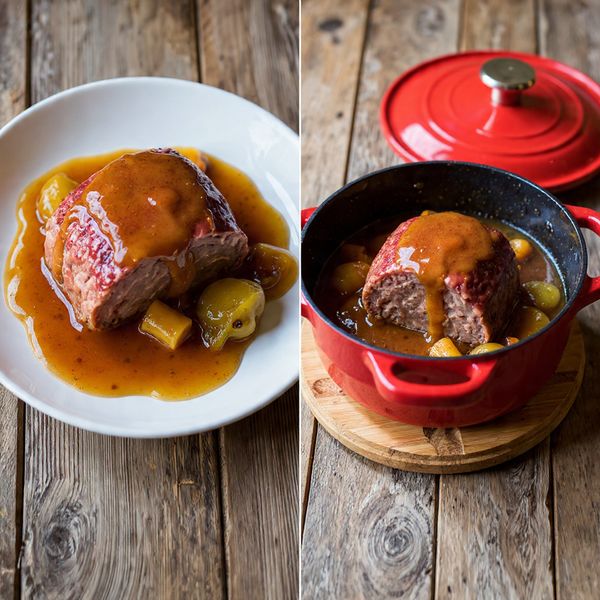
- Rest and Serve: Remove the roast and vegetables to a platter. Let the roast rest for 15 minutes before shredding or slicing. Skim the excess fat from the gravy in the pot. Serve the roast and veggies with a generous ladle of the hot gravy.
📊 Calories & Nutritional Info
This is a rich, satisfying, protein-heavy meal. These are estimated notes per serving (assuming 8 servings).
- Estimated Calories Per Serving: ~450-550 kcal (Varies based on the fat content of the chuck roast and added wine/oil).
- Macronutrient Notes:
- High Protein: Chuck roast provides a massive protein boost.2
- Complex Carbs: Potatoes and carrots add satisfying complex carbohydrates and fiber.3
- Iron and B Vitamins: Beef is a great source of essential iron and B vitamins.4
- Note: The long cooking time breaks down the fat and connective tissue, making the roast very easily digestible.5
🛑 Common Mistakes to Avoid (The Tough Meat Debacle)
Don’t let your beautiful Dutch oven produce a tough result. Avoid these braising sins!
- Skipping the Sear: The Dutch oven’s main advantage is searing. Skipping this step results in a flat, uninspired gravy. Sear aggressively on high heat!
- Using the Wrong Cut: Chuck roast (or shoulder) is the only acceptable cut here. Using lean cuts results in dry, stringy beef, no matter how long you braise it.
- Adding Vegetables Too Early: Carrots and potatoes cook faster than the beef. If added too soon, they will turn into mushy sludge by the time the beef is tender. Add them during the last hour or so.
- Cooking Time Panic: If the roast is tough, it means it hasn’t cooked long enough for the collagen to break down. You need to cook it until it’s $200^{\circ}\text{F}$ and easily shreds. Don’t pull it out at $165^{\circ}\text{F}$!
- Not Patting the Beef Dry: If the beef is wet, it steams in the Dutch oven instead of searing. Always pat it completely dry before seasoning.
🌶️ Variations & Customizations: Your Flavor Journey
Ready to mix up your roast game? The Dutch oven can handle anything!
H3 Rich Mushroom French Onion Roast
Go savory and sweet. Add 1 pound of sliced cremini mushrooms with the onions. After the roast is done, thicken the gravy and stir in 1/2 cup of caramelized onions. Finish with a sprinkle of Gruyère cheese right before serving.
H3 Mediterranean Lemon & Olive Roast
Go bright and tangy. Omit the tomato paste and red wine. Deglaze with 1/2 cup of fresh lemon juice. Add 1/2 cup of Kalamata olives and 1 tablespoon of oregano with the broth. Substitute the carrots/potatoes with whole small parsnips for a different root vegetable flavor.
H3 Vegan Pot Roast with Jackfruit (Vegetarian Swap)
Make it hearty and plant-based! Substitute the chuck roast with 2 cans of young jackfruit (rinsed, shredded, and patted dry). Follow the exact steps, using vegetable broth and a generous amount of Worcestershire sauce (check that it’s vegan!) for umami. The texture perfectly mimics shredded pork.
❓ FAQ Section: Your Braising Questions Answered
We know you have specific questions about mastering the Dutch oven.
H3 Is it better to cook pot roast on the stovetop or in the oven?
For a traditional braise, the oven is superior because it provides even, consistent heat around the entire Dutch oven, preventing scorching on the bottom and cooking the meat more uniformly.6
H3 How do I prevent my gravy from being too thin?
After removing the meat and veggies, simmer the remaining liquid in the Dutch oven on the stovetop (uncovered) to reduce it. Alternatively, mix 1 tablespoon of cornstarch with 2 tablespoons of cold water and whisk it into the simmering liquid for 1 minute to thicken.
H3 What is the best liquid to use for pot roast?
A mix of beef broth/stock and dry red wine is ideal for depth. The alcohol cooks off, leaving behind complex, savory flavor notes that enhance the beef.
H3 Why is the pot roast still tough after 3 hours?
It simply needs more time! Toughness means the collagen hasn’t melted yet. Cover the pot and continue braising until the roast is easily shredded (likely 4 hours total on the stovetop or 4.5 hours total in the $325^{\circ}\text{F}$ oven).
H3 Can I cut the roast into cubes before cooking?
No. Cook the roast whole. Cutting it beforehand releases too much moisture too quickly, resulting in dry, less flavorful, smaller pieces of meat.
H3 How do I clean scorched bits from the bottom of my Dutch oven?
After removing the roast, add a small amount of liquid (wine or broth) and gently scrape the bottom with a wooden spoon while the liquid simmers. This process, called deglazing, should lift the food bits easily.
H3 Should I cover the Dutch oven tightly or leave a gap?
Cover it tightly! The lid traps steam, which keeps the cooking environment moist and ensures the roast doesn’t dry out during the long braise.
🎉 Final Thoughts: Crown Yourself the Braising Champion!
You did it. You mastered the searing, honored the low and slow oven braise, and produced the ultimate, fall-apart tender Dutch oven pot roast. You created a masterpiece of comfort food that defines Sunday dinner.
Go ahead, ladle that rich, wine-infused gravy over a big chunk of beef and potatoes. You’ll never look at a dry roast again, will you? Now, are you going to make this again next week, or save the Dutch oven for chili? 😉

