
The Ultimate Dump-and-Go Instant Pot Taco Soup: Weeknight Dinner Solved
Be honest: how many times have you stared into your pantry, seen a pile of canned goods, and thought, “I should make something healthy… or I could just order pizza?” Too many? I get it. We’re busy people, and sometimes dinner requires zero brain power. But what if I told you that you could transform those sad, dusty cans into a deeply flavorful, hearty, and satisfying meal in less than 30 minutes?

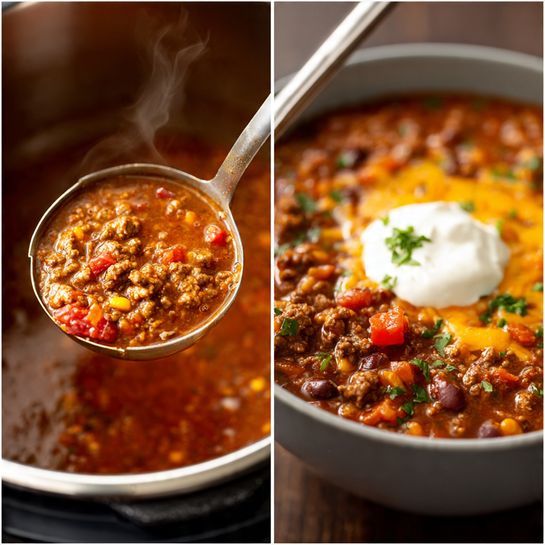
Say hello to your new weeknight obsession: instant pot taco soup. Seriously, this soup is like the easiest chili you’ve ever made, except it tastes like a fiesta exploded in your mouth. You literally dump the ingredients in, press a button, and return to the land of amazing aromas and minimal dishwashing. This recipe is the definition of effort-to-flavor ratio excellence.
Why This Recipe is Your Weeknight Hero
We love this taco soup because it delivers maximum flavor for minimal fuss. It’s the kind of meal that makes you feel competent and organized, even if your laundry basket is currently staging a hostile takeover of your living room.

First, the speed is unmatched. We’re talking 10 minutes of prep and about 20 minutes of cook time. Compare that to slow cooker versions that demand all day attention. The Instant Pot infuses all the spices and tomatoes deep into the meat and beans almost instantly.1 Who needs all-day simmering when you have high-pressure technology?
Second, the customization is endless. Do you have shredded chicken? Use it. Do you only have black beans? Fine. Do you want to load it up with cheese and sour cream until it’s basically a dip? Go for it! This soup welcomes all your personal touches. IMO, a recipe that lets you be lazy and creative is a winner. Plus, the bright colors from the corn, beans, and tomatoes make it look fantastic, so you can totally impress guests while secretly knowing you only opened cans.
Ingredients: The Pantry Power Pack

Grab your can opener. We are making minimal cuts and maximal flavor. We keep the base simple so the toppings can truly shine.
The Soup Base
- 1 lb Ground Beef, Ground Turkey, or Chicken: Leaner meat works best here.
- 1 medium Onion, chopped: The classic flavor foundation.
- 1 (14.5 oz) can Diced Tomatoes, undrained: We need those juices!
- 1 (15 oz) can Kidney Beans, drained and rinsed: Adds texture and protein.
- 1 (15 oz) can Black Beans, drained and rinsed: Kidney and black beans make a great duo.
- 1 (15 oz) can Corn, drained: Adds sweetness and color.
- 1 (10 oz) can Rotel Diced Tomatoes with Green Chilies, undrained: This is a flavor secret weapon! It brings heat and brightness.
- 1 (4 oz) can Diced Green Chilies, undrained: More mild heat and depth.
- $3$ cups Chicken or Beef Broth: Use low sodium to control the saltiness.
- 1 (1 oz) packet Taco Seasoning: We are not making our own today. Embrace the packet!
- 1 tsp Chili Powder: Boosts the deep, smoky flavor.
- $1/2$ tsp Cumin: The essential spice for that authentic Tex-Mex flavor.
Assembly & Toppings (The Fun Part)
- Shredded Cheddar or Monterey Jack Cheese
- Sour Cream or Plain Greek Yogurt
- Crushed Tortilla Chips or Fritos
- Sliced Avocado or Guacamole
- Chopped Cilantro
Key Substitutions
- Meat: Use cooked shredded chicken (throw it in frozen!) or $1 \ 1/2$ cups of cooked lentils for a vegetarian option (adjust cook time).
- Beans: Swap out any beans for pinto beans, chickpeas, or even extra corn. Use what you have!
- Rotel: If you can’t find Rotel, use a can of diced tomatoes and $1/2$ cup of mild salsa.
Tools & Kitchen Gadgets Used
You really only need your Instant Pot and a few common kitchen items. No need to buy a confusing specialty gadget here.
- Instant Pot (6-quart or 8-quart): The pressure-cooking miracle worker.
- Tongs or Wooden Spoon: Essential for browning the meat and scraping the pot.2
- Can Opener: You’ll be using this a lot today.
- Cutting Board and Chef’s Knife: For chopping that onion.
- Measuring Spoons: For accurate spice levels. You don’t want to accidentally dump two tablespoons of chili powder.
- Colander: For rinsing those beans—super important for digestion, FYI.
- Serving Ladle: Because fishing out bits of beef with a fork is inefficient.
Step-by-Step Instructions: Dump, Cook, Devour
Keep it short. Keep it fast. That’s the Instant Pot way.
H3: Phase 1: Sauté the Meat and Onion
- Sauté Prep: Plug in your Instant Pot and hit the Sauté button. Once it reads “Hot,” add your ground meat (or a tablespoon of oil if using raw chicken).
- Brown the Meat: Brown the meat, breaking it up with a wooden spoon or tongs. Once mostly browned, add the chopped onion and cook until the onion softens (about 3-4 minutes).
- Drain the Fat: Hit Cancel. Use a ladle to carefully drain off any excess fat from the pot. We don’t need all that grease floating around!
H3: Phase 2: Dump and Pressure Cook
- Add the Broth: Pour in the chicken or beef broth. Use your wooden spoon to scrape up any browned bits stuck to the bottom of the liner. This step is crucial to avoid the dreaded “Burn” warning.
- Dump the Cans: Add the diced tomatoes, Rotel, green chilies, kidney beans, black beans, and corn. Do not stir the mixture once the tomatoes and seasoning are in. Layering the ingredients helps prevent the thicker items from scorching the bottom.
- Seasoning Time: Sprinkle the taco seasoning, chili powder, and cumin right over the top. Again: do not stir!
- Seal and Cook: Secure the lid and make sure the venting knob is set to “Sealing.” Hit the Pressure Cook (Manual) button and set the time for 10 minutes on High Pressure.
H3: Phase 3: Release and Finish
- Release the Pressure: Once the timer beeps, allow a Natural Pressure Release (NPR) for 5 minutes. This prevents foam and hot liquid from spraying everywhere. After 5 minutes, carefully flip the valve to “Venting” to release any remaining pressure (Quick Release, or QR).
- Stir and Serve: Remove the lid and give the soup a good stir to combine all those glorious layers and spices.
- Garnish: Ladle the hot soup into bowls. Serve with a mountain of your favorite toppings. Are you really eating taco soup without sour cream? I don’t think so.
Calories & Nutritional Info (The Health Check)
This recipe yields 6 hearty servings. These estimates will fluctuate based on the type of meat and toppings you use—so don’t go too wild with the Fritos!
- Estimated Calories Per Serving (Soup Base Only): $\approx \textbf{350-400}$ Calories
- High Protein: Expect around 30-35g of protein per serving thanks to the meat and the beans.
- Fiber King: Beans and corn make this soup incredibly fiber-rich, aiding digestion.3
- Low Fat Option: If you use lean ground turkey and drain the fat after sautéing, this soup becomes quite low in saturated fat.
- Key Nutritional Note: This soup is nutrient-dense and highly satisfying. Watch the sodium content if you use canned items—opt for low-sodium broth where possible.
Common Mistakes to Avoid (The “Burn” Warning is Real)
The Instant Pot is fantastic, but it hates thick sauces sitting right on the bottom. Prevent disaster by following these simple rules.
- Mistake 1: Not Scrapping the Pot After Searing. This is the number one cause of the dreaded “Burn” error. After sautéing the meat, pour in the broth first and use a wooden spoon to vigorously scrape the bottom of the pot. Ensure no browned bits remain.
- Mistake 2: Stirring the Tomatoes/Beans in too Early. Tomatoes and thick starches (like beans) settle quickly and can also trigger the “Burn” warning. Layer the thick ingredients and spices on top of the broth. Only stir after the pressure cooking cycle finishes.
- Mistake 3: Skipping the Rinsing Step. You must drain and rinse the canned beans to remove excess sodium and starches. Nobody wants foamy, overly salty soup.
- Mistake 4: Using Too Little Liquid. If you are adjusting the recipe, remember the Instant Pot needs at least 1 $1/2$ cups of liquid to come up to pressure safely. Don’t skimp on the broth!
Variations & Customizations: Level Up Your Taco Game
Once you master the base recipe, start having fun. A small change can completely remix the flavor profile.
H3: 1. Smoky Chicken Chili
Use 1 $1/2$ pounds of boneless, skinless chicken breasts instead of ground meat (throw them in whole!). Swap the taco seasoning for a Chipotle Chili Powder blend for a smoky depth. After cooking, remove the chicken, shred it with two forks, and return it to the soup.
H3: 2. Creamy Fiesta (No Dairy Required!)
For a richer, almost creamy texture without heavy cream, stir in 4 ounces of softened cream cheese right after the pressure cooking finishes. Stir until the cheese completely melts and thickens the soup slightly. You get a luscious texture that’s truly decadent.
H3: 3. Vegetarian Powerhouse
Ditch the meat entirely. Add 1 cup of cooked brown rice or quinoa to the liquid mixture (this will require increasing the broth by $1/2$ cup). Add an extra can of black beans or pinto beans for protein. For extra flavor, sauté chopped zucchini and bell pepper with the onion before adding the liquid.
FAQ Section: Taco Soup Q&A
You asked. We answered. Now stop stressing and start eating.
H3: Can I use frozen ground beef in the Instant Pot?
You should always thaw ground beef first so you can sauté and drain the fat properly. If you must use frozen meat, place the frozen block on a trivet above the liquid and increase the pressure cook time to 20 minutes, then shred it after cooking.
H3: Is it better to use chicken or beef broth?
Since we’re making taco soup, chicken broth often provides a lighter base that allows the specific taco spices to shine. Beef broth works too, but it will give the final soup a slightly darker, beefier flavor profile.
H3: How do I make this soup less spicy?
Avoid the Rotel, which contains green chilies. Instead, use a can of plain diced tomatoes and only use a mild taco seasoning packet. You can also reduce the chili powder to just $1/2$ teaspoon.
H3: Can I freeze Instant Pot Taco Soup?
Yes! This soup freezes exceptionally well. Cool it completely, then transfer it to freezer-safe containers, leaving about one inch of headspace (liquid expands when frozen). It lasts for up to 3 months.
H3: My soup seems too thin. How do I thicken it?
If you like a thicker soup, you have a couple of options. Remove $1/2$ cup of the soup and blend it, then pour it back in. Or, you can stir in a slurry of 1 tablespoon of cornstarch mixed with 1 tablespoon of cold water after pressure cooking.
H3: How long do leftovers last in the fridge?
Leftovers keep beautifully for 4-5 days in an airtight container in the refrigerator. The flavors actually deepen and improve overnight!
H3: Do I need to rinse the corn?
Yes, you should drain the corn, but rinsing is optional. Rinsing beans is more crucial because of the starches and excess sodium.
Final Thoughts
You did it. You took a few humble cans, a little ground meat, and your Instant Pot, and you created a weeknight feast that tastes like you spent hours working on it. These instant pot taco soup bowls are your passport to a delicious, low-effort dinner. Ditch the delivery menu, load up those toppings, and enjoy the easiest, most satisfying meal you’ve made all week. Go share this recipe with someone who really needs a night off!