Forget Soggy Sandwiches: The Ultimate Grab-and-Go Ham and Cheese Breakfast Bars
Okay, confession time. How many times have you stood in front of your fridge at 6 a.m., bleary-eyed, wishing that a perfectly balanced, savory breakfast would magically appear? Too many? Me too. I used to be a granola bar heathen, pretending those dry, crumbly things satisfied my soul. Then, I invented the ultimate morning hack: ham and cheese breakfast bars. Seriously, these bars are the only reason I consistently make it to my 8 a.m. meetings without considering a life change. They are crunchy, cheesy, savory pockets of pure morning genius, and honestly, they will make you feel like a domestic superstar.
Why These Bars are Your New Morning MVP

Let’s be real. Your breakfast needs to do three things: taste amazing, keep you full, and require zero hand-holding on the way out the door. These ham and cheese bars check every single box. Plus, they ditch the sad, pre-made breakfast sandwich vibe.
First, the flavor profile is chef’s kiss. You get salty, smoky ham, sharp, melted cheddar, and a crispy-chewy crust that holds it all together. It’s basically an omelet and a pastry had a delicious, low-maintenance baby.
Second, the ease of cooking is ridiculous. You mix, you press, you bake, and suddenly, you have 12 perfect servings ready for the week. Meal prep has never been this satisfying, IMO. They reheat like a dream, too. Are you really going to tell me that a batch of these doesn’t beat scrambling eggs every single morning? I think not.
Ingredients: The A-Team of Savory Breakfast
You probably have most of these lying around, which is the best kind of recipe, isn’t it? We’re keeping the ingredient list tight and effective because who has time for unnecessary trips to the fancy grocery store?
The Crust & Base
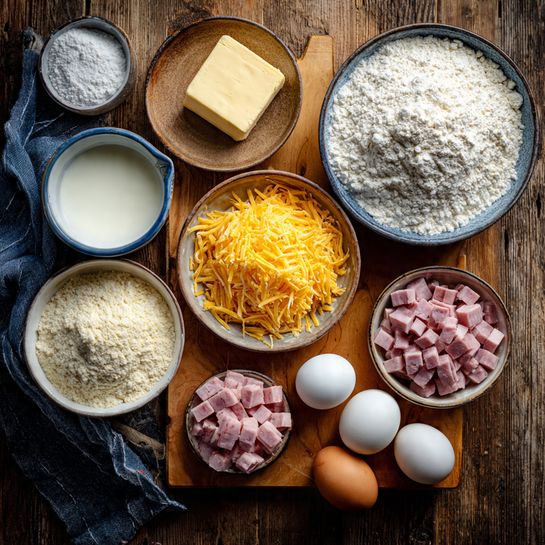
- 2 cups All-Purpose Flour: The foundation of our grab-and-go empire.
- 1 tsp Baking Powder: Helps the crust achieve that perfect “shortbread-but-savory” texture.
- 1/2 tsp Salt: Don’t skip this—it brings out all the savory flavor.
- 1/2 cup (1 stick) Unsalted Butter, cold and cubed: Cold is key! It’s the secret to flakiness.
- 1/2 cup Milk (any kind): You need just enough to bring the dough together.
The Savory Filling
- 1 cup Diced Ham: Go for good quality deli ham or leftover holiday ham. Dice it small so it distributes evenly.
- 1 1/2 cups Shredded Cheese: Sharp Cheddar is the gold standard here. Provolone or Gruyere also work beautifully if you’re feeling bougie.
- 2 Large Eggs, lightly beaten: Our binding agent. It holds the filling hostage inside the perfect crust.
- 1/4 cup Milk: Again, just a splash to lighten the egg mixture.
- 1 tsp Dried Mustard or Dijon: This is the secret ingredient. It adds a delightful, unexpected tang.
- 1/4 tsp Black Pepper: Freshly ground, if you’re feeling fancy.
Substitutions for the Win
- Flour: You can swap AP flour for a gluten-free 1:1 blend. Just make sure it includes xanthan gum.
- Ham: Sub in cooked, crumbled sausage or crispy bacon for a different smoky vibe.
- Cheese: Mix up the cheese! Monterey Jack melts like a dream, and a bit of shredded Swiss adds nuttiness.
Tools & Kitchen Gadgets Used
You don’t need a professional pastry kitchen, FYI. Just a few basic tools will get you from zero to breakfast hero. These are the workhorses that make these bars a cinch:
- 9×13 Inch Baking Pan: The non-negotiable MVP. A light-colored metal one bakes most evenly.
- Large Mixing Bowl Set: You need one for the dough, one for the filling. Simple math.
- Pastry Cutter or Food Processor: A pastry cutter makes quick work of cutting in the butter, but a food processor can do it even faster.1 (We love speed, don’t we?)
- Rubber Spatula: Essential for mixing and scraping down the sides.
- Measuring Cups and Spoons: Precision matters, even in a “throw-it-together” recipe like this.
- Cutting Board and Sharp Knife: For dicing that ham like a pro.
- Wire Cooling Rack: Don’t let your perfect crust get soggy!
Step-by-Step Instructions: Mastering the Bar
We are not messing around here. Follow these short, punchy steps, and bask in the glory of your impending breakfast mastery.
H3: Phase 1: The Flaky, Savory Crust
- Preheat & Prep: Crank your oven up to 375°F (190°C). Grease your 9×13 inch baking pan. If you want zero stick, line it with parchment paper, leaving an overhang. Trust me on the overhang.
- Combine the Dry: Whisk the flour, baking powder, and salt in your large mixing bowl.
- Cut in the Butter: Add the cold, cubed butter. Use your pastry cutter (or pulse in the food processor) until the mixture resembles coarse crumbs. We’re aiming for the size of small peas.
- Add the Milk: Pour in the $1/2$ cup of milk and mix until the dough just comes together. Do not overmix! A few dry spots are actually a good thing.
- Press the Base: Divide the dough in half. Press half the dough evenly into the bottom of the prepared $9\times 13$ pan. This is your foundation. Bake this crust base for 15 minutes.
H3: Phase 2: The Cheesy, Meaty Filling
- Mix the Filling: While the base bakes, grab a clean bowl. Whisk the 2 eggs, $1/4$ cup milk, dried mustard, and pepper together.
- Add the Solids: Stir in the diced ham and the shredded cheese. The filling should look gloriously chunky and cheesy.
H3: Phase 3: Assembly and Baking
- Pour it On: Take the partially baked crust out of the oven. Pour the entire ham and cheese filling mixture evenly over the top.
- Crumble the Topping: Take the remaining half of the raw dough you set aside. Gently crumble this dough right over the filling. We want a rustic, beautiful topping, not a smooth, perfect sheet.
- Bake Until Golden: Pop the pan back in the oven. Bake for an additional 25-30 minutes, or until the topping is a lovely golden brown and the center is set. If the topping starts browning too fast, loosely tent it with foil.
- Cool (The Hard Part): Let the bars cool in the pan on a wire rack for at least 15-20 minutes. Cutting them hot is a recipe for a crumbly mess. TBH, I still do it sometimes, but you shouldn’t.
- Slice and Store: Once cooled, use the parchment overhang to lift the entire creation out of the pan. Slice into 12 perfect ham and cheese breakfast bars. Store them in an airtight container in the fridge.
Calories & Nutritional Info (The Important Disclosures)

Disclaimer: These are estimated and depend entirely on the ham, cheese, and milk choices you make. But hey, knowledge is power, right?
- Estimated Calories Per Bar (out of 12 servings): $\approx \textbf{280-320}$ Calories
- Protein Power: Each bar packs a serious protein punch, typically 15-18g of protein. Thanks, ham and cheese!
- Carbohydrates: Mostly from the flour, sitting around 25-30g per bar.
- Fats: This is not a low-fat recipe (hello, butter and cheese). Expect around 15-20g of fat, much of it saturated. But hey, you need energy to conquer the day!
- Key Nutritional Note: These bars deliver high amounts of calcium (cheese!) and are a great source of sustained energy, helping you avoid that mid-morning crash.
Common Mistakes to Avoid (AKA: Don’t Do What I Did)
You’re a rockstar, but even rockstars trip sometimes. Let’s make sure your bars come out perfect every time.
- Mistake 1: Not Chilling the Butter Enough. If your butter is soft, your crust will be tough and greasy, not flaky and tender. Keep the butter COLD! If your kitchen is hot, toss the bowl in the fridge for 10 minutes mid-prep.
- Mistake 2: Overmixing the Dough. Once you add the milk, mix only until the flour is just incorporated. Overmixing develops the gluten, making your crust tough and cracker-like. We want tender, not tough.
- Mistake 3: Cutting Them Too Soon. I know you’re hungry. I get it. But slicing a hot bar will guarantee the filling oozes out and the crust crumbles. Wait 15 minutes; you’ll thank me later.
- Mistake 4: Using Too Much Ham/Cheese. Seriously. Stick to the measurements. Too much bulk prevents the egg from setting properly, and you’ll end up with a loose filling. A firm bar is the goal.
Variations & Customizations: Remix Your Breakfast
Want to shake things up? Of course you do. Here are three super-easy ways to adapt this recipe to your mood (or your dietary needs).
H3: 1. The Spicy Italian Swap
Ditch the ham and replace it with diced pepperoni or spicy Italian sausage (cooked first, obviously). Swap the cheddar for shredded mozzarella and Parmesan. Stir in 1/2 teaspoon of red pepper flakes with the egg mixture for a major morning kick. Now that’s a breakfast that wakes you up!
H3: 2. Keto-Friendly Base
This is a game-changer for low-carb eaters. Skip the flour base entirely. Instead, use a dough made from almond flour, cream cheese, and an egg. Blend $2 \ 1/2$ cups almond flour with $4$ ounces softened cream cheese and $1$ egg. Press $2/3$ of this dough into the base, add the filling, and crumble the rest on top. You’re basically eating pure savory goodness.
H3: 3. Vegetarian Powerhouse
Who needs meat? Swap the ham for a colorful mix of pre-cooked veggies. Sauté chopped bell peppers, spinach, and mushrooms until the moisture releases. Squeeze the excess liquid out of the spinach before adding it to the egg mixture. Use Feta cheese along with the cheddar for a bright, tangy finish.
FAQ Section: All Your Burning Questions Answered
We know you have questions. We’ve got sassy answers.
H3: How long do ham and cheese breakfast bars last in the fridge?
They last easily for 4 to 5 days in an airtight container in the refrigerator. Perfect for your weekday meal prep. Just grab one and go—that’s the whole point, right?
H3: Can I freeze these bars?
Yes! Definitely freeze them. Once they are completely cool, wrap individual bars tightly in plastic wrap, then place them in a freezer bag. They keep well for up to 3 months. To reheat, thaw overnight and then warm in the microwave or oven.
H3: What is the best way to reheat them?
The microwave works, sure, but for maximum crispiness, wrap a bar in foil and reheat it in a toaster oven or regular oven at $350^\circ\text{F}$ ($175^\circ\text{C}$) for about 10-15 minutes. This gets that crust nice and crunchy again.
H3: Can I use pie crust or puff pastry instead of making the dough?
Sure, if you hate yourself and love spending money on sub-par results. Just kidding! Yes, you can. Use two sheets of refrigerated pie crust or puff pastry. Press one sheet into the base, add the filling, and lay the second sheet on top. It changes the texture, but it works in a pinch.
H3: Can I make these in a standard muffin tin?
You can! Fill the muffin cups about $2/3$ full with the base dough, press an indentation into the center, add the filling, and top with a small crumble. Adjust the baking time down to about 20-25 minutes. They make cute little breakfast cups!
H3: My crust came out tough. What did I do wrong?
You overmixed the dough, didn’t you? See the “Common Mistakes” section! Next time, mix gently and stop as soon as the flour disappears. Also, make sure your butter was icy cold when you cut it in.
H3: Why did my filling sink or get soggy?
Two reasons: too much moisture in your add-ins, or you didn’t bake the bottom crust long enough. If you add wet veggies (like mushrooms), always pre-cook them and drain them well. And ensure the bottom crust gets that initial 15-minute bake to set its foundation.
Final Thoughts
Look, you’ve just created a dozen gourmet breakfast items that require less effort than brewing your morning coffee. Are you feeling smug yet? You should be! These ham and cheese breakfast bars are officially the reason you’ll stop skipping breakfast. Now, go make a batch, slice them up, and realize you never, ever have to settle for a dusty convenience store pastry again. Send me a picture of your beautiful, cheesy creation!