

🍗 The Ultimate Homemade Chicken Nuggets Recipe: Crispy, Juicy, and Better Than Takeout
Let’s talk about the unsung hero of the dinner table: the chicken nugget. It’s the one food everyone—from the pickiest toddler to the most sophisticated adult (who secretly loves them)—agrees upon. But if your relationship with nuggets is limited to that bag in the freezer or the drive-thru window, you’re missing out. Seriously. Making them at home transforms them from questionable freezer fare into crispy, juicy, tender perfection. I’m here to give you the ultimate chicken nuggets recipe—the one that will make you swear off the processed stuff forever. Get ready for a major flavor upgrade that’s easier than you think.
Why You Need This Nugget Recipe in Your Life

This isn’t just a food; it’s a nostalgic experience, revamped. We’re talking better flavor, better texture, and a lot less mystery meat.
Flavor & Texture: The Golden Standard
The secret here is real, high-quality chicken and a double-coating process. This method delivers a super crispy, textured exterior that holds up beautifully to dipping, while the chicken inside remains incredibly tender and moist. We season the chicken and the coating, ensuring massive flavor in every bite. Seriously, once you taste a homemade nugget, those frozen pucks just feel sad. Are you still buying the freezer bags? You don’t have to anymore!
Kid-Friendly and Adult-Approved
This recipe is the ultimate crowd-pleaser. Kids inhale them, and adults appreciate the difference real, recognizable chicken makes. Plus, you control the ingredients! No mystery fillers, weird preservatives, or strange shapes. This is honest, good food disguised as a fast-food favorite. Make a big batch and freeze the extras; this recipe is perfect for easy meal prep.
The Essentials: Ingredients
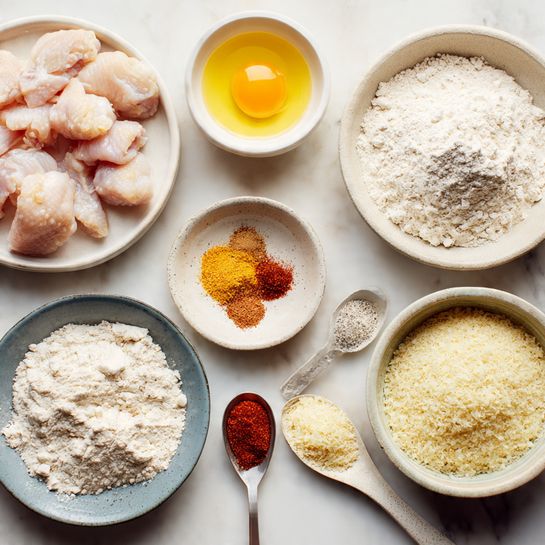
Simple ingredients lead to spectacular results. Focus on quality here, especially with the chicken!
- 1 pound Boneless, Skinless Chicken Breast or Thighs: Cut into 1-inch pieces. Thigh meat stays juicier, FYI.
- 1/2 cup All-Purpose Flour: The first layer of the “dredge.”
- 1 large Egg: Beaten lightly. The binder that makes the coating stick.
- 1/2 cup Plain Breadcrumbs: For texture. Panko breadcrumbs offer maximum crunch!
- 1 teaspoon Garlic Powder: Essential seasoning for that savory flavor.
- 1/2 teaspoon Onion Powder: Boosts the umami factor.
- 1/2 teaspoon Smoked Paprika (optional): Adds depth and a beautiful golden color.
- Salt and Black Pepper: Liberal amounts for seasoning the chicken and the breadcrumbs.
- Oil for Frying/Baking: Vegetable oil or peanut oil for frying; olive oil spray for baking/air frying.
Key Substitutions for When You’re Out of Things
- No Breadcrumbs? Crush up plain corn flakes or even potato chips in a food processor for an extra crispy, unconventional coating.
- No Panko? Traditional plain breadcrumbs are fine, but expect a softer crust. Add an extra minute of frying time for maximum color.
- Chicken Thighs for Breasts: Thighs are naturally fattier and will result in a much juicier nugget. Breasts are leaner but tend to dry out slightly faster—watch your cooking time closely!
Tools & Kitchen Gadgets Used
You don’t need a commercial fryer, but a couple of items will make the coating and cooking process infinitely easier.
- 3 Shallow Dishes or Plates: Essential for the classic three-step breading station (flour, egg, breadcrumbs). Keep your hands separate!
- Cutting Board and Sharp Chef’s Knife: For prepping the chicken into even, nugget-sized pieces.
- Large Skillet or Dutch Oven: For pan-frying. A heavy-bottomed pot maintains temperature better.
- Deep Fry Thermometer: If frying, this is crucial for maintaining the oil temperature (around 350°F / 175°C). Don’t guess; oil temp matters!
- Tongs: For safely maneuvering the chicken in the hot oil.
- Wire Rack and Baking Sheet: For draining the excess oil and keeping the nuggets crispy after cooking.
- Meat Mallet (optional): For tenderizing and evening out chicken pieces before cutting.
The Nugget Masterclass: Step-by-Step Instructions
The secret to a perfect nugget is the assembly line. Prep everything before you start the coating process.
Step 1: Prep the Chicken and the Breading Station
Cut the chicken into uniform, bite-sized nugget shapes. Season the pieces aggressively with salt and pepper. Now, set up your three stations:
- Dish 1 (Flour): All-purpose flour seasoned with a pinch of salt and pepper.
- Dish 2 (Egg): The beaten egg.
- Dish 3 (Breadcrumbs): Panko breadcrumbs, garlic powder, onion powder, paprika, salt, and pepper—mix this well!
Step 2: The Double-Dip Dredge
This is where the magic (and the mess) happens. Maintain a “wet hand” and a “dry hand” to minimize clumping!
- Using your “dry hand,” dredge the chicken piece in the flour (Dish 1). Shake off the excess.
- Transfer the floured piece to the egg wash (Dish 2). Use your “wet hand” to coat it completely.
- Transfer the piece immediately to the breadcrumb mixture (Dish 3). Use your “dry hand” to press the crumbs firmly onto all sides. Pressing is key for a thick crust!
Place the fully coated nuggets on a clean plate and chill them for 10 minutes in the freezer—this sets the breading and prevents it from falling off during cooking.
Step 3: Cook to Golden Perfection (Pan-Fry or Bake)
H3: Pan-Frying Method (Crispiest!)
Fill your large skillet with about 1/2 inch of oil. Heat the oil to 350°F (175°C) (use your thermometer!). Using your tongs, carefully place the nuggets in the hot oil, ensuring you don’t overcrowd the pan. Cook for 2–3 minutes per side, turning until all sides are deep golden brown and the internal temperature reaches 165°F (74°C).
H3: Baking Method (Healthier!)
Line a baking sheet with parchment paper and lightly coat the nuggets with olive oil spray. Bake at 400°F (200°C) for 15–20 minutes, flipping halfway through, until golden and cooked through.
Step 4: Drain and Devour
Transfer the cooked nuggets immediately to a wire rack set over a baking sheet. This allows air to circulate, keeping the bottoms crispy. Do not put them on a paper towel! Serve them piping hot with your favorite dipping sauce.
Calories & Nutritional Info (The Real Deal)

Homemade nuggets are a healthier alternative to fast food, especially if you bake them. This recipe yields about 4 servings (4-5 nuggets per serving).
- Estimated Calories Per Serving (Pan-Fried): ~300–400 calories (depending on oil absorption and cut of meat).
- Estimated Calories Per Serving (Baked/Air-Fried): ~200–280 calories.
- High in Protein: Excellent source, thanks to the chicken.
- Fat: Higher in fat if fried, significantly lower if baked.
- Carbohydrates: Moderate, primarily from the breading.
Nutritional Note: Making your own nuggets allows you to use quality white meat (high protein, low saturated fat). Use Panko breadcrumbs for maximum crunch and consider baking or air-frying for a much lighter version!
Common Mistakes to Avoid (Nugget Failures are Real)
Don’t let bad habits ruin your perfect chicken bite. These are the top errors to dodge.
- Mistake #1: Not Pounding the Chicken. Chicken breasts have thick and thin ends. Pound them to uniform thickness before cutting into nuggets to ensure even cooking.
- Mistake #2: Skipping the Freezer Time. Chilling the coated nuggets for 10 minutes helps the breading adhere to the chicken and prevents it from falling off during cooking. Set the breading!
- Mistake #3: Overcrowding the Frying Pan. Cramming too many nuggets into the oil drops the oil temperature immediately. This results in soggy, greasy nuggets. Cook in batches, waiting for the oil to heat back up between rounds.
- Mistake #4: Not Seasoning the Breadcrumbs. Bland breading makes a bland nugget. Season the breadcrumbs aggressively with salt, pepper, and your powders—this is where the flavor lives!
- Mistake #5: Draining Nuggets on Paper Towels. Paper towels trap steam and moisture underneath, making the bottom of the nugget soggy. Always drain on a wire rack.
Variations & Customizations (Get Saucy)
Once you nail the classic, it’s time to experiment. These variations are ridiculously good.
1. Spicy Nashville Hot Nuggets
Add 2 teaspoons of cayenne pepper and 1 tablespoon of brown sugar to the breadcrumb mixture. After cooking, toss the hot nuggets immediately in a glaze made from melted butter and a heavy dash of cayenne pepper. Serve with ranch or blue cheese dressing. Warning: these are addictive.
2. Parmesan Herb Nuggets (The Grown-Up Version)
Replace half the breadcrumbs with freshly grated Parmesan cheese. Add 1 tablespoon of chopped fresh parsley and 1 teaspoon of dried oregano to the breading mix. These are incredible dipped in warm marinara sauce. It’s like a tiny chicken parmesan!
3. Keto/Gluten-Free Nuggets
Swap the all-purpose flour for almond flour. Replace the breadcrumbs with pork rinds (chicharrones) crushed into a fine powder. Use the air fryer or oven method. The pork rinds give a surprisingly light, crispy, and savory crust that is completely grain-free. Perfect for those following a low-carb diet.
FAQ Section: Your Nugget Queries Answered
Q1: Is it better to fry or bake chicken nuggets?
A: Frying (or air-frying) gives the absolute crispiest exterior. Baking is the healthier choice, producing a crisp exterior but a slightly softer bite. For the best texture, pan-fry.
Q2: What is the best cut of chicken for nuggets?
A: Boneless, skinless chicken breast is the leanest and easiest to work with. However, chicken thighs stay much juicier and more flavorful due to their higher fat content.
Q3: How do I freeze these homemade chicken nuggets?
A: After breading (Step 2), freeze the raw nuggets on a baking sheet until solid. Transfer them to a freezer bag. Cook from frozen, adding about 5–8 minutes to the baking time or maintaining the same frying time.
Q4: My breading keeps falling off! What did I do wrong?
A: You likely skipped the chill step, or you didn’t press the breadcrumbs firmly enough. Chilling the nuggets sets the coating. Also, ensure your chicken is patted dry before the first dredge in flour!
Q5: How do I know when the nuggets are fully cooked?
A: The breading should be golden brown, and you should check a few pieces with a meat thermometer. The internal temperature must reach 165°F (74°C).
Q6: Can I use different types of flour?
A: Yes. You can use gluten-free flour blends or cornstarch for the first dredge. Cornstarch makes the final product extra crispy!
Q7: What are the best dipping sauces for these nuggets?
A: The classics never fail: honey mustard, BBQ sauce, ranch, and sweet and sour. For a fun twist, try dipping them in the leftover frosting from a cookie monster cake (just kidding… maybe).
Final Thoughts (Ditch the Freezer)
You now possess the secrets to the ultimate chicken nuggets recipe. Seriously, ditch those sad, store-bought, heavily processed hockey pucks. You can create a superior, crispy, juicy, and immensely satisfying nugget right in your own kitchen. This recipe is simple, scales easily, and guarantees happy faces at the dinner table. Go grab that chicken! I can’t wait to see your golden-brown masterpieces. Don’t forget to send me a picture of your dipping sauce lineup!