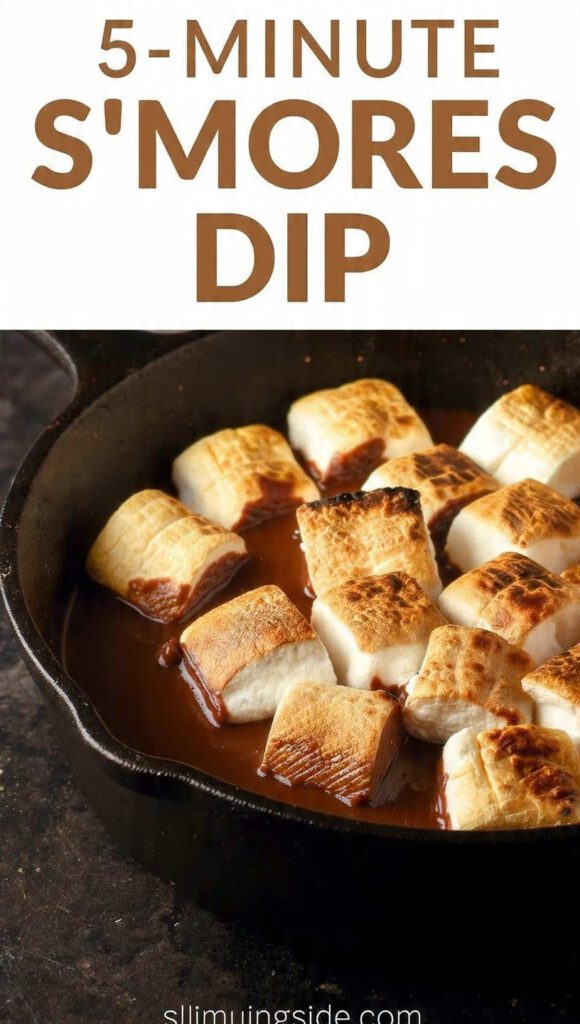
5-Minute S’mores Dip: The Ultimate Easy, Gooey Dessert Hack
Let’s be honest, sometimes you just need dessert right now. You don’t have time for campfires, complex baking, or waiting for a delivery driver. You need pure, melted chocolate and perfectly toasted marshmallows, and you need it in the time it takes to find your keys. That’s why the 5-minute s’mores dip is the ultimate dessert panic button.
This isn’t a delicate recipe; it’s an assembly and melt operation. You layer chocolate and marshmallows in a small baking dish or skillet, pop it into a hot oven (or, gasp, the microwave), and emerge 5 minutes later with a bubbling, gooey, irresistible masterpiece. Get ready to banish complex desserts and embrace the fastest, most satisfying sugar rush of your life. Seriously, why wait 30 minutes for cookies when you can have s’mores dip in 5?
Why This 5-Minute S’mores Dip Is Awesome (Speed, Gooeyness, and Simplicity)
This dip is the perfect solution for sudden dessert cravings or impromptu gatherings.
First, Unbeatable Speed. Five minutes. That’s the actual cook time. You spend three minutes prepping the dish and five minutes melting the marshmallows. This is the definition of instant gratification. Why spend an hour on dessert when 5 minutes delivers peak gooeyness?

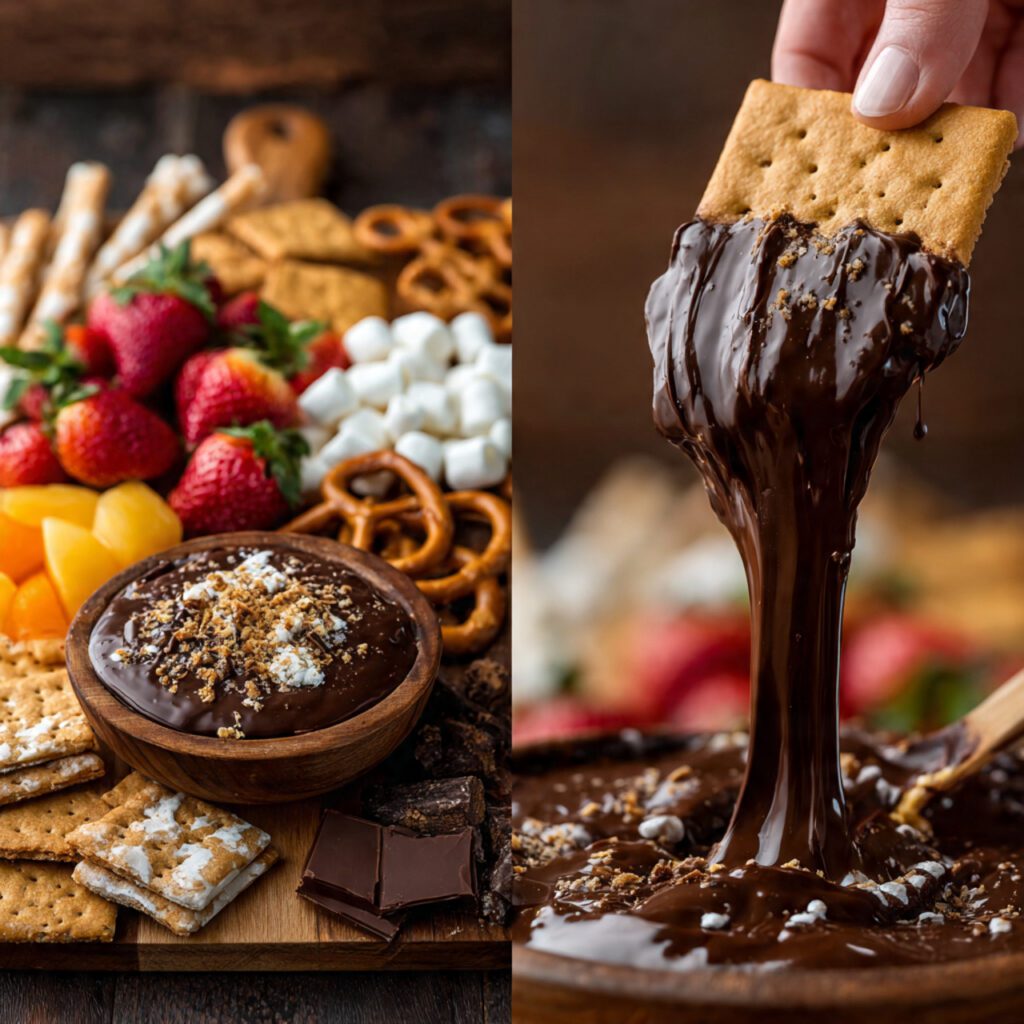
Second, The Ultimate Gooey Texture. This dip delivers the essential s’mores experience: a warm, melted chocolate layer topped with perfectly toasted, caramelized marshmallows. The contrast between the rich chocolate and the light, sweet marshmallow is pure comfort. IMO, the more stretch and pull, the better the dessert.
Third, Minimal Cleanup and Effort. You literally use one oven-safe dish or skillet. No complicated mixing, no multiple layers. You assemble, bake, and serve right from the pan. TBH, the hardest part is waiting for the dish to cool enough so you don’t burn your tongue.
The Goods: Ingredients You Need
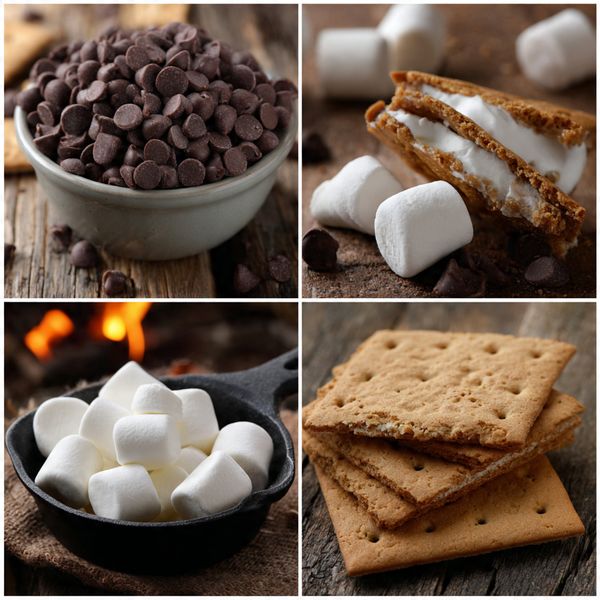
This recipe uses minimal ingredients, so choose quality chocolate—it’s the core flavor!
- The Chocolate Base (The Melt):
- 1 cup Milk Chocolate Chips or chopped Milk Chocolate bar (Semi-sweet works too, but milk chocolate is traditional).
- The Marshmallow Topping (The Puff):
- 1 1/2 cups Large Marshmallows, cut in half horizontally (or mini marshmallows for faster melting).
- The Dippers (The Necessary Scoops):
- Graham Crackers (broken into squares).
- Vanilla Wafers or Animal Crackers.
- Fresh Strawberries or Banana Slices (for contrasting freshness!).
H3 Key Substitutions (The Gooey Mix-Up)
- Milk Chocolate Swap: Use peanut butter chips or white chocolate chips for a flavored base. Adjust the bake time slightly, as white chocolate melts faster.
- Marshmallow Swap: Use marshmallow fluff spread over the chocolate layer, but be aware the top won’t get that classic toasty char.
- Dipper Swap: Use pretzels or salty potato chips for a fantastic salty-sweet combination!
Tools & Kitchen Gadgets Used (The Heat Source)
The key is a small, oven-safe dish that conducts heat well.
- Small Cast Iron Skillet (6-8 inch) or Oven-Safe Dish: CRUCIAL! The small surface area ensures the chocolate melts quickly before the marshmallows burn.
- Spatula or Spoon: For spreading the chocolate chips and scraping the dish.
- Serving Platter: For arranging the dippers around the hot pot.
- Oven Mitts: Mandatory for handling the scorching hot dish.
Step-by-Step Instructions (Layer, Melt, and Toast)
The goal is to get the chocolate fully melted just as the marshmallows turn perfectly golden brown.
H3 Step 1: Prep the Dish (The Base Layer)
- Preheat your oven to 400°F (200°C) (or turn the broiler on if you dare).
- Spread the chocolate chips evenly in the bottom of your 6-8 inch cast iron skillet or oven-safe dish. The layer should be about 1/2 inch thick.
H3 Step 2: Layer the Marshmallows (The Puff)
- If using large marshmallows, slice them in half horizontally for a cleaner cut.
- Arrange the marshmallows tightly over the chocolate chips. Make sure the entire surface is covered. They should touch slightly to create a cohesive gooey layer.
H3 Step 3: Melt and Toast (The 5-Minute Miracle)
- Bake the s’mores dip in the preheated 400°F oven for 5–7 minutes.
- Watch carefully! The dip is done when the chocolate is fully melted underneath (test gently with a spoon) and the marshmallows are golden brown and puffy on top.
- If you want a darker, quicker top, switch to the broiler for the last 30-60 seconds, watching constantly to prevent burning.
H3 Step 4: Serve Immediately (The Dip Dash)
- Carefully remove the scorching hot dish using oven mitts. Place it directly onto a sturdy trivet or board for serving.
- Arrange the graham crackers and other dippers artfully around the dish.
- Serve immediately! The dip is best enjoyed when the chocolate is liquid and the marshmallows are hot and stretchy.
Calories & Nutritional Info (Pure Sugar Rush)
This is a fun, high-calorie, pure comfort dessert. This estimate is for a 1/4 cup serving of the dip only, without dippers.
- Estimated Calories Per Serving (1/4 cup dip): ~280–350 calories. (Sugar and fat are the core components).
- High in Sugar: Mostly simple sugars from the marshmallows and chocolate.
- Comforting Fats: Chocolate and dairy (in milk chocolate) provide satisfying fats.
- Contains Trace Minerals: Cocoa powder provides iron and magnesium.
- Requires Immediate Consumption: The only rule that truly matters.
Common Mistakes to Avoid (The Burning Blunder)
The high heat required for the perfect toast is also the source of the most common mistakes.
- Using Only Marshmallow Fluff: Fluff doesn’t toast well in the oven; it risks melting into a sticky puddle. Use whole marshmallows (mini or halved large ones) for the best puff and char.
- Baking Too Long/Too Hot: Marshmallows go from golden to charcoal in seconds under a hot oven or broiler. Watch the dip constantly during the last 2 minutes.
- Using a Deep Dish: A dish that is too deep (like a soup bowl) makes it difficult for the heat to melt the bottom layer of chocolate effectively. Use a shallow skillet for even heat distribution.
- Forgetting the Warning: The dish is SCORCHING hot. Always warn guests not to touch the cast iron/ramekin! Place it on a clearly marked trivet.
Variations & Customizations (The Gooey Remix)
You can easily adapt the flavor of the chocolate layer for a unique dip every time.
- Peanut Butter Layer: Spread a thin layer of creamy peanut butter directly on the bottom of the skillet before adding the chocolate chips. The melted peanut butter swirl is amazing.
- Spicy Chili Flake S’mores Dip: Sprinkle 1/2 teaspoon of red pepper flakes over the chocolate chips before adding the marshmallows. The slight heat contrasts beautifully with the gooey sweetness.
- Dairy-Free Coconut S’mores (Vegan Swap): Use vegan chocolate chips (dark chocolate is usually dairy-free) and vegan marshmallows. Use crushed graham crackers (check ingredients for honey) or vegan vanilla cookies for dipping.
FAQ Section (The S’mores Secrets)
Got questions about achieving the ultimate s’mores dip perfection?
- Q: Can I use the microwave instead of the oven?
- A: Yes! Microwave the chocolate chips in a glass dish for 30-60 seconds until melted. Add marshmallows and microwave for another 30-60 seconds. You will lose the toasty char, but it will still be gooey.
- Q: How can I keep the dip warm for a party?
- A: Place the oven-safe dish on a small warming plate or candle warmer (low heat only). Alternatively, use a small, clean slow cooker set to the “Keep Warm” setting.
- Q: Why are my marshmallows burning before the chocolate melts?
- A: Your chocolate layer is too thick, or your oven is running too hot. Use a thin layer of chocolate chips (they melt faster than bars) or cover the top loosely with foil for the first 3 minutes.
- Q: What is the best chocolate to use?
- A: Milk chocolate chips or Hershey’s bars are the classic, sweetest choice. Dark chocolate (around 50-60%) provides a richer, less sweet contrast.
- Q: Can I prepare this ahead of time?
- A: Yes! Assemble the dish completely (chocolate and marshmallows). Cover it tightly and refrigerate until you are ready to bake. Then, bake for 7-10 minutes from cold.
- Q: What if I don’t have a cast iron skillet?
- A: Use any small, shallow, oven-safe ceramic or glass baking dish (like an 8×8 brownie pan cut down).
- Q: How do I store leftovers?
- A: Let the dip cool completely. Cover tightly and refrigerate for up to 3 days. Reheat gently in the microwave or a low oven (300°F) until gooey again.
Final Thoughts (The Dip Dynamo)
You conquered the craving, defeated the five-minute clock, and created a bubbling, irresistible monument to melted goodness. That 5-minute s’mores dip is proof that the simplest desserts are often the most effective. You are officially the Dip Dynamo.
Go ahead, enjoy that last gooey scoop with a graham cracker. Did you realize instant dessert could taste this satisfying? I bet you’ll never buy a bag of marshmallows without thinking of your cast iron skillet again. Now, are you adding peanut butter or pretzels next time?