
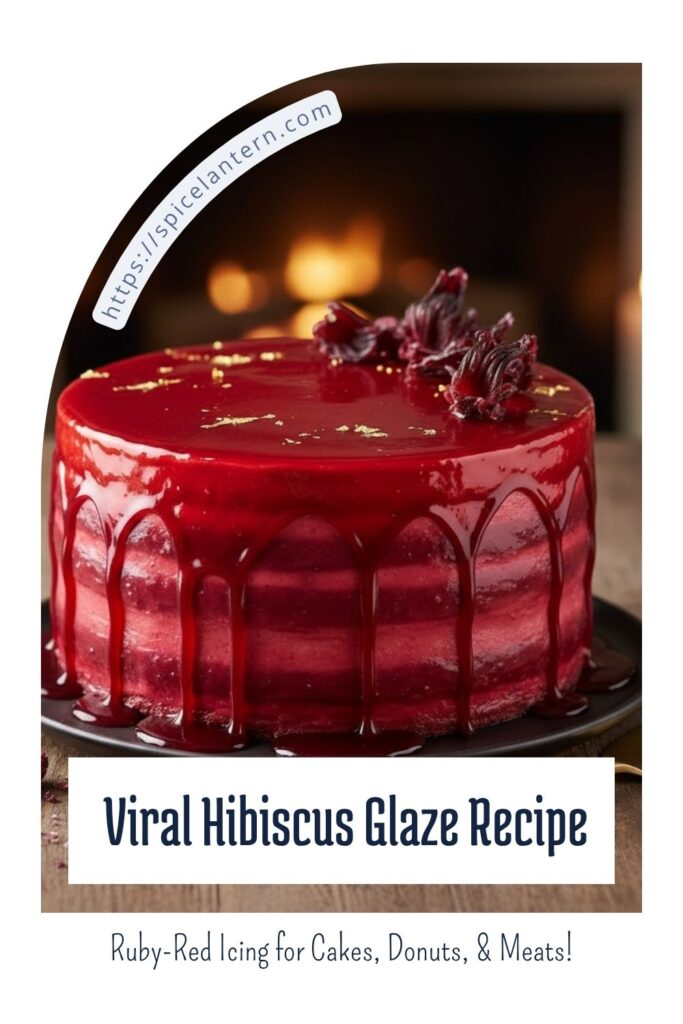
Forget Basic Glaze: How to Make the Viral, Ruby-Red Hibiscus Glaze That Screams Fancy
Ever look at a simple powdered sugar glaze and think, “Ugh, beige?” Yeah, me too. I love a good donut, but sometimes the topping needs a glow-up. I’m talking about turning dessert from “nice” to “OMG, what is this magic?” That’s where this incredible Hibiscus glaze swoops in, cape flying, looking like a ruby-red superhero.

This isn’t just a glaze; it’s a flavor bomb and a color spectacle. It has this amazing tangy, slightly fruity flavor that cuts through sweetness beautifully. Plus, the color! It’s the kind of intense, natural red-pink hue that makes people pull out their phones before they even take a bite. You need this. Your cakes need this. Your life needs this. Trust me on this one.
Why This Recipe Is Awesome (It’s Basically Edible Jewelry)
The best thing about this hibiscus glaze is the effortless elegance. You use three ingredients, and the result looks like something a French pastry chef agonized over for hours. The naturally tart flavor of the dried hibiscus flowers (often called flor de jamaica if you’re feeling cultured) stops the glaze from being cloyingly sweet.

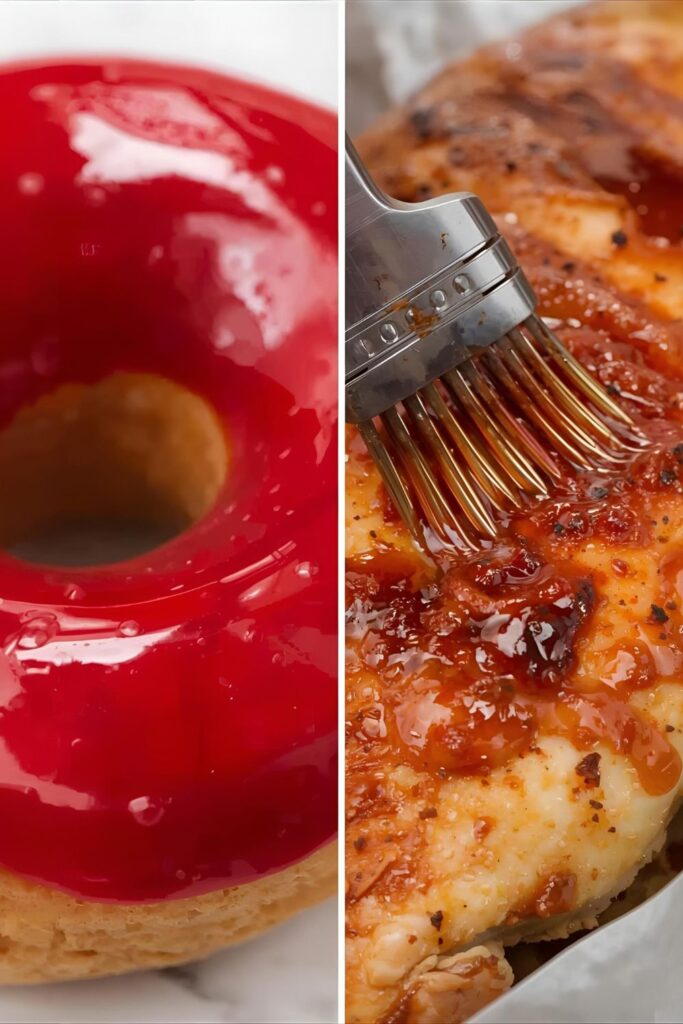
It’s versatile, too. You can use it on everything from pound cake and donuts to roasted pork (seriously!) or even as a vibrant drizzle on a fruit salad. Think of it as your secret weapon for making any dish look instantly impressive and taste complex. Why serve boring white icing when you can serve a shimmering, ruby-red masterpiece?
🌸 The Core Ingredients You Need
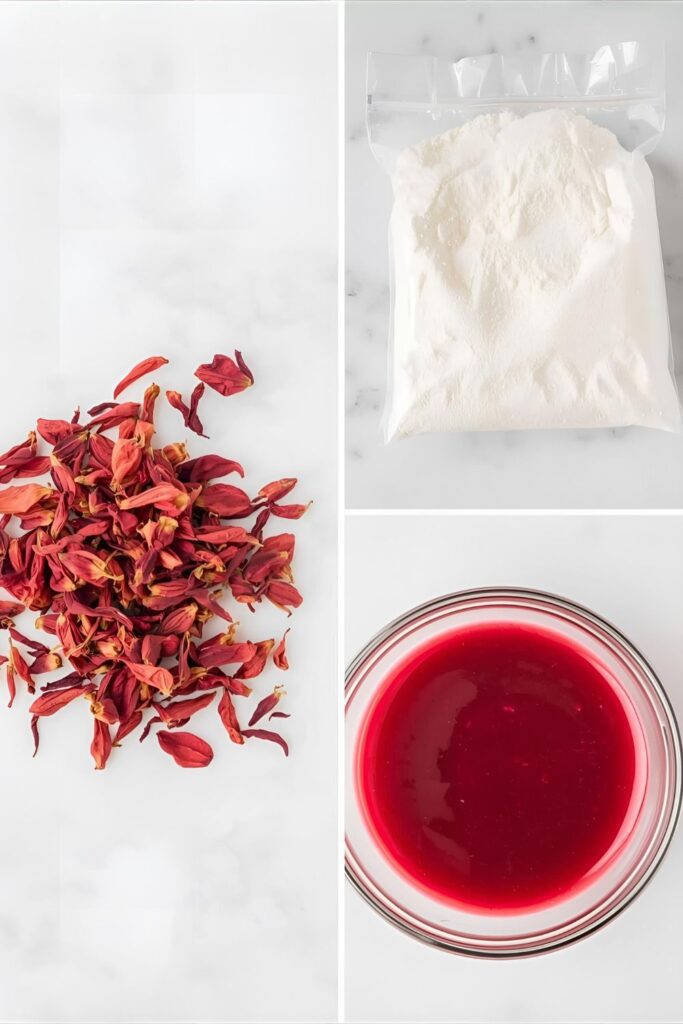
Stop stressing. You don’t need obscure ingredients. You only need three things, though one is definitely the star of the show.
- 1/4 cup Dried Hibiscus Flowers (or 2-3 Hibiscus Tea Bags): This is where the magic color and tang come from! Dried flowers work best for the deepest flavor and color.
- 1/2 cup Water: The liquid base for brewing our ultra-strong hibiscus tea.
- 2 cups Powdered Sugar (Confectioners’ Sugar): The essential ingredient for creating that smooth, perfect glaze consistency.
- Optional Flavor Booster: 1/2 tsp Vanilla Extract or a pinch of salt to balance sweetness.
Key Substitutions:
- No Powdered Sugar? You absolutely need powdered sugar for a glaze that sets nicely. Granulated sugar will create syrup, not glaze. Don’t try it!
- Hibiscus Flowers Swap: Use strong herbal tea bags, like berry or rosehip, if you can’t find dried hibiscus, but the color won’t be as intense or ruby-red.
🛠️ Tools & Kitchen Gadgets Used
This is where your Amazon cart stays mostly empty. You need basic kitchen equipment, but a couple of items make the process incredibly easy.
- Small Saucepan: For boiling the water and hibiscus flowers to create the strong brew.
- Fine-Mesh Sieve (Strainer): Crucial for separating the liquid from the flowers to ensure a smooth glaze.
- Medium Mixing Bowl: You need enough room to whisk the sugar and liquid without splashing red liquid all over your kitchen.
- Whisk: A simple wire whisk works perfectly for achieving that lump-free, silky consistency.
- Measuring Cups and Spoons: Precision matters here! Don’t eyeball the liquid, or you’ll end up with soup.
📝 Step-by-Step Instructions: Creating the Ruby Glaze
This is so easy, you’ll be done before your oven even preheats. Time to brew up some concentrated color!
Step 1: Brew the Ruby Concentrate
In your small saucepan, combine the 1/2 cup water and the dried hibiscus flowers. Bring the water to a boil over medium-high heat. Once it boils, immediately reduce the heat to low and let it gently simmer for 5–7 minutes. We are making the strongest, darkest tea possible here.
Step 2: Strain and Cool (Be Patient!)
Remove the pan from the heat. Use your fine-mesh sieve to strain the deep red liquid into a small, heatproof bowl. Press down on the flowers to extract every last drop of color. Discard the flowers. You should have about 1/4 cup of concentrated hibiscus liquid. Let this cool for about 5 minutes. Hot liquid + powdered sugar = lumps, and we hate lumps.
Step 3: Whisk in the Sugar
Pour the powdered sugar into your medium mixing bowl. Slowly, a tablespoon at a time, whisk the cooled hibiscus liquid into the sugar. Keep whisking until it’s smooth and all the sugar dissolves. You are looking for a thick but pourable consistency.
Step 4: Adjust the Consistency
If the glaze seems too thick (it won’t pour easily), add a few drops more of the hibiscus liquid until it reaches a ribbon-like flow. If you got overzealous and it’s too thin (it looks like watery paint), add a little more powdered sugar, a tablespoon at a time, until it thickens up. This is where you show your skill!
Step 5: Glaze and Serve
Use the glaze immediately! Drizzle it over cooled cakes, dip warm donuts, or brush it onto roasted meats. The glaze will set as it cools, giving you that beautiful, shiny, professional finish. It looks best when applied generously.
📊 Calories & Nutritional Info (Sweet Facts)
Glaze is sugar, so we aren’t pretending this is kale. But it’s homemade, and that counts for something, right? (Note: Calculations based on 1/16 of the total glaze recipe, or about 1–2 Tbsp).
- Estimated Calories Per Serving: Around 80–100 calories. (Mostly from the sugar, obvi.)
- Main Component: Simple carbohydrates (sugar). This is a treat, not a main course!
- Natural Benefits (of Hibiscus): Hibiscus is naturally high in antioxidants and is sometimes associated with helping manage blood pressure. You are technically adding health benefits! (I’m a little sarcastic here, FYI.)
- The Bottom Line: You control the ingredients, unlike store-bought glazes filled with unpronounceable chemicals.
🛑 Common Mistakes to Avoid (The Glaze Graveyard)
Don’t let your beautiful crimson dream turn into a pink mess. Avoid these common glaze disasters.
- Using Hot Liquid: As mentioned, hot liquid + powdered sugar = sadness. The result is a lumpy, grainy glaze that refuses to smooth out. Always use cooled or lukewarm liquid.
- Adding All the Liquid at Once: Glazes are finicky. If you dump all the liquid in, you instantly get hibiscus soup. Add liquid slowly, tablespoon by tablespoon, whisking vigorously until you hit that perfect pourable thickness.
- Not Straining Thoroughly: If you leave even small bits of the dried hibiscus flower in the liquid, your glaze will have a weird, speckled, bumpy texture. Use a very fine mesh sieve and press firmly.
- Glazing a Warm Cake/Donut: The glaze will melt right off and turn into a sticky pool if the baked good isn’t completely cool. Make sure your surface is cooled for a beautiful, set finish.
🌶️ Variations & Customizations
This glaze is delicious as is, but you can definitely give it a personality adjustment if you’re feeling bold.
- Spicy Chili-Lime GlazeMake the glaze as directed. Before serving, whisk in a pinch of cayenne pepper or a small dash of hot sauce (like Cholula). Add a little extra lime zest for a savory-spicy kick. This is incredible on grilled chicken or pork tenderloin.
- Creamy Coconut GlazeSubstitute half of the water in the initial brew with full-fat coconut milk. This makes the glaze opaque, creamier, and adds a subtle tropical note. Perfect for a lemon loaf or a sweet bread.
- Boozy Raspberry GlazeAfter straining the hibiscus liquid and it has cooled, replace 1/2 of the liquid with raspberry liqueur (like Chambord) or a good quality dark rum. The alcohol adds depth and a beautiful aromatic note. Use this on chocolate cake—it’s divine.
❓ FAQ Section: Your Hibiscus Glaze Hot Takes Answered
You’ve got questions about this floral goodness. I’ve got the answers.
What does hibiscus glaze taste like?
It tastes sweet, of course, but the hibiscus adds a beautiful tart, cranberry-like, slightly floral flavor that prevents the glaze from being overwhelmingly sugary.
Where can I buy dried hibiscus flowers?
Look for dried hibiscus flowers (often labeled flor de jamaica) in the Mexican/Latin American aisle of your grocery store, specialty tea shops, or bulk food stores.
Can I use hibiscus tea bags instead of dried flowers?
Yes, you can. Use 2–3 tea bags for the strongest concentration, but the final color might not be as deep and ruby-red as when you use the pure dried flowers.
How long does the glaze take to set?
If you make the consistency correctly (thick, but pourable), the glaze should set and harden in about 30–60 minutes at room temperature.
How do I store leftover hibiscus glaze?
Store leftover glaze in an airtight container in the refrigerator for up to 5 days. You may need to thin it slightly with a few drops of water when you reheat it.
Can I make this with a sugar substitute?
You can use powdered erythritol or monk fruit sweetener (labeled “confectioners'”) instead of powdered sugar. The texture will be slightly different, but the flavor and color will still be great.
Can I use this glaze on savory dishes?
Absolutely! The tartness of the hibiscus makes it a fantastic counterpart to rich meats like ham, chicken wings, or pork chops. Try the spicy chili-lime variation for savory dishes!
Final Thoughts (Glaze with Attitude)
You just made Hibiscus glaze, the prettiest, most delicious glaze in the world. You’ve successfully elevated your baking game from amateur hour to edible art show, all thanks to a dried flower and some sugar. Go drizzle that ruby perfection on everything you own. You’ll never buy a bland bottle of white icing again. Now, are you going to use this on donuts or roast chicken first?

