

Your Wallet (and Taste Buds) Will Thank You: Mastering the Copycat Starbucks Cake Pop
Let’s face it. We’ve all been victims. You walk into Starbucks for a sensible coffee, and then BAM! Your eyes lock onto those adorable, perfectly round, sprinkle-covered little spheres of joy. Before you know it, you’re adding a Starbucks cake pop to your order, because, well, look at them! They’re tiny, they’re cute, and they promise a bite-sized moment of pure bliss. But those little delights add up, don’t they? What if I told you that you could recreate that exact same moist, sweet, frosting-laden magic at home, for a fraction of the cost, and in quantities that would make a barista weep with joy? Yes, my friend, the secret to endless cake pop happiness is here. Prepare for your baking game (and your bank account) to be forever changed.
Why This Cake Pop Recipe Is Your New Obsession

Why DIY when Starbucks exists? Because you deserve unlimited cake pops, that’s why! This recipe nails that signature Starbucks cake pop texture: dense yet tender, perfectly sweet, and coated in a smooth, vibrant candy shell. It’s seriously easier than you think to make. No fancy patisserie skills required! Plus, you get to customize them to your heart’s content. Think about it: sprinkle colors, flavor variations, endless possibilities! They’re perfect for parties, impressing your friends (who will swear you bought them), or just having a secret stash for those inevitable cake pop emergencies. IMO, it’s a public service.
The Good Stuff: Ingredients You’ll Need
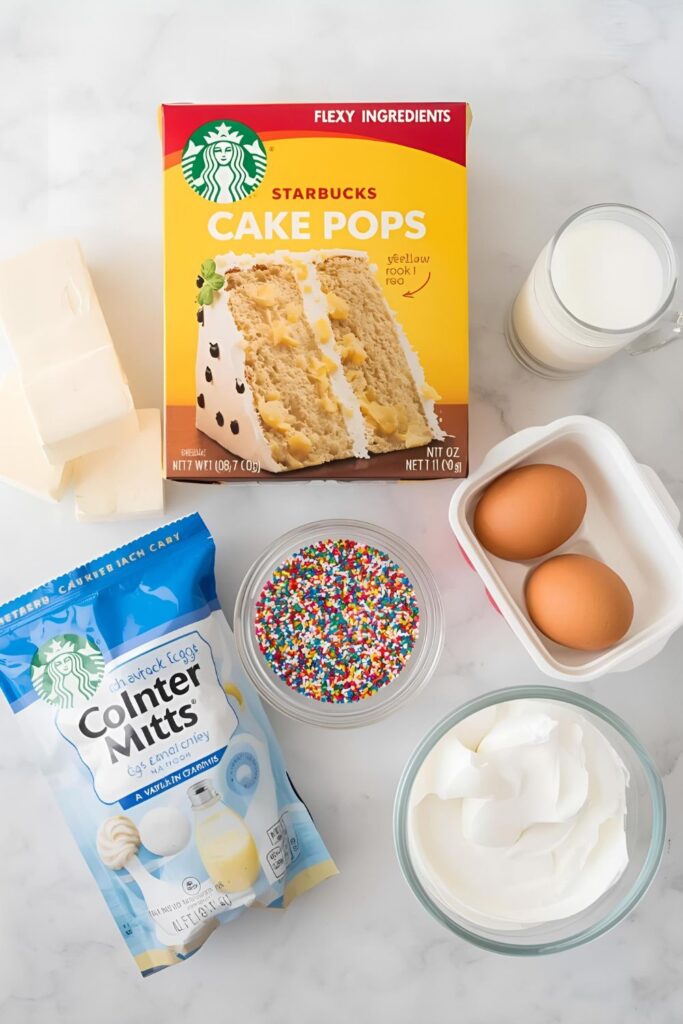
Gather your weapons of mass deliciousness! Most of these ingredients are pretty standard, so you might not even need a grocery run. We’re keeping it simple for maximum success.
- 1 box yellow cake mix (any brand, about 15.25 oz/432g) – Our trusty shortcut to delicious cake. Substitution: You can bake your favorite homemade yellow cake from scratch, but a box mix saves tons of time!
- 1 (16 oz) container vanilla frosting (store-bought or homemade) – The “glue” that holds it all together. Substitution: Cream cheese frosting for a tangy twist, or chocolate frosting for chocolate cake pops!
- 2 tablespoons unsalted butter, softened – Adds richness to the cake mix (if using box mix).
- 1 cup milk – For the cake mix. Substitution: Water or buttermilk also works, follow box directions.
- 3 large eggs – Also for the cake mix.
- 1 (16 oz) package white candy melts (or almond bark) – The magical coating. Substitution: White chocolate chips mixed with a tablespoon of coconut oil, but candy melts are much easier to work with.
- Lollipop sticks (4-inch) – Essential for the “pop” factor.
- Sprinkles (your favorite colors!) – For decoration and pure joy.
Tools & Kitchen Gadgets Used

You don’t need a professional bakery setup, but having these gadgets will make your cake pop journey smooth sailing.
- Large mixing bowl: For combining cake and frosting.
- Electric mixer (stand or hand-held): Makes mixing the cake batter a breeze.
- 9×13 inch baking pan: For baking the cake.
- Foil or plastic wrap: For covering the cake ball mixture.
- Cookie scoop (1.5 tablespoon size): For perfectly uniform cake balls. This is key!
- Baking sheets: For chilling the cake balls.
- Parchment paper or silicone baking mats: Prevents sticking.
- Microwave-safe bowl or double boiler: For melting candy melts.
- Deep, narrow glass or mug: For dipping cake pops efficiently.
- Styrofoam block or cardboard box with holes: For drying the dipped cake pops upright.
Step-by-Step Instructions: Your Path to Cake Pop Stardom
Ready to create these adorable little masterpieces? Follow these steps, and you’ll be a cake pop pro in no time. Don’t worry, even if they’re not perfect, they’ll still be delicious.
- Bake the Cake: Prepare your yellow cake mix according to the package directions, using the butter, milk, and eggs specified above. Pour the batter into a greased 9×13 inch baking pan. Bake as directed, until a toothpick inserted into the center comes out clean. Let the cake cool completely in the pan. Patience, young grasshopper!
- Crumble Time!: Once the cake is fully cooled (this is CRUCIAL!), crumble it directly into your large mixing bowl. Use your hands to make sure there are no large chunks left. You want fine crumbs, like sandy beach material.
- Mix in the Frosting: Add about half of the vanilla frosting to the cake crumbs. Use your hands (yes, get in there!) to mix and squish everything together until it forms a thick, play-dough-like consistency. It should hold its shape when squeezed. If it feels too dry, add a bit more frosting, a spoonful at a time, until perfect. Do not add too much!
- Roll into Balls: Using your cookie scoop, portion out the cake mixture and roll it firmly into 1.5-inch balls. Place these balls on a parchment-lined baking sheet. This firm rolling is important to prevent cracking later.
- Chill Out: Once all your cake balls are formed, place the baking sheet in the refrigerator for at least 30 minutes (or freezer for 15 minutes). This helps them firm up, which makes dipping much easier.
- Melt the Candy Melts: While your cake balls chill, melt your white candy melts. You can do this in a microwave-safe bowl in 30-second intervals, stirring well after each, until smooth and fluid. Alternatively, use a double boiler. Transfer the melted candy to a deep, narrow glass or mug – this makes dipping easier.
- Dip Time!: Now for the fun (and sometimes messy) part! Take one lollipop stick, dip about 1/2 inch of the stick into the melted candy, and then insert it about halfway into a chilled cake ball. This acts as glue.
- The Big Dip: Immediately dip the entire cake pop into the melted candy coating. Gently tap the stick against the rim of the glass to shake off any excess coating. Don’t swirl it around too much, just a quick dip and tap.
- Sprinkle & Set: While the coating is still wet, sprinkle with your favorite sprinkles. Immediately insert the stick into your Styrofoam block or cardboard box to dry upright. Repeat with all remaining cake pops.
- Final Set: Let the cake pops set completely at room temperature for about 30-60 minutes, or in the fridge for 15-20 minutes, until the coating is hard. Then, try not to eat them all at once!
Calories & Nutritional Info

You just baked a dessert that’s arguably cuter than a baby sloth. Here’s a rough idea of the deliciousness you’ve created.
- Serving Size: 1 cake pop (recipe makes approximately 24-30 cake pops)
- Estimated Calories per serving: ~180-220 calories (varies based on cake mix, frosting, and coating)
- Sugar: Pretty high, let’s be honest. It’s a treat!
- Fat: Moderate, from frosting and candy melts.
- Carbohydrates: The main event here.
- Nutritional Note: This is a TREAT, people! It’s not a health food, but it’s definitely a happiness food. Indulge responsibly.
Common Mistakes to Avoid (Unless You Love Cake Pop Catastrophes)
Cake pops can be finicky, but most issues are avoidable. Learn from my past kitchen disasters so your journey is smooth and sprinkle-filled!
- Warm Cake: DO NOT mix frosting into warm cake crumbs. The frosting will melt, and you’ll end up with a greasy, impossible-to-roll mess. Ensure your cake is completely cooled.
- Too Much Frosting: This is the most common culprit for cake pops falling off sticks. Start with half the frosting and add more only if the mixture is too dry to form a ball. Too much frosting makes the balls too soft and heavy.
- Not Chilling: Skipping the chilling step is a recipe for disaster. Warm cake balls will crumble, melt into the candy coating, and generally make you want to cry. Firm balls equal easy dipping.
- Water in Candy Melts: Water is the enemy of melted chocolate/candy melts! Even a tiny drop can cause them to seize up and become a grainy mess. Ensure your bowls and utensils are perfectly dry.
- Over-Thick Coating: If your candy melts are too thick, they won’t give a smooth finish and will create a heavy coating. Thin them out with a tiny bit of vegetable shortening (like Crisco) or paramount crystals, a teaspoon at a time. Do NOT use water!
- Not Letting the “Glue” Set: That little dip of the stick into melted candy before inserting it into the cake ball? That’s your glue. Give it a few seconds to set before dipping the whole pop, or it might slide right off.
Variations & Customizations: Your Cake Pop Playground
The classic vanilla is fantastic, but why stop there? Let your imagination run wild with these fun cake pop twists!
- Chocolate Obsession: Use a chocolate cake mix and chocolate frosting. Dip in dark chocolate candy melts and sprinkle with mini chocolate chips or cocoa powder. So decadent!
- Red Velvet Dream: Opt for a red velvet cake mix and pair it with cream cheese frosting. Dip in white candy melts and decorate with red sprinkles or finely crushed red velvet crumbs.
- Seasonal Flavors: In the fall, use a spice cake mix and add a pinch of pumpkin pie spice to the frosting. Dip in white or even orange candy melts and top with fall-themed sprinkles. For spring, lemon cake mix with lemon frosting!
- Cookie Dough Cake Pops: Mix in 1/4 cup mini chocolate chips into your cake ball mixture. You get a fun, chewy texture with a hint of cookie flavor.
- Boozy Bites: For adults only! Add 1-2 tablespoons of a complementary liqueur (like Kahlua for chocolate, or Grand Marnier for vanilla) to your frosting mixture before combining with the cake crumbs.
FAQ Section: Your Most Pressing Cake Pop Queries, Answered!
Still got questions about perfecting your cake pop game? Don’t worry, I’ve got the answers to keep you out of sticky situations.
Q1: How do I get my cake pops perfectly smooth?A: The key is a smooth, fluid candy melt coating (thin with shortening if needed) and a gentle, quick dip and tap. Avoid over-tapping, which can create dimples. Smooth, firmly rolled cake balls also help!
Q2: How far in advance can I make cake pops?A: You can make the cake balls and chill them for up to 2-3 days before dipping. Once dipped, cake pops will last at room temperature for about 5-7 days or in the refrigerator for up to 2 weeks.
Q3: Can I freeze cake pops?A: Yes! You can freeze undipped cake balls for up to 1 month. Once dipped, you can also freeze finished cake pops for up to 2-3 weeks in an airtight container. Thaw them in the fridge overnight or at room temperature.
Q4: Why are my cake pops cracking after dipping?A: This often happens if the cake ball is too cold when dipped into warm coating, causing a temperature shock. Let chilled cake balls sit at room temperature for 10-15 minutes before dipping. Also, too much frosting can cause this!
Q5: What’s the best way to melt candy melts without them seizing?A: Use a microwave in 30-second intervals, stirring thoroughly between each, or a double boiler over simmering (not boiling) water. Ensure no water gets into the melts! If they are too thick, thin with a touch of shortening or paramount crystals.
Q6: My cake pops are falling off the stick! Help!A: This is usually because the cake ball mixture is too soft (too much frosting) or not chilled enough. Also, make sure you’re using that little bit of melted candy to “glue” the stick in before the main dip.
Q7: Can I use regular chocolate chips instead of candy melts?A: You can, but it’s trickier. Chocolate chips need a tablespoon or two of coconut oil or shortening melted with them to create a thin enough consistency for dipping. Candy melts are formulated to melt smoothly without extra additives.
Final Thoughts: Your New Bakery Is Open!
And there you have it, folks! You just mastered the art of the Starbucks cake pop, transforming humble cake mix into adorable, irresistible little spheres of joy. You’ve bypassed the fancy coffee shop queue, saved some cash, and gained some serious baking bragging rights. Go ahead, make a huge batch, impress everyone you know, and maybe (just maybe) eat a few in secret. Your journey to becoming a cake pop legend starts now. Don’t forget to show off your creations!

