

Graveyard Gourmet: The Ultimate, Spookiest Halloween Board Recipe
Let’s be honest, Halloween is all about the aesthetic. You could spend three weeks crafting a hyper-realistic vampire costume, or you could spend thirty minutes crafting a hyper-realistic edible masterpiece that will actually make your guests gasp (and then immediately eat it). I choose the edible route, always. Forget slaving over tiny individual appetizers; we’re embracing the art of the graze with the ultimate, spookiest Halloween board. This isn’t just a cheese plate wearing a cheap plastic witch hat; this is a thoughtfully curated, color-themed, utterly viral-worthy platter of treats and savory bites. Get ready to impress your friends and prove that you are, in fact, the host with the most creatively unsettling snacks.
Why This Halloween Board Will Cast a Spell on Your Party

Why is a Halloween board the absolute best party trick you can pull? Because it’s high-impact, low-effort, and delivers on the core Halloween promise: fun food.
First, the visual shock factor is immense. We’re leaning heavily into the black, orange, and purple palette, adding creepy crawlies (the edible kind!), and creating easy, gruesome shapes. It looks like you spent hours on a complex theme, but you essentially just arranged groceries. Who needs cooking skills when you have dramatic flair?
Second, it’s the ultimate party appetizer. Grazing boards encourage mingling, conversation, and less stress for you. No need to keep anything warm or time anything perfectly. You put it out, people eat it, and you get all the compliments. Plus, you can sneak in some genuinely delicious, non-spooky elements like gourmet cheese and fresh fruit.
Finally, it’s totally customizable to your crowd. Hosting adults who prefer charcuterie? Load it with spooky meats and dark cheeses. Got a horde of trick-or-treaters? Fill it with spooky sweets. This Halloween board is a blank, beautiful canvas of impending doom (and deliciousness).
Ingredients: Black, Orange, and Creepy Delights
We are strategically choosing foods that fit the eerie theme without tasting weird. Think color, texture, and a touch of the macabre.
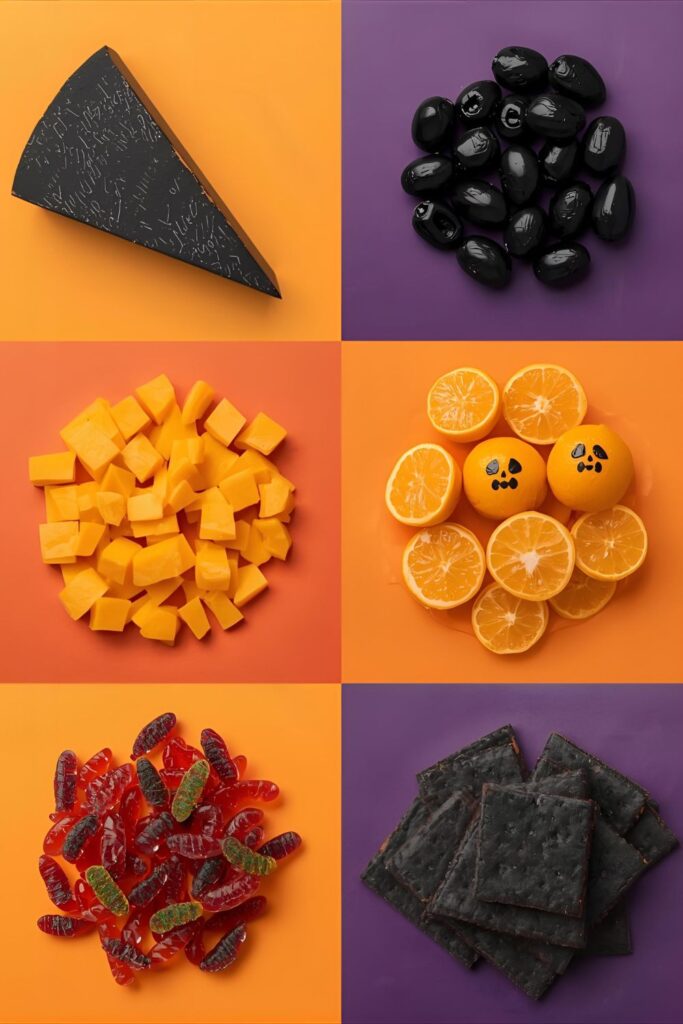
- The Cheeses (The Ghoulish Goodness):
- Dark Cheese: 4 oz Black Wax Cheddar or Black Garlic Cheese (or plain Brie topped with black sesame seeds)
- Orange Cheese: 4 oz Sharp Orange Cheddar, cubed
- White Cheese: 4 oz Goat Cheese Log, unwrapped (Use toothpicks/olives to make little “ghosts”!)
- The Savory Spooks:
- Meats: 4 oz Prosciutto (thinly sliced, crumpled for a “skin-like” texture)
- Dips: Guacamole (served in a small bowl with olive slices to resemble a Frankenstein face)
- Vegetables: Black olives, purple carrots, and blanched broccoli florets (for a “mossy” look)
- The Crunch and Creepy Crawlies:
- Crackers: Black crackers (charcoal or dark rye) and simple butter crackers
- Salty: Pretzel sticks (to serve as “bones” or “wands”)
- Fillers: Black grapes, blackberries, and clementines (Draw jack-o’-lantern faces on the clementine peels!)
- The Sweet Side of Fear (Optional):
- Candy: Gummy worms, candy corn, and dark chocolate chips
- Drizzle: Balsamic glaze (drizzled over Brie to look like blood)
Key Substitutions: No black cheese? Use blue cheese with visible mold veins for a wonderfully unsettling look. Vegetarian swap? Omit the meats and use spooky savory elements like marinated black beans or purple potato chips. Do not substitute the Guacamole—its green color is crucial for the Frankenstein dip or a bowl of “slime.”
Tools & Kitchen Gadgets Used
You don’t need a haunted kitchen, but a few basics help create the spooky magic.
- Large Wooden Board or Black Slate Platter: Essential! The black slate really makes the colors pop.
- Small Ramekins/Bowls: For dips, olives, and guacamole.
- Sharp Paring Knife: For slicing cheese and carving scary faces into carrots or peppers.
- Toothpicks/Skewers: For assembling tiny olive spiders or cheese ghosts.
- Small Halloween Cookie Cutters (Optional): For cutting cheese or salami into bat/ghost shapes.
- Cheese Knives and Spreaders: So guests can, you know, eat the food.
- Fine-Tip Black Marker (Food Grade): For drawing faces on clementines or marshmallows.
Step-by-Step Instructions: Assembling Your Edible Nightmare
Follow these steps precisely to ensure maximum visual impact and structural integrity. Remember, we are filling every square inch!
H3: Step 1: Anchor the Scary Dips
First, place your serving bowls and ramekins on the board. Fill one with Guacamole and immediately create the Frankenstein face using strategically placed sliced black olives for the eyes and a mouth. Drizzle the Balsamic Glaze into a small ramekin. Anchor the cheeses next, spacing them around the bowls.
H3: Step 2: Slice the Cheeses and Add Color
Slice the Orange Cheddar into cubes. If using Brie, cut a wedge and drizzle the Balsamic Glaze over the white surface, making it look like a bleeding heart (so romantic!). Cube the Black Cheddar and scatter it near the orange pieces. Create the Goat Cheese Ghosts using toothpicks and small black olive pieces for eyes.
H3: Step 3: Layer the Meats and Skeletons
Crumple the Prosciutto loosely into piles—the texture looks disturbingly like skin. Roll the Salami slices and arrange them near the crackers. Use the pretzel sticks to form small, crude “bone piles” or a simple “skeleton outline” across a section of the board.
H3: Step 4: Add the Fruit and Fillers
Fill in large sections of the board with the black grapes, blackberries, and purple carrots. The carrots add a wonderful contrast. Draw simple, spooky jack-o’-lantern faces onto the peels of your clementines with the food-grade marker and place them randomly across the board for pops of orange.
H3: Step 5: The Final Spooky Details
Fill every remaining gap with crackers, gummy worms, and dark chocolate chips. The gummy worms look suitably unsettling draped over the cheese or dangling from a pile of fruit. Cluster the black olives and, if you’re feeling ambitious, use toothpicks to stick them together to make tiny edible spiders. Place the blanched broccoli in a corner to look like a patch of moss or swamp.
H3: Step 6: Serve and Scream (Just a Little)
Take a picture—you nailed it! Serve immediately and watch your friends hover. This board is best enjoyed at room temperature. Don’t worry about keeping it perfectly neat; messy grazing is part of the fun!
Calories & Nutritional Info (Estimated Per Serving – 1/8th of Board)
This is a broad estimate for a large, varied board, divided into eight moderate servings. Calorie density varies heavily based on the ratio of candy to cheese/meat.
- Calories: ~450-600 kcal
- Protein: ~20-30g (From cheese and meat/dips)
- Fats: ~30-40g (From cheese, nuts, and meats)
- Carbohydrates: ~40-60g (From crackers, fruit, and candy)
- Nutritional Notes: A fun, indulgent mix! You get protein and calcium from the cheese, and vitamins/fiber from the fruit and vegetables.
Common Mistakes to Avoid (Unless You Want a Lame Halloween)
Your board is a reflection of your commitment to the spooky season. Don’t ruin it with these mistakes!
- Ignoring the Color Theme: Stick to black, dark purple, and orange! A successful Halloween board relies heavily on this palette. Avoid bright blues or yellows (unless they are a specific scary accent).
- Using Wet Items Directly on the Board: Never place dips, olives, or jams directly on the wood. The moisture will make your crackers soggy and ruin the integrity of the board. Use ramekins!
- Pre-Cutting Everything: Leave some cheese blocks intact and arrange the fruit/meats in different piles (some rolled, some loose, some on the vine) to create visual interest and texture. Too many uniform cubes are boring!
- Forgetting the Heights: Use the ramekins and bowls to add height. You can also place the Brie on a stack of crackers. Different heights make the board look more professional and dynamic.
- Under-Greasing the Board: Okay, not literal grease, but under-filling the board is the biggest mistake. Fill every crack and crevice with small things (olives, chocolate chips, nuts, small candies) to achieve that desired “lush” look.
Variations & Customizations: Haunted Hacks
You can easily adjust the board to fit your party’s needs—from healthy snacks to a total sugar rush.
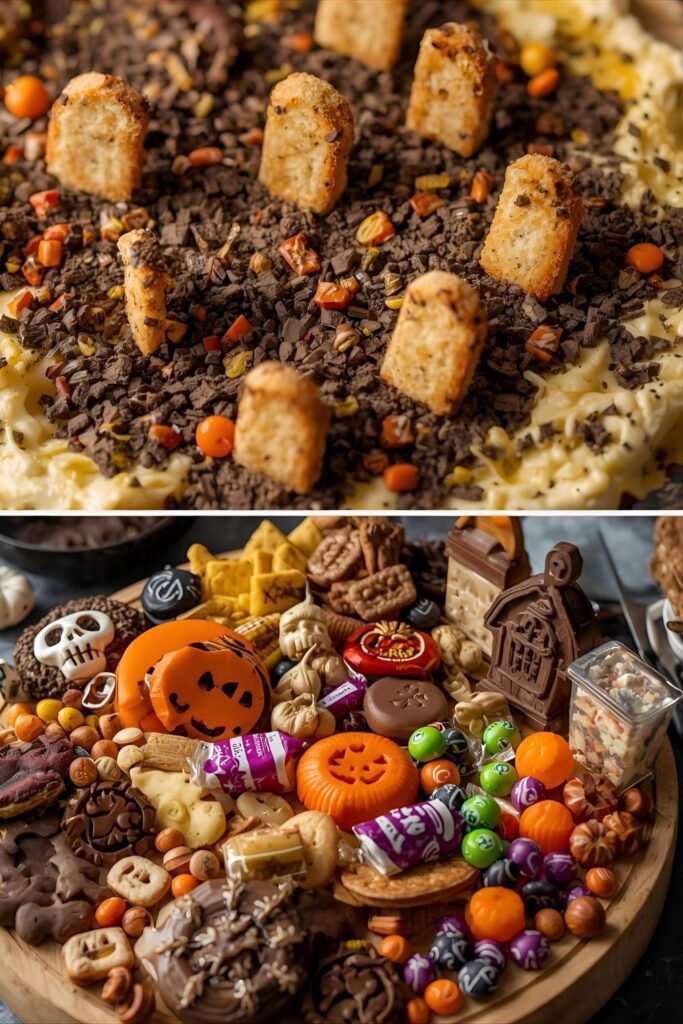
H3: The Savory “Graveyard” Appetizer Board
Skip all the candy and focus on the charcuterie side. Use a soft cheese log (like cream cheese) smoothed flat, then sprinkle crushed dark rye bread/oregano/thyme over it to look like dirt. Stick small, savory crackers into the “dirt” to act as edible headstones. Use the Guacamole Frankenstein as the centerpiece.
H3: The Keto-Friendly Crypt
Replace all crackers, pretzels, candy, and grapes with nut and seed crackers, celery sticks, cucumber slices, and walnuts. Use a small bowl of pimento cheese dip (low carb!) and high-fat meats like pepperoni and cured sausage. For sweetness, use sugar-free dark chocolate chips. Spooky and skinny!
H3: The “Dessert Graveyard” Candy Board
Forget the savory! Use a base of marshmallows, chocolate wafers, mini donuts, and small cookies. Use a frosting to “glue” chocolate wafers into gravestones and write “RIP” on them. Melt chocolate for a “blood” drizzle. Use the gummy worms and candy corn aggressively! This one is for the kids (and the kid in all of us).
FAQ Section: Spooky Snack Solutions
H3: How far in advance can I build the Halloween board?
You can prep and slice all the non-perishable items (meats, hard cheese, crackers) up to 24 hours in advance. Do the final assembly and add the fruits, soft cheese, and dips no more than 1 hour before serving for the freshest look and flavor.
H3: What is the best way to keep the guacamole from browning?
Press a layer of plastic wrap directly onto the surface of the guacamole in the ramekin, ensuring no air touches it. You can also spray the top lightly with a bit of lime juice.
H3: What is the best way to serve the board for a large party?
Use two smaller boards instead of one giant one, placing them on opposite ends of the serving area. This prevents crowding and ensures everyone has access to the spooky snacks!
H3: Can I use different dips, like hummus or pimento cheese?
Yes! Use any dip that fits the color scheme. Black bean hummus is great for the “dirt” look, and pimento cheese (orange) fits the theme perfectly. Just remember to use ramekins!
H3: How much meat and cheese do I need for a party of 10?
If this board serves as the main appetizer, aim for about 15-20 ounces of cheese total (5-6 varieties) and 10-12 ounces of cured meat (3-4 varieties). Always have more crackers and fruit than you think you need.
H3: Is it okay to use pre-cut cheese?
You can use pre-cut cubes of hard cheese (like cheddar) for convenience. However, buy soft cheeses whole (like Brie or goat cheese) and cut them yourself for better presentation and freshness.
H3: Should the board be refrigerated?
Only if you assemble it more than an hour ahead of time. Serve the board at room temperature for optimal cheese flavor and texture. Don’t leave it out for more than 4 hours.
Final Thoughts: The Ghost with the Most
You’ve officially graduated to Graveyard Gourmet status! You created the most visually stunning, delicious, and low-effort Halloween board imaginable. Go enjoy your party, accept the well-deserved compliments, and remember, you didn’t even turn on the oven! That, my friend, is a true Halloween miracle. Share your spooky creation—I want to see those terrifyingly good snacks!

