

The Ultimate Sheet Pan Nachos for Your Next Lazy Night (or Party!)
Let’s cut to the chase. You want nachos. You don’t want to mess with individual plates, or that sad, soggy pile from the takeout joint. You want a glorious, sprawling landscape of crispy chips, melted cheese, and all your favorite toppings, baked to perfection. And you want it fast, with minimal cleanup. My friend, you are craving Sheet pan nachos, and I’m here to deliver.

This isn’t just a recipe; it’s a declaration of culinary independence. It’s permission to be lazy, messy, and utterly satisfied. Forget fancy plating; we’re embracing the beautiful chaos of a giant tray of cheesy goodness. Prepare to redefine your weeknight dinners, game day snacks, and general life happiness.
Why These Nachos Are Your New Best Friend
Still thinking about that sad little plate of chips and cheese from the sports bar? Please. Let’s talk about why this sheet pan version is superior.

First, they deliver maximum crunch-to-topping ratio. No more fighting over the one chip that actually has all the good stuff. With the sheet pan method, every single chip gets a fair shot at being loaded with cheese, meat, and veggies. It’s democratic nachos, if you will.
Second, the cleanup is shockingly easy. Seriously. Line that pan with parchment paper, and you’re basically done before you even start. Plus, it’s one glorious platter for everyone to dig into, minimizing dishes. Who doesn’t love that?
Finally, they are infinitely customizable and perfect for a crowd. Got picky eaters? Want to go all-out gourmet? These nachos don’t judge. You can layer on whatever your heart desires, and because they cook all together, they are ready at the same time. It’s the ultimate party food or the perfect solution for a “I can’t even” kind of night.
The Essential Ingredients (And Some Awesome Ideas)
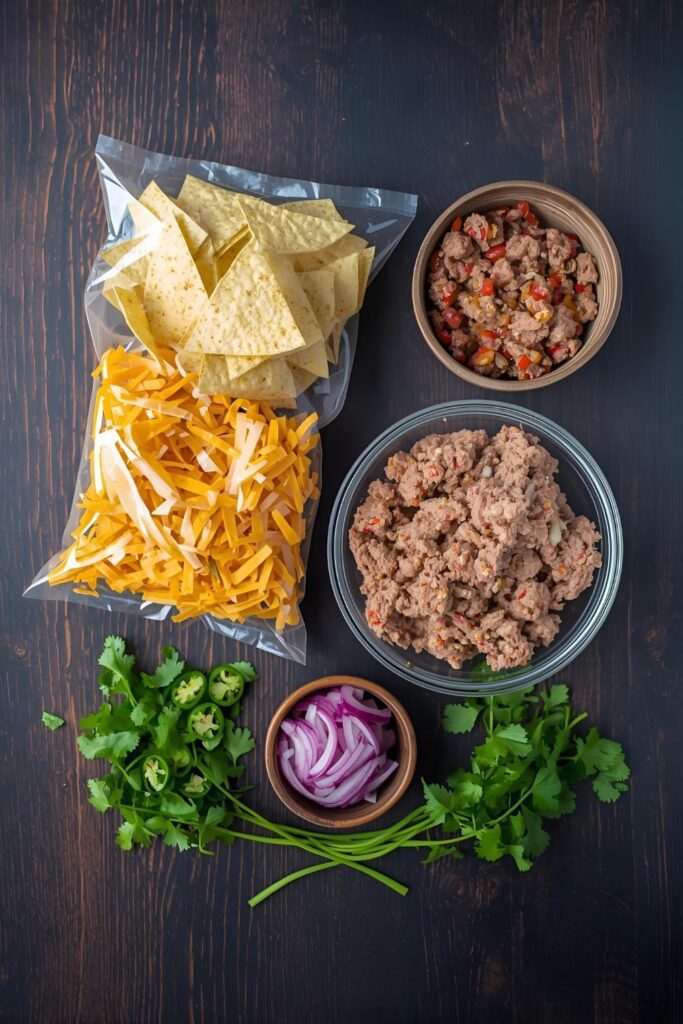
Here’s your shopping list. Feel free to use this as a jumping-off point for your nacho masterpiece.
The Foundation:
- Tortilla Chips: 1 large bag (about 13-16 ounces) – Choose sturdy, restaurant-style chips. Thin ones get soggy.
- Shredded Cheese: 2-3 cups (about 8-12 ounces) – A good blend of Monterey Jack, cheddar, or a Mexican blend. Freshly shredded melts best!
The Protein Power-Up (Choose one, or don’t!):
- Ground Beef or Turkey: 1 lb, seasoned with taco seasoning.
- Shredded Chicken: 2 cups, cooked (rotisserie chicken works wonders here).
- Black Beans: 1 can (15 ounces), rinsed and drained.
The Veggie & Flavor Boosters (Pick your favorites!):
- Diced Onion: 1/2 cup (red or white).
- Diced Bell Pepper: 1/2 cup (any color).
- Jalapeños: Sliced (fresh or pickled, to taste).
- Corn: 1/2 cup (fresh, canned, or frozen and thawed).
- Salsa: 1/2 cup (your favorite kind).
The “After Baking” Dream Team (Don’t forget these!):
- Sour Cream or Greek Yogurt: For cooling creaminess.
- Guacamole or Diced Avocado: Because avocados are life.
- Fresh Cilantro: Chopped, for brightness.
- Pico de Gallo or Extra Salsa: More fresh flavor.
- Lime Wedges: A squeeze of fresh lime juice makes everything pop.
The Tools for Your Nacho Nirvana
You probably already own everything you need for this culinary triumph.
- Large Sheet Pan (Baking Sheet): A half-sheet size (13×18 inches) is ideal for spreading everything out.
- Parchment Paper: Seriously, this is your best friend. It makes cleanup virtually non-existent.
- Large Mixing Bowl: If you’re mixing meat with seasoning.
- Frying Pan/Skillet: For cooking any meat.
- Oven: Obvious, but important!
Step-by-Step to Nacho Greatness
Follow these simple steps, and you’ll be diving into cheesy bliss in no time.
Step 1: Preheat & Prep Your Pan
Preheat your oven to 400°F (200°C). Line your large sheet pan with parchment paper. This is the secret weapon for easy cleanup, FYI.
Step 2: Cook Your Protein (If Using)
If you’re using ground beef or turkey, cook it in a skillet over medium-high heat, breaking it up with a spoon, until it’s browned. Drain any excess fat. Stir in your taco seasoning according to package directions. If using shredded chicken or beans, just make sure they’re ready to go.
Step 3: The First Layer of Chips & Cheese
Spread about half of your tortilla chips in a single layer over the parchment-lined sheet pan. Try not to overlap them too much initially. Sprinkle about half of your shredded cheese evenly over these chips.
Step 4: Add the Good Stuff
Distribute about half of your cooked protein (or beans/corn) and half of your chosen veggies (like onion, bell pepper, jalapeños) over the first layer of cheese and chips.
Step 5: The Second Layer (Repeat the Magic!)
Now, add the remaining tortilla chips on top, spreading them out as best you can. Sprinkle the remaining shredded cheese, followed by the rest of your protein and veggies. Yes, we are layering for maximum flavor distribution. This is important!
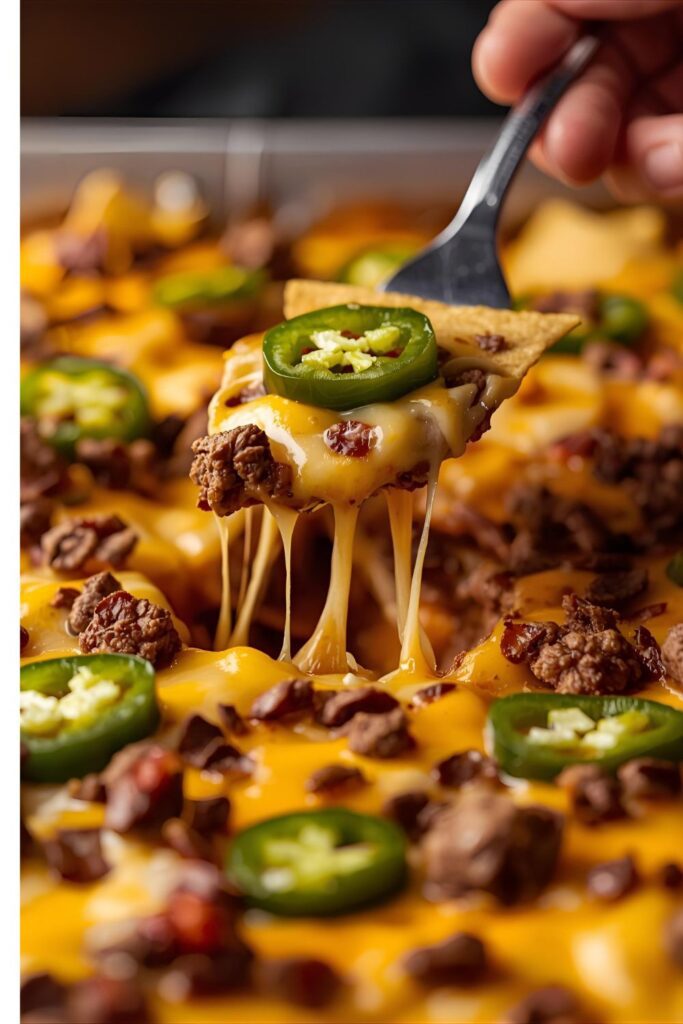
Step 6: Bake ‘Em Up!
Place the sheet pan in your preheated oven and bake for 8-12 minutes. You want the cheese to be completely melted and bubbly, and the edges of some chips to be slightly golden brown. Keep a close eye on them to prevent burning!
Step 7: The Grand Unveiling & Topping Time
Carefully remove the sheet pan from the oven. Let it cool for just a minute or two. Now for the fun part: load it up with your “after baking” dream team! Dollop on sour cream or Greek yogurt, scoop generous amounts of guacamole, sprinkle fresh cilantro, and maybe a dash of pico de gallo. Don’t forget those lime wedges for a squeeze of brightness.
Step 8: Dive In!
Serve directly from the sheet pan. No plates needed, just a bunch of hungry hands. Prepare for utter deliciousness and inevitable finger-licking.
Calories & Nutritional Info (The Delicious Truth)
Nachos are hearty comfort food. They’re meant to be indulgent.
- Calories: Approximately 400-600 kcal per serving (based on 4-6 servings, highly dependent on toppings).
- Fat: Around 25-40g.
- Carbohydrates: Roughly 30-50g.
- Protein: About 15-30g.
- The Takeaway: This is a satisfying meal or a very generous snack. Enjoy it without guilt, IMO.
Common Mistakes to Avoid (Nachos No-Nos)
Even something as glorious as nachos can go wrong. Learn from my mistakes, so you don’t have to.
- The Single-Layer Sadness: Don’t just dump all your chips in one flat layer and all the toppings on top. You’ll end up with a few loaded chips and a whole lot of naked ones. Layering is key for even topping distribution.
- Using Thin Chips: Those flimsy, delicate chips? They will not survive the oven. They’ll get soggy and sad. Choose sturdy, thick-cut tortilla chips that can stand up to the heat and all those delicious toppings.
- Overcrowding the Pan: Trying to cram too many chips or toppings onto one sheet pan will prevent even cooking and melting. Give everything a little breathing room. If you’re making a huge batch, use two sheet pans.
- Putting Everything in the Oven: Some toppings, like sour cream, guacamole, and fresh cilantro, do NOT belong in the oven. They get weird and gross when heated. Add them after baking for optimal freshness and flavor.
- Burning the Chips: Keep an eye on your oven! Chips can go from perfectly golden to charred charcoal in a blink. Every oven is different, so start checking at the 8-minute mark.
Variations & Customizations (Your Nacho, Your Rules)
This recipe is a blank canvas. Get creative!
- Breakfast Nachos: Scramble some eggs with sausage or bacon. Use crispy potato slices or tater tots instead of tortilla chips. Top with cheddar, green onions, and a dollop of hot sauce. Brunch, anyone?
- BBQ Chicken Nachos: Use shredded BBQ chicken (toss cooked chicken with your favorite BBQ sauce). Top with cheddar, red onion, and a drizzle of ranch or extra BBQ sauce after baking.
- Vegan Supreme Nachos: Use plant-based “meat” crumbles or extra black beans and corn. Swap regular cheese for your favorite vegan shredded cheese blend. Top with vegan sour cream or cashew cream, guacamole, and salsa.
FAQ: Your Nacho Niggles, Solved
Here are the answers to some of the most pressing nacho questions.
1. What kind of cheese melts best for nachos?
A good blend of Monterey Jack, cheddar, or a pre-shredded Mexican blend works wonderfully. Freshly shredded cheese always melts smoother than pre-shredded because it lacks anti-caking agents.
2. Can I make sheet pan nachos ahead of time?
You can do some prep work, like cooking the meat and chopping veggies, but don’t assemble and bake until you’re ready to serve. Nachos are best eaten fresh from the oven.
3. How do I prevent soggy nachos?
Layering is key! This ensures toppings are distributed. Also, use sturdy tortilla chips and put wet toppings (like salsa, sour cream, guacamole) on after baking.
4. What’s the best way to reheat leftover nachos?
Honestly, nachos are best fresh. Reheating often leads to soggy chips. If you must, spread them on a new sheet pan and pop them back in a 300°F (150°C) oven or a toaster oven until warmed through and re-crisped. Avoid the microwave at all costs!
5. Can I use a different type of meat?
Absolutely! Ground pork, shredded pork carnitas, or even steak work beautifully. Just make sure whatever meat you choose is fully cooked and seasoned before adding it to the chips.
6. Should I put salsa on before or after baking?
It depends on the salsa! If it’s a very watery salsa, add it after baking to avoid soggy chips. If it’s a thicker, less liquidy salsa, you can put a little on before baking for an extra flavor layer.
7. What’s the best way to get even cheese melt?
Spread your cheese out as evenly as possible and use two layers of cheese. If your cheese isn’t melting perfectly, cover the pan loosely with foil for the last few minutes of baking to trap heat.
Final Thoughts
You are now a certified master of the sheet pan nacho. You’ve conquered the art of cheesy, crispy, loaded goodness with minimal effort and maximum reward. This recipe isn’t just a meal; it’s an experience, a tradition, and a testament to the fact that sometimes, the best things in life are also the messiest.
So go forth, load up that sheet pan. Invite some friends over, or just embrace a solo nacho night. And revel in the fact that you just made something infinitely better than anything you could order. You’re welcome.

