

These No-Bake Peanut Butter Bars Are Dangerously Addictive
Let’s be honest, the combination of chocolate and peanut butter is the undisputed heavyweight champion of the flavor world. It’s a partnership more iconic and beloved than any celebrity couple. The craving for that perfect salty-sweet, creamy-chocolatey union can be all-consuming. But who has the time or the inclination to bake something truly worthy of this legendary duo? My friend, I present to you the ultimate solution: a ridiculously easy recipe for No-bake bars.

This isn’t just a simple dessert. This is a life hack. We’re talking about rich, decadent, chocolate-topped peanut butter bars that taste like a giant, homemade Reese’s Cup. And the best part? Your oven can sit this one out.
Why This Recipe is an Absolute Must-Make
The most glorious thing about these bars is the no-bake aspect. Whether it’s a scorching hot day in Khulna or you just view your oven with deep suspicion, this recipe is your best friend. It keeps your kitchen cool and your stress levels low. The entire operation is handled by your microwave and your refrigerator.

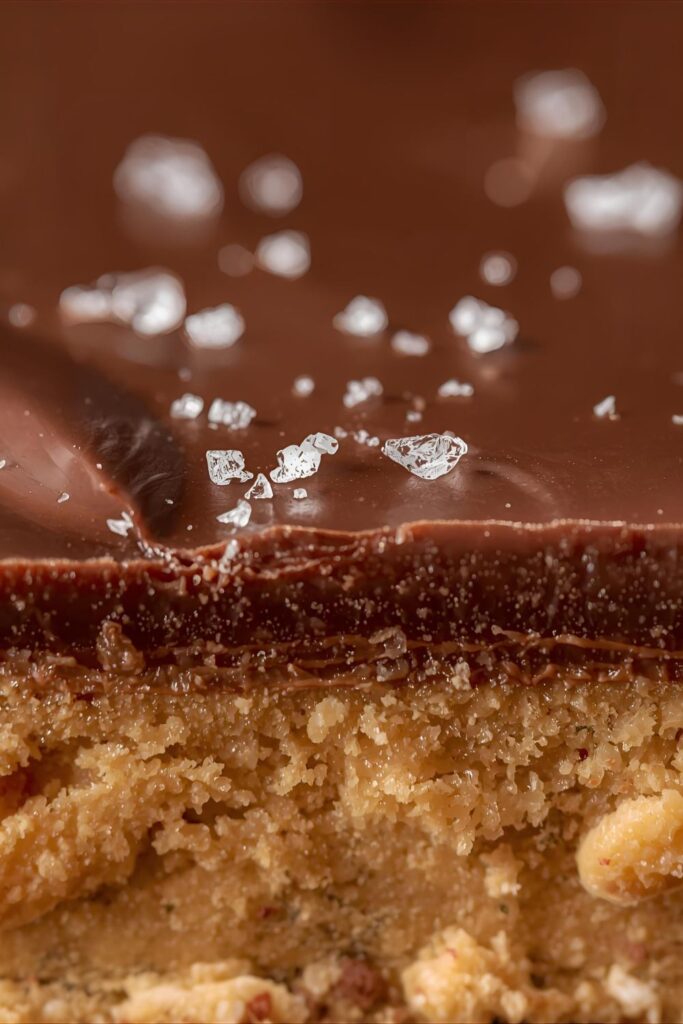
But let’s get to the taste, because it is outrageously delicious. The base is a dense, sweet, and salty peanut butter layer that’s almost like a fudge. The topping is a smooth, rich layer of chocolate that snaps ever so slightly when you bite into it. They are dangerously addictive, and you will not be able to eat just one.
IMO, the effort-to-praise ratio is off the charts. You can whip these up in about 20 minutes of active time, and the rest is just hands-off chilling. You’ll walk into any party or potluck with a pan of these, and I guarantee you’ll walk out with an empty pan and a dozen new fans asking for the recipe.
The Simple Ingredients You’ll Need
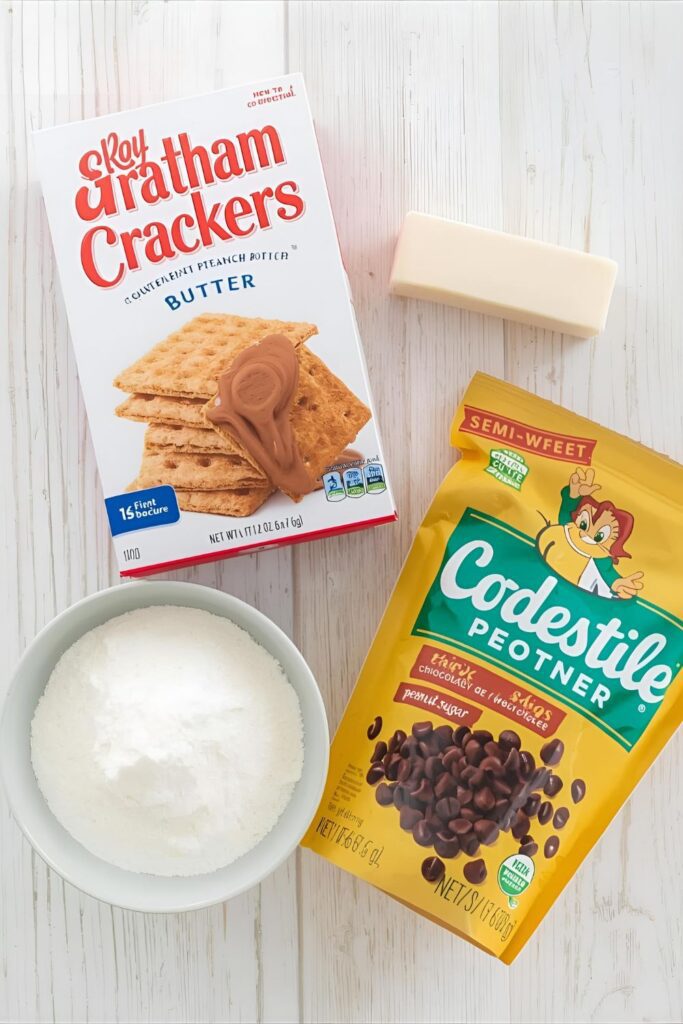
This recipe is a testament to the power of a few simple, perfect ingredients working together in harmony.
For the Peanut Butter Base:
- Unsalted Butter: 1/2 cup (1 stick), melted.
- Graham Cracker Crumbs: 1 ½ cups. You can buy them pre-crushed or pulverize about 10-12 full sheets yourself.
- Powdered Sugar: 1 cup.
- Creamy Peanut Butter: 1 cup. Use a standard commercial brand like Skippy or Jif for the best texture.
For the Chocolate Topping:
- Semi-Sweet Chocolate Chips: 1 ½ cups.
- Creamy Peanut Butter: 2 tablespoons. This is the secret ingredient that keeps the chocolate topping from getting rock-hard, making the bars easy to slice.
Tools & Kitchen Gadgets Used
You don’t need any fancy equipment to create this masterpiece.
- An 8×8-inch or 9×9-inch Square Pan: This is the perfect size for thick, satisfying bars.
- Parchment Paper: This is non-negotiable! It allows you to lift the entire block of bars out of the pan for easy, clean cutting.
- A Large Mixing Bowl: For combining the base ingredients.
- A Spatula: For mixing and for spreading the layers smoothly.
- A Microwave-Safe Bowl: For melting the glorious chocolate topping.
Step-by-Step Instructions: Your Path to Peanut Butter Paradise
This is so simple you’ll have it memorized in no time.
- Prepare Your Pan: Line your 8×8 or 9×9-inch pan with parchment paper, leaving a few inches of overhang on two opposite sides. These will be your “handles” later.
- Create the Peanut Butter Base: In your large mixing bowl, combine the melted butter, graham cracker crumbs, powdered sugar, and 1 cup of peanut butter. Mix everything together with a spatula until it’s thoroughly combined and forms a thick, dough-like consistency.
- Press It Down: Scrape the peanut butter mixture into your prepared pan. Using your spatula or your clean hands, press the mixture down firmly and evenly into the bottom of the pan. Get it as flat and compact as you can.
- Make the Chocolate Topping: In your microwave-safe bowl, combine the chocolate chips and the 2 tablespoons of peanut butter.
- Melt to Perfection: Microwave the chocolate mixture in 30-second intervals, stirring well after each one, until it’s completely melted and smooth. The peanut butter helps it melt evenly and prevents it from scorching.
- Spread the Chocolate Love: Pour the melted chocolate mixture over the pressed peanut butter base in the pan. Use your spatula to spread it out into a smooth, even, glorious layer that covers the entire surface.
- The All-Important Chill: This is where the magic happens. Place the pan in the refrigerator and chill for at least 2 hours, or until the chocolate is completely firm and the bars are set.
- Slice and Devour: Once the bars are fully chilled, use the parchment paper handles to lift the entire block out of the pan and onto a cutting board. Let it sit at room temperature for 5-10 minutes to make slicing easier. Use a large, sharp knife to cut into 16 squares.
Calories & Nutritional Info
Here’s a ballpark estimate for one bar, assuming you cut the pan into 16 squares.
- Calories: Approximately 220-260 per bar.
- Fat: Around 15g.
- Carbohydrates: Roughly 20g.
- A Friendly Warning: These are incredibly rich and decadent. They are a treat in the truest sense of the word, so enjoy them!
Common Mistakes to Avoid (For Bar Perfection)
Even no-bake recipes have a few pitfalls. Steer clear of these.
- A Weak, Crumbly Base: If your base layer is falling apart, you didn’t press it down firmly enough. You really need to compact that mixture into a solid foundation so it holds its shape when you cut it.
- The Rock-Hard Chocolate Topping: You know what I’m talking about—the chocolate layer that shatters into a million pieces the second you try to cut it. The secret to avoiding this is adding that little bit of peanut butter or oil to the melting chocolate. It keeps it just soft enough to slice cleanly.
- The Impatient Slice: If you try to cut the bars before they are fully chilled and set, you won’t get clean squares. You’ll get a delicious, gooey mess. Be patient and let the refrigerator do its job.
- Using the Wrong Peanut Butter: For this recipe, a standard commercial creamy peanut butter is best. The natural, oil-on-top kind can separate and make your base greasy or too soft to set up properly.
Variations & Customizations
The classic is perfect, but who doesn’t love a good remix?
- The Salty & Crunchy: Swap half of the graham cracker crumbs for finely crushed pretzels. After spreading the chocolate topping, sprinkle a little flaky sea salt over the top before chilling.
- The Biscoff Sensation: Ditch the graham crackers and use crushed Biscoff cookies for the base. Replace the peanut butter in the base with Biscoff cookie butter spread. It’s a whole different level of delicious.
- The S’mores Bar: Use graham cracker crumbs for the base. Before you pour on the chocolate topping, scatter a cup of mini marshmallows over the peanut butter layer. The warm chocolate will melt them slightly.
FAQ Section: Your No-Bake Bar Bafflements, Solved
H3: How do you cut no-bake bars so cleanly?
The best trick is to let the chilled slab sit at room temperature for about 10 minutes to take the intense chill off. Then, use a large, sharp chef’s knife. For extra clean cuts, you can run the knife under hot water and wipe it dry between each slice.
H3: Can I use a different size pan?
You can. A 9×13-inch pan will work, but it will produce much thinner bars. An 8×8 or 9×9-inch pan is ideal for that classic thick bar.
H3: How should I store these bars?
They must be stored in the refrigerator. In an airtight container, they will last for up to a week. The butter and peanut butter will get too soft if left at room temperature.
H4: Can you freeze no-bake peanut butter bars?
Yes! They freeze perfectly. Cut them into squares and store them in a freezer-safe container, separated by layers of parchment paper. They’ll last for months and are delicious straight from the freezer.
H3: What can I use instead of graham crackers?
Crushed Nilla Wafers, shortbread cookies, digestive biscuits, or even crushed pretzels are all great substitutes.
H3: Why did my peanut butter base seem oily?
This can sometimes happen if you use natural-style peanut butter. A standard, homogenized creamy peanut butter will give you the best, most consistent results for this recipe.
H3: Can I use milk chocolate or white chocolate for the topping?
Absolutely! Milk chocolate will give you a sweeter, creamier topping, while white chocolate would be a delicious and visually striking alternative.
Final Thoughts
You are now the proud owner of a recipe that is, without exaggeration, one of the easiest and most-loved desserts on the planet. You have the power to quell any chocolate-peanut butter craving in about 20 minutes flat, with minimal effort and maximum glory.
So go forth and spread the joy. Make a pan for your friends, for your family, or just for yourself. You’ve earned it. And you’ll never look at a store-bought peanut butter cup the same way again.

