

This Easy No-Bake Peanut Butter Pie is Dangerously Good
Let’s be real for a moment. There are times when the desire for a ridiculously decadent, show-stopping pie is all-consuming. But then reality sets in. The thought of preheating the oven on a hot day, dealing with a finicky pastry crust, and anxiously peering through the oven door hoping it doesn’t burn is… a lot. What if you could achieve pie greatness without any of that drama? What if the path to glory was paved with cookies and peanut butter and required nothing more than a refrigerator? Welcome, my friend, to the glorious world of the No-bake pie.

This isn’t just a dessert. It’s a statement. It’s proof that you don’t need an oven to create something truly spectacular. We’re about to make a Chocolate Peanut Butter Pie so rich, so creamy, and so easy, you’ll wonder why you ever bothered with baking in the first place.
Why This Recipe is an Absolute Legend
The number one reason this no-bake pie reigns supreme is the blissful lack of an oven. Is it a sweltering day in Khulna? Are you just generally intimidated by baking? Perfect. This recipe keeps you and your kitchen cool, calm, and collected. It’s the ultimate hot-weather hero.
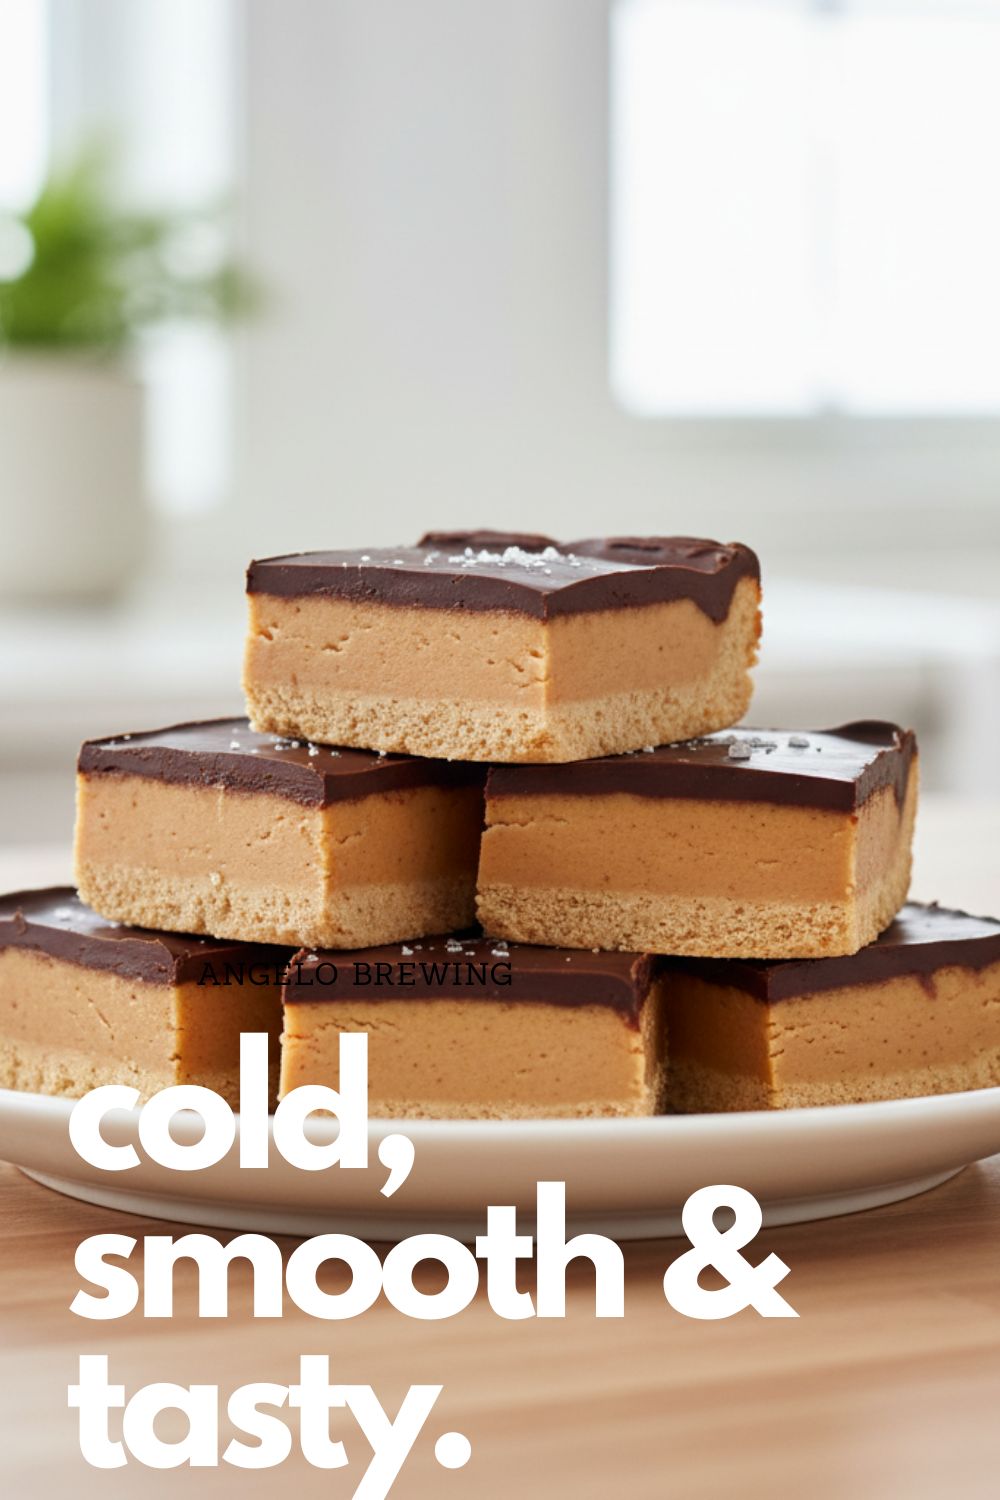
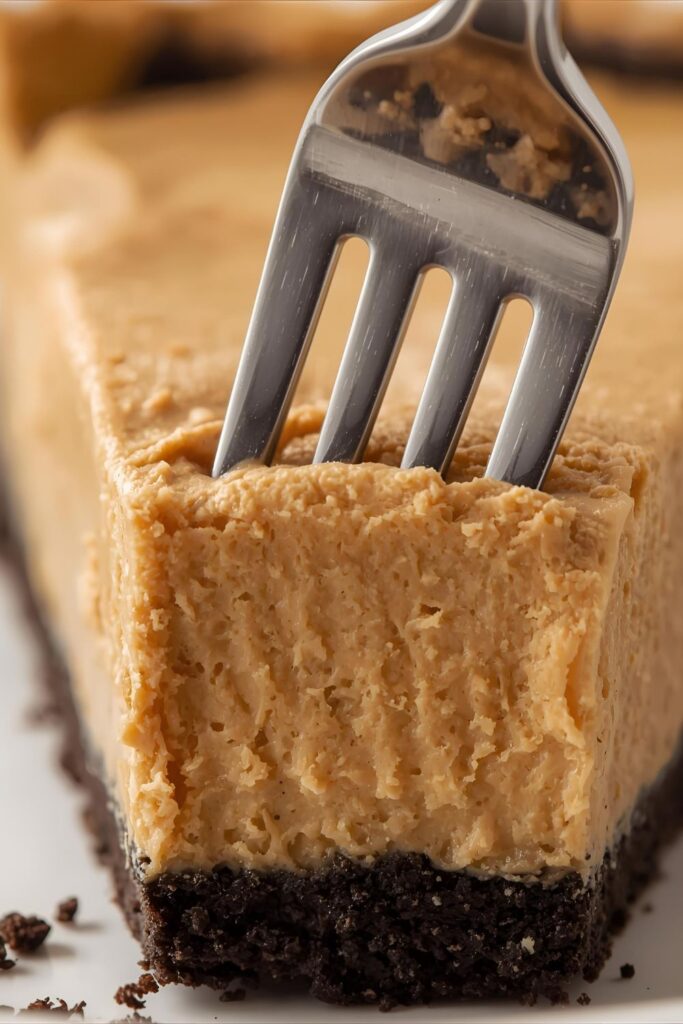
But let’s talk about the taste, because it is pure, unadulterated decadence. We’re talking about a crunchy, chocolatey Oreo crust filled with a silky, light-as-air, intensely peanut buttery mousse. It’s the perfect balance of sweet, salty, and rich. It’s the kind of dessert that silences a room.
And the best part? It is impressively easy. This pie has a massive effort-to-reward ratio. It looks like it came from a high-end bakery, but the process is little more than crushing, mixing, and chilling. It’s also the perfect make-ahead dessert, which means less stress for you when you’re hosting. In fact, it has to be made ahead. How great is that?
The Simple Cast of Ingredients
This masterpiece is built on a foundation of pure joy and a few simple, easy-to-find ingredients.
For the Crunchy Chocolate Crust:
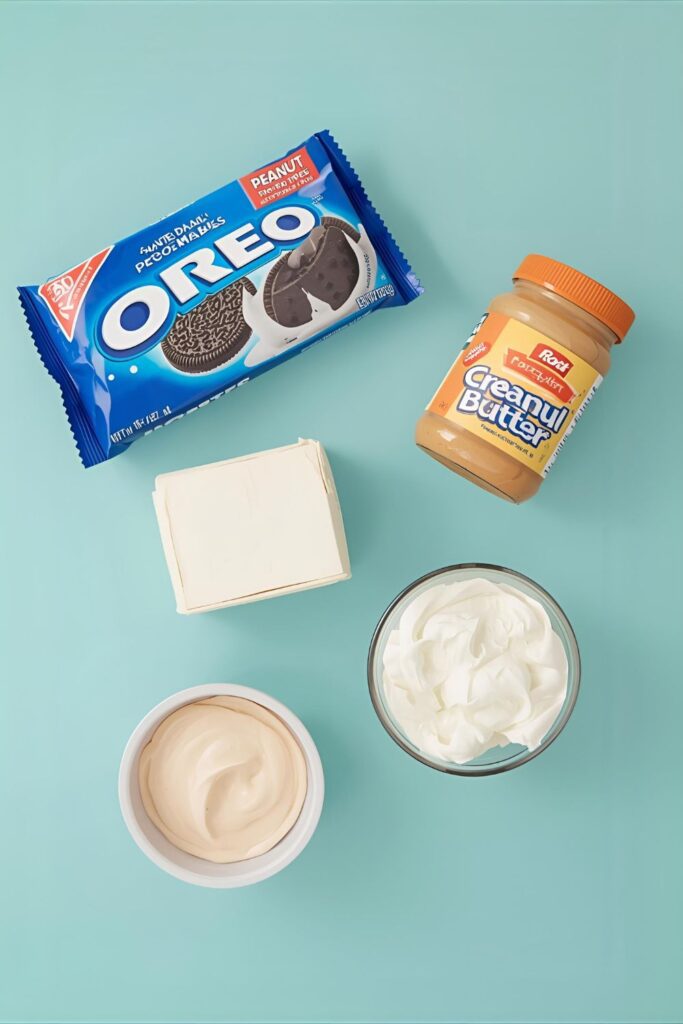
- Oreo Cookies: About 24-25 regular Oreos. Yes, the whole cookie—filling and all!
- Unsalted Butter: 5 tablespoons, melted. This is the magical glue that holds our crust together.
For the Silky Peanut Butter Filling:
- Cream Cheese: One 8-ounce block, full-fat and softened to room temperature. I cannot stress the “softened” part enough.
- Creamy Peanut Butter: 1 cup. Use a standard commercial brand like Jif or Skippy; natural peanut butter can sometimes separate.
- Powdered Sugar: 1 cup. This dissolves perfectly for a smooth, non-grainy filling.
- Whipped Topping (like Cool Whip): One 8-ounce tub, thawed. You can also use homemade stabilized whipped cream if you’re feeling fancy.
Tools & Kitchen Gadgets Used
No oven mitts are needed for this mission, but a few key tools will make it a walk in the park.
- A Food Processor: The fastest, most efficient way to turn a sleeve of Oreos into fine, sandy crumbs.
- An Electric Mixer (Hand or Stand): Absolutely essential for beating the cream cheese and peanut butter into a perfectly smooth, lump-free filling.
- A 9-inch Pie Plate: A standard glass or ceramic pie dish is perfect for this.
- Mixing Bowls: You’ll need a large one for the filling.
- A Rubber Spatula and an Offset Spatula: For scraping the bowl and creating that beautiful, swoopy, professional-looking top.
Step-by-Step Instructions to No-Bake Nirvana
Ready to create a legend? The process is simple, but the results are extraordinary.
- Annihilate the Oreos: Place the entire package of Oreos into your food processor and pulse until they are very fine crumbs. There should be no big chunks left.
- Form the Crust: Pour the Oreo crumbs into a medium bowl. Drizzle in the melted butter and mix with a fork until all the crumbs are evenly moistened, like wet sand.
- Press and Chill: Tip the buttery crumbs into your 9-inch pie plate. Using the bottom of a measuring cup or your fingers, press the mixture firmly and evenly into the bottom and up the sides of the plate. Pop the crust into the freezer for at least 15-30 minutes to firm up while you make the filling.
- Make the Peanut Butter Base: In a large bowl, use your electric mixer to beat the softened cream cheese and creamy peanut butter together on medium speed until the mixture is completely smooth and combined. Scrape down the sides of the bowl to make sure there are no lumps.
- Sweeten the Deal: With the mixer on low, gradually add the powdered sugar and beat until it’s fully incorporated and the mixture is smooth and creamy.
- Fold in the Fluff: Now, switch to a rubber spatula. Gently fold in the thawed whipped topping until no white streaks remain. Be gentle! You want to keep the filling light and airy.
- Assemble Your Masterpiece: Spoon the glorious peanut butter filling into your chilled Oreo crust. Use an offset spatula or the back of a spoon to spread it into an even, beautiful layer.
- The Hardest Part: The Chill: Cover the pie loosely with plastic wrap and place it in the refrigerator to chill for at least 6-8 hours, but overnight is even better. This is non-negotiable! The pie needs this time to fully set up so you can cut clean, beautiful slices.
Calories & Nutritional Info
Here’s a rough estimate for one slice, assuming you cut the pie into 8 very generous servings.
- Calories: Approximately 600-750 per slice.
- Fat: Around 45g.
- Carbohydrates: Roughly 50g.
- A Disclaimer: FYI, this is a rich, decadent, celebration-worthy dessert. It is not health food. It is happiness in pie form. Enjoy it accordingly.
Common Mistakes to Avoid (For a Flawless Pie)
This pie is easy, but a few missteps can lead to a less-than-perfect result.
- The Lumpy Filling Fiasco: I’m saying it again for the people in the back: your cream cheese must be softened to room temperature. If it’s cold, it will not blend smoothly, and you will have little lumps of cream cheese in your otherwise perfect filling.
- The Crumbly Crust Calamity: If your crust falls apart when you slice it, you either didn’t use enough butter, or you didn’t press it into the pan firmly enough. Really pack those crumbs in there to create a solid foundation.
- The Soupy Slice Sadness: This is the most common crime against no-bake pies. If your pie is a runny mess, you did not chill it long enough. It truly needs a minimum of 6 hours to set properly. Be patient; the reward is worth the wait.
- The Deflated Filling: When you’re adding the whipped topping, fold it in gently. If you beat it in aggressively with the mixer, you’ll knock all the air out, and your filling will be dense and heavy instead of light and mousse-like.
Variations & Customizations
The chocolate-peanut butter combo is classic, but this pie is a great template.
- The Cookie Butter Dream: Swap the Oreos for Biscoff cookies in the crust. In the filling, substitute the peanut butter with an equal amount of Biscoff cookie butter spread. It’s ridiculously good.
- The Chocolate Mousse Pie: Keep the Oreo crust. For the filling, beat the cream cheese and powdered sugar, then fold in 1 ½ cups of melted and slightly cooled semi-sweet chocolate chips and the whipped topping. It’s pure chocolate heaven.
- The Lemon Icebox Pie: Use a store-bought or homemade graham cracker crust. For the filling, beat an 8-ounce block of softened cream cheese with one 14-ounce can of sweetened condensed milk and 1/2 cup of fresh lemon juice until smooth. Fold in the whipped topping, chill, and serve.
FAQ Section: Your No-Bake Pie Predicaments, Solved
H3: How do you get a no-bake pie to set up firmly?
The keys are using full-fat ingredients (especially the cream cheese) and, most importantly, chilling it for a long enough time. At least 6 hours is a must, but overnight is your best bet for perfect, firm slices.
H3: Can I use a store-bought crust to make it even easier?
Absolutely! A store-bought Oreo or graham cracker crust works perfectly and saves you a step.
H3: Can you freeze this no-bake peanut butter pie?
Yes! It freezes beautifully. You can freeze it whole or in individual slices. Wrap it well and it will last in the freezer for up to 3 months. In fact, some people prefer the texture of it frozen, like an ice cream pie.
H3: Why is my filling runny?
The most likely culprit is that it just wasn’t chilled long enough. Other possibilities include using low-fat cream cheese or natural peanut butter, which can be oilier and less stable than commercial brands.
H3: How do I get clean, pretty slices?
The trick is to use a long, sharp knife. Dip the knife in hot water and wipe it dry before each and every cut. This will melt the filling just enough to glide through cleanly without smearing.
H3: Can I use real whipped cream instead of Cool Whip?
You can, but you need to stabilize it first. To do this, whip 1 ½ cups of very cold heavy cream with 1/2 cup of powdered sugar and 1 teaspoon of vanilla until stiff peaks form. The sugar helps it hold its shape in the pie.
H3: What are some good toppings for this pie?
Oh, the possibilities! A drizzle of melted chocolate, chopped peanut butter cups, a pile of whipped cream, crushed peanuts, or even whole Oreos are all fantastic choices.
Final Thoughts
You are now in possession of a recipe so powerful, so delicious, and so easy that it should probably be a secret. You have the ability to create a dessert that will make you the undisputed hero of any party, potluck, or Tuesday night.
So go forth and conquer. Embrace the glorious, oven-free world of the no-bake pie. Your friends will be impressed, your family will be delighted, and you’ll have a new go-to dessert that will never, ever let you down.

