

How to Make Viral Pancake Cereal (It’s Easier Than You Think!)
Remember that glorious time on the internet when everyone collectively decided that regular-sized food was boring? When we all looked at a stack of fluffy pancakes and thought, “Yes, this is good, but what if it were tiny and I could eat it with a spoon?” That, my friends, was the birth of the adorable, the whimsical, the utterly extra breakfast trend known as Pancake cereal.
This isn’t just breakfast; it’s a culinary craft project. It’s the answer to the question, “What happens when you combine the comfort of pancakes with the fun of cereal?” You get a bowl of pure, unadulterated joy that is practically guaranteed to make you smile. So, let’s dive into the trend that broke the internet, shall we?
Why This Recipe is Ridiculously Awesome

Okay, let’s be real. The number one reason to make pancake cereal is because it is ridiculously fun. It transforms a standard breakfast into an event. It’s perfect for a lazy weekend morning, for making with kids, or for any time you want to feel like a giant eating a regular-sized breakfast. The novelty factor here is off the charts.
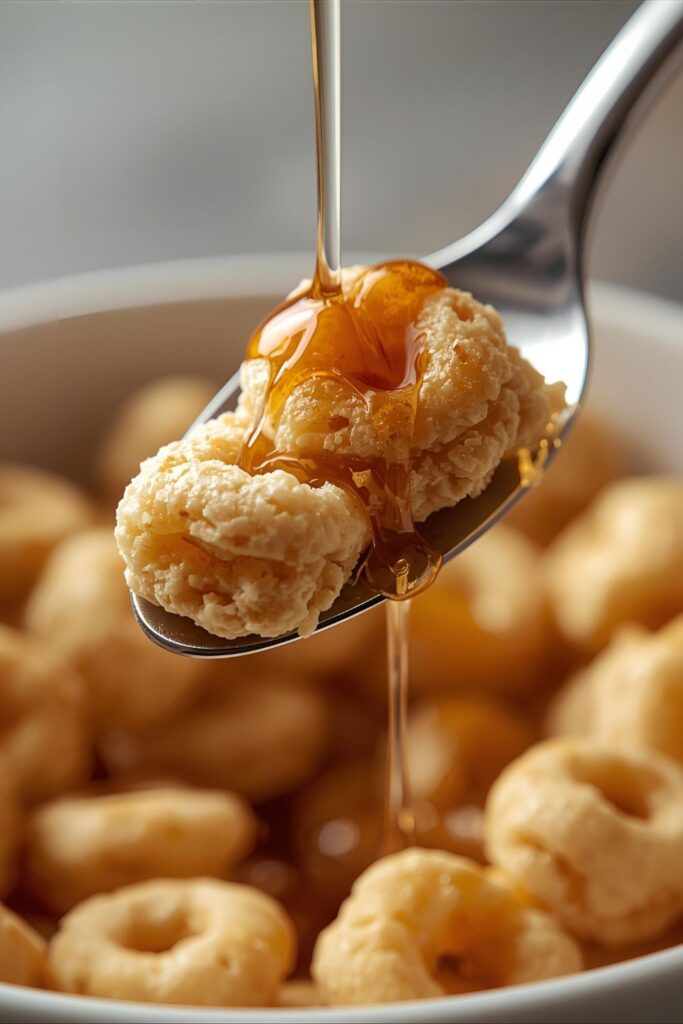
Secondly, it’s a feast for the eyes. A bowl of freshly made pancake cereal topped with butter, berries, and a river of maple syrup is one of the most Instagrammable breakfasts in existence. Your social media followers will be impressed, I promise.

But beyond the aesthetics and the fun, it’s also just plain delicious. You get tiny, fluffy pancakes that have the perfect ratio of crispy edges to soft, tender centers. Every spoonful is a perfect bite, and it’s a fantastic vehicle for all your favorite toppings. It’s a little bit of effort for a whole lot of delicious, photogenic reward.
The Simple Ingredients You’ll Need
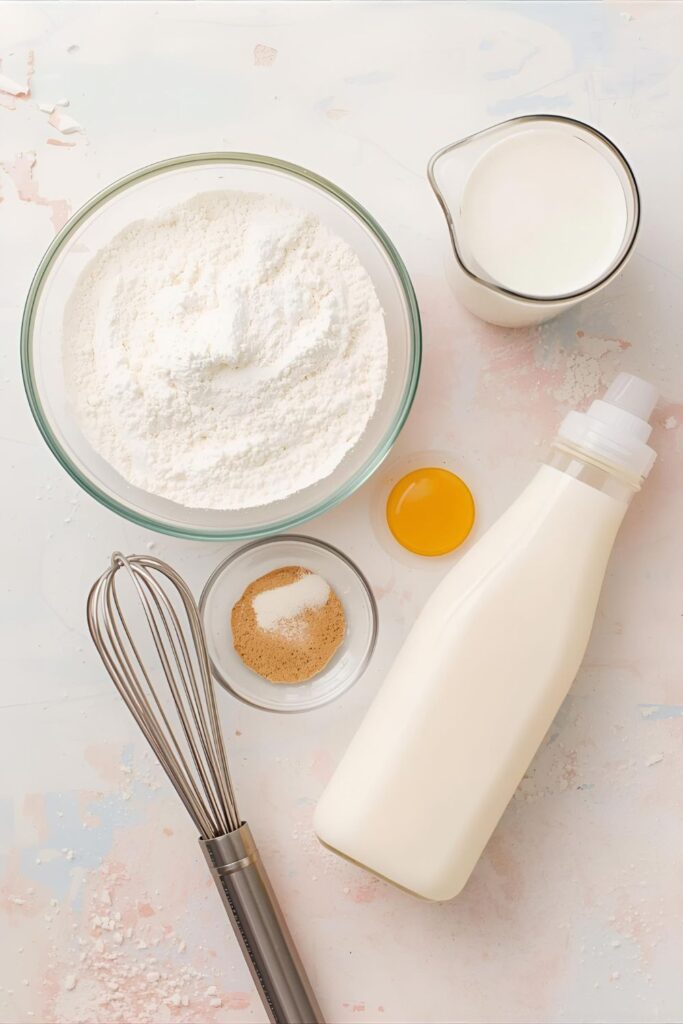
At its heart, this is just a really good, classic pancake recipe. No need for anything fancy.
- All-Purpose Flour: 1 cup.
- Granulated Sugar: 2 tablespoons.
- Baking Powder: 2 teaspoons. This is what makes them fluffy!
- Salt: 1/2 teaspoon.
- Milk: 1 cup. Whole milk is great, but any kind will work.
- Egg: 1 large.
- Unsalted Butter: 2 tablespoons, melted and slightly cooled. Plus more for the pan.
- Vanilla Extract: 1 teaspoon. The secret ingredient for that classic pancake flavor.
Tools & Kitchen Gadgets Used
While the ingredients are simple, a few specific tools will make your life a whole lot easier.
- A Squeeze Bottle: This is the non-negotiable, must-have tool for this recipe. It’s the secret to making uniform, tiny, dime-sized pancakes without losing your mind. A piping bag with a small round tip or a sturdy ziplock bag with a tiny corner snipped off can work in a desperate pinch.
- A Large Non-Stick Skillet or Griddle: You need a high-quality, non-stick surface to prevent a sticky disaster.
- Mixing Bowls: One for your dry ingredients and one for your wet.
- A Whisk and a Spatula: For making the batter and scraping the bowl.
- A Thin, Flexible Spatula: A small offset spatula or a fish spatula is perfect for flipping a bunch of the mini pancakes at once.
- Cereal Bowl and Spoon: The grand finale! For serving your masterpiece.
Step-by-Step Instructions: The Mini Pancake Journey
Ready to embark on this tiny adventure? Let’s make some cereal.
- Make the Batter (Don’t Overdo It!): In a large bowl, whisk together the flour, sugar, baking powder, and salt. In a separate medium bowl, whisk the milk and egg, then slowly whisk in the melted butter and vanilla.
- Combine Wet and Dry: Pour the wet ingredients into the dry ingredients. Whisk until just combined. Seriously, stop as soon as the flour streaks disappear. A few lumps are not only okay, they are mandatory for tender pancakes.
- Bottle It Up: Carefully pour your lumpy, perfect batter into your squeeze bottle and screw on the cap. Let the batter rest for 5 minutes.
- Heat the Pan: Place your non-stick skillet over medium-low heat. A little butter or a light coating of cooking spray is a good idea. The pan is ready when a drop of water sizzles and evaporates.
- Pipe the Pancakes: Hold the squeeze bottle over the pan and, working quickly, squeeze out tiny, dime-sized dots of batter. Leave a little bit of space between each one. You’ll feel like a pointillist painter creating a masterpiece.
- Cook and Flip: Cook the mini pancakes for about 60-90 seconds, or until the edges look set and tiny bubbles start to form on the surface. Now for the flip. You can either use a large, thin spatula to flip a whole section at once (the efficient method) or, if you’re feeling extra, flip them one by one with tweezers or chopsticks (the slightly unhinged method).
- Finish Cooking: Cook on the other side for another 30-60 seconds until golden brown.
- Serve and Admire: Slide the finished pancake cereal out of the pan and into a bowl. Repeat with the remaining batter. Serve immediately with all your favorite toppings.
Calories & Nutritional Info
Here’s a rough estimate for one serving, which is about a quarter of the total batter. Toppings are not included, so go wild (or don’t).
- Calories: Approximately 400-500 per serving.
- Protein: Around 13g.
- Carbohydrates: Roughly 60g.
- Fat: About 15g.
- TBH: It’s pancakes. In a bowl. Let’s not overthink the nutrition and just enjoy the moment of pure, whimsical carb-loading. 🙂
Common Mistakes to Avoid (And Keep Your Sanity)
This is fun, but a few wrong moves can lead to frustration. Avoid these!
- Overmixing Your Batter: I know I sound like a broken record, but it’s the #1 pancake sin. Overmixing develops the gluten in the flour and will make your tiny pancakes tough and chewy instead of light and fluffy. Embrace the lumps!
- A Scorchingly Hot Pan: If your heat is too high, your mini pancakes will burn on the outside before the center is cooked. Keep the heat on medium-low. It’s a marathon, not a sprint.
- Blob-Sized “Cereal”: If you’re making quarter-sized pancakes, you’re not making pancake cereal; you’re just making small pancakes. The magic is in the miniature size. Aim for dime-sized or even smaller.
- Attempting to Spoon the Batter: Trying to create tiny, uniform dots with a spoon is a fool’s errand. You’ll end up with amoeba-shaped blobs of varying sizes. Just use the squeeze bottle. It’s worth it.
Variations & Customizations
Once you’ve mastered the classic, you can get really creative.
- Chocolate Funfetti Explosion: Add 1 tablespoon of cocoa powder to your dry ingredients and stir some mini chocolate chips and rainbow sprinkles into the finished batter. It’s a party in a bowl.
- Blueberry Lemon Zest: Add the zest of one lemon to your batter. When you serve, top the pancake cereal with fresh blueberries. It’s a bright and refreshing twist.
- Vegan & Gluten-Free: This recipe is easily adaptable! Use a 1-to-1 gluten-free all-purpose flour. Swap the milk for almond or oat milk, use melted coconut oil or vegan butter instead of dairy butter, and replace the egg with one “flax egg” (1 tablespoon ground flaxseed mixed with 3 tablespoons water).
FAQ Section: Your Pancake Cereal Questions, Answered
H3: How do you actually eat pancake cereal?
With a spoon, right out of a bowl! You can pour milk over it like traditional cereal, or you can just top it with a pat of butter and a generous pour of maple syrup. There are no rules here.
H3: How do you flip all those tiny pancakes?
The easiest way is to use a large, thin spatula (like a fish spatula) and flip a large section of them at once. They won’t all flip perfectly, but it gets the job done quickly and efficiently.
H3: Can I just use a boxed pancake mix?
Absolutely! This is a fantastic shortcut. Just prepare the batter according to the package directions and pour it into your squeeze bottle.
H3: How do you keep the pancake cereal from sticking to the pan?
A good quality non-stick pan is your best friend. Even with a great pan, a little bit of melted butter or oil for the first batch is always a good idea to season the surface.
H3: Can you make it ahead of time and store it?
You can, but it’s definitely best when fresh and warm. If you have leftovers, store them in an airtight container in the fridge. You can reheat them for a few seconds in the microwave or for a few minutes in a dry pan to crisp them up.
H3: This seems like a lot of work. Is it worth it?
It’s more patient work than hard work. It’s worth it for the fun factor and the delicious result, especially if you’re making it for a special occasion or with kids.
H3: What are the best toppings for pancake cereal?
Anything you would put on regular pancakes! Melted butter, maple syrup, fresh berries, sliced bananas, chocolate chips, sprinkles, and a big dollop of whipped cream are all amazing choices.
Final Thoughts
You did it. You took a normal, respectable breakfast food and shrunk it down into something whimsical, adorable, and frankly, a little bit ridiculous—in the best way possible. You’ve created a breakfast that’s an experience.
So go ahead, grab your spoon, and dig into that bowl of tiny, fluffy perfection. You’ve earned it. And the next time someone asks you what’s for breakfast, you can look them dead in the eye and say, “Pancake cereal,” and watch their world change.

