

The Easiest Holiday Fudge Recipes That Will Make You a Gifting Legend
Let’s be real, the holidays are basically an excuse to eat all the sugar. And while cookies and pies are nice, there’s one sweet treat that consistently brings joy, nostalgia, and a serious sugar rush: fudge. But not just any fudge. We’re talking about holiday fudge recipes that are so ridiculously easy, you’ll wonder why you ever bought it from a fancy candy shop. Forget slaving over a hot stove with a candy thermometer, stressing about soft-ball stages. We’re going to make fudge so simple, so foolproof, that you’ll feel like a confectionery wizard without any of the actual wizardry. Get ready to impress everyone on your nice (and naughty) list!
Why These Holiday Fudge Recipes Are Your Secret Weapon

Why bother with homemade fudge when you can just buy it, you ask? Because homemade tastes infinitely better, is way cheaper, and frankly, makes you look like a domestic god/goddess. Here’s why you need these recipes in your life.
Seriously Simple (No Candy Thermometer Required!)
This isn’t your grandma’s old-school, temperamental fudge. We’re talking about modern, super-easy methods that deliver perfectly creamy, melt-in-your-mouth fudge every single time. No boiling sugar to precise temperatures, no stirring for what feels like an eternity. Just melt, mix, and chill. Boom.
Infinitely Customizable and Festive

The beauty of fudge is its versatility. You can whip up a classic chocolate, but why stop there? We’re going to dive into festive flavors that scream “holidays!” Think peppermint, eggnog, gingerbread—the possibilities are endless, and they all make for stunning edible gifts.
The Best Edible Gift (That People Actually Want)
Let’s be honest, how many times have you received a fruitcake you secretly re-gifted? Homemade fudge, however, is always a winner. It’s a thoughtful, delicious, and deeply indulgent gift that everyone will appreciate. Plus, it looks super cute packaged in little boxes or tins.
Your Go-To Easy Fudge Base Ingredients (Chocolate Lovers, Unite!)
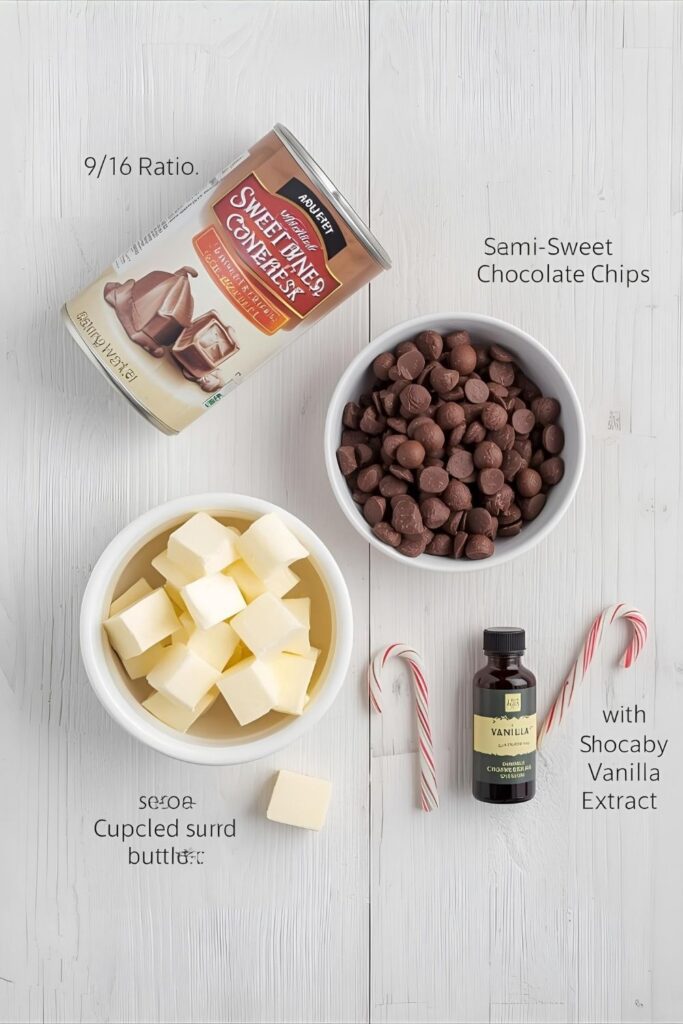
This is the base for glorious chocolate fudge, which you can then customize. Adjust quantities for different variations.
- Sweetened Condensed Milk: One 14-ounce can. This is the magic ingredient that makes it so easy!
- Chocolate Chips: 12 ounces (about 2 cups). Use good quality semi-sweet, milk, or dark chocolate chips, depending on your preference.
- Unsalted Butter: 2 tablespoons, cubed.
- Vanilla Extract: 1 teaspoon.
- Pinch of Salt: Just to balance the sweetness and enhance the chocolate flavor.
Tools & Kitchen Gadgets Used (The Bare Essentials)
No need for specialized candy-making gear here!
- 8×8 inch Square Baking Pan: Or a slightly larger one for thinner fudge.
- Parchment Paper: Essential! For lining the pan and easy removal.
- Medium Saucepan: For melting your ingredients on the stovetop.
- Heatproof Spatula or Wooden Spoon: For stirring everything together.
- Measuring Cups & Spoons: The usual suspects.
- Sharp Knife: For cutting your beautiful fudge into squares.
Step-by-Step Instructions: Your Fudge Journey Begins
Ready to make fudge so easy, it’s almost criminal? Let’s do this.
Step 1: Prep Your Pan
Line an 8×8 inch baking pan with parchment paper, leaving an overhang on two sides. This creates “handles” for you to easily lift the set fudge out later. A little cooking spray on the bottom of the pan before the parchment helps it stick, FYI.
Step 2: Melt It All Together
In your medium saucepan, combine the sweetened condensed milk, chocolate chips, and cubed butter. Place the saucepan over low heat. Stir constantly with your spatula until everything is completely melted and smooth. This takes a few minutes, so don’t rush it. Once it’s a luscious, glossy, uniform mixture, remove it from the heat.
Step 3: Flavor & Finish the Base
Stir in the vanilla extract and the pinch of salt. Give it a good stir until everything is perfectly combined. The mixture should be thick and glossy.
Step 4: Pour and Chill
Pour the fudge mixture into your prepared baking pan. Use your spatula to spread it evenly into the corners. If you’re adding any toppings (nuts, sprinkles, etc. – see variations!), sprinkle them on now while the fudge is still soft. Pop the pan into the refrigerator for at least 2-4 hours, or until the fudge is completely firm. For best results, chill overnight.
Step 5: Cut and Serve
Once the fudge is firm, use the parchment paper overhang to lift it out of the pan. Place it on a cutting board. Using a sharp knife, cut the fudge into 1-inch squares. If the knife gets sticky, wipe it clean between cuts. Store your glorious fudge in an airtight container in the fridge, or at room temperature if your house isn’t a sauna.
Calories & Nutritional Info (Because Science)

Let’s just say this is a “treat yourself” kind of deal.
- Serving Size: 1 piece (1×1 inch square)
- Calories: Approximately 100-120 kcal (varies significantly with chocolate type and additions)
- Fat: ~6-8g
- Carbohydrates: ~12-15g
- Sugar: ~10-13g
- Protein: ~1-2g (Disclaimer: These are rough estimates. Actual values depend on ingredient brands and portion sizes. You’re making fudge, not a health smoothie, okay? 🙂
Common Mistakes to Avoid (So Your Fudge Doesn’t Become a Fudg-ed Up Mess)
Even easy recipes have potential pitfalls. Pay attention, buttercup!
- Overheating the Chocolate: This is the biggest no-no. Chocolate can seize or burn if exposed to too much direct heat. Keep that heat low and stir constantly. Be patient!
- Not Stirring Enough: If you don’t stir continuously, the chocolate at the bottom of the pan can scorch, giving your fudge a lovely burnt taste. Not what we’re going for, IMO.
- Using Chocolate Syrup Instead of Chips: Don’t even think about it. Sweetened condensed milk is creamy, chocolate syrup is liquidy. It will not work. Stick to chocolate chips/chunks.
- Impatience with Chilling: You need that fudge to firm up properly. If you cut it too soon, it’ll be a sticky, gooey mess. Resist the urge!
Holiday Fudge Variations & Customizations (Get Creative!)
This base recipe is just the beginning. Let’s make it festive!
1. Peppermint Bark Fudge
Add 1/2 teaspoon of peppermint extract with the vanilla. After pouring into the pan, immediately sprinkle 1/2 cup of crushed candy canes or peppermint candies over the top. Press them gently into the fudge.
2. White Chocolate Cranberry Pistachio Fudge
Swap the semi-sweet chocolate chips for white chocolate chips. Add 1/2 cup dried cranberries and 1/2 cup chopped pistachios into the fudge mixture just before pouring into the pan.
3. Gingerbread Spice Fudge
With your chocolate chips, add 1 teaspoon ground ginger, 1/2 teaspoon ground cinnamon, and 1/4 teaspoon ground cloves. You can also add a tablespoon of molasses for a deeper gingerbread flavor. Top with a sprinkle of ginger snaps crumbs or a drizzle of white chocolate before chilling.
FAQ Section: Your Fudge Fears, Addressed
How long does homemade fudge last?
Stored in an airtight container, homemade fudge lasts about 1-2 weeks at room temperature, or 3-4 weeks in the refrigerator. Some people even freeze it for longer storage (up to 3 months!).
Why is my fudge too soft/not setting?
This usually means there wasn’t enough chocolate for the amount of condensed milk, or it didn’t chill long enough. Make sure you use the exact measurements and give it ample time in the fridge.
Why is my fudge grainy or gritty?
Grainy fudge often happens when sugar crystals don’t fully dissolve or recrystallize. This recipe minimizes that risk because we aren’t boiling sugar to precise temperatures. Ensure all ingredients melt smoothly and stir well.
Can I use a double boiler instead of direct heat?
Absolutely! If you’re nervous about scorching, a double boiler is a great way to melt the ingredients gently and evenly. Just combine everything in a heatproof bowl set over a saucepan of simmering water, stirring until smooth.
Can I add nuts to my fudge?
Yes! Chopped nuts like walnuts, pecans, or almonds are fantastic in fudge. Stir about 1/2 to 1 cup of chopped nuts into the fudge mixture just before pouring it into the pan.
How can I make my fudge shine?
Adding a small amount of butter (as this recipe does) or a tiny bit of coconut oil helps give fudge a lovely glossy finish. Also, storing it properly helps.
Is fudge supposed to be chewy or crumbly?
Good fudge should be creamy and smooth, not crumbly. It should hold its shape but melt in your mouth. If it’s crumbly, it might have been overcooked or have too much sugar.
Final Thoughts
So, there you have it. You are now officially equipped to churn out some of the most delicious, easiest holiday fudge known to humankind. No more excuses for store-bought mediocrity! Your friends and family will think you’ve become a master chocolatier, and you can just smile enigmatically. Go forth, make fudge, and spread that holiday cheer (one delicious square at a time). And don’t forget to save a secret stash just for yourself. You deserve it!

