

The Ridiculously Easy Festive Truffles Recipe That Makes You Look Like a Pro
Let’s be honest. The holidays are a special kind of chaos, aren’t they? You’re juggling a to-do list longer than a CVS receipt, trying to remember where you hid the gifts, and contemplating if surviving solely on leftover cookies is a valid dietary choice. The last thing you need is a complicated dessert recipe that requires a culinary degree and the patience of a saint. That’s where these game-changing, ridiculously easy festive truffles come in to save the day (and your sanity).
Why This Recipe is Your Holiday Hero

Still skeptical? Think you need to be a chocolatier to pull off something this elegant? Think again. These truffles are your secret weapon for winning the holiday season, and here’s why.
Practically Foolproof
This recipe is so simple, it’s almost suspicious. We’re talking about a no-bake, minimal-ingredient situation that delivers maximum “wow” factor. You basically just melt, mix, chill, and roll. If you can operate a microwave without starting a fire, you can make these truffles.
Insanely Delicious & Impressive

Imagine biting into a rich, velvety smooth, intensely chocolatey bite of pure bliss. That’s what you’re making. They look like they came from a fancy chocolate shop, and they taste even better. Your friends and family will think you spent hours slaving away in the kitchen. We’ll just keep the 20-minute prep time our little secret, okay? 😉
Ingredients You’ll Need
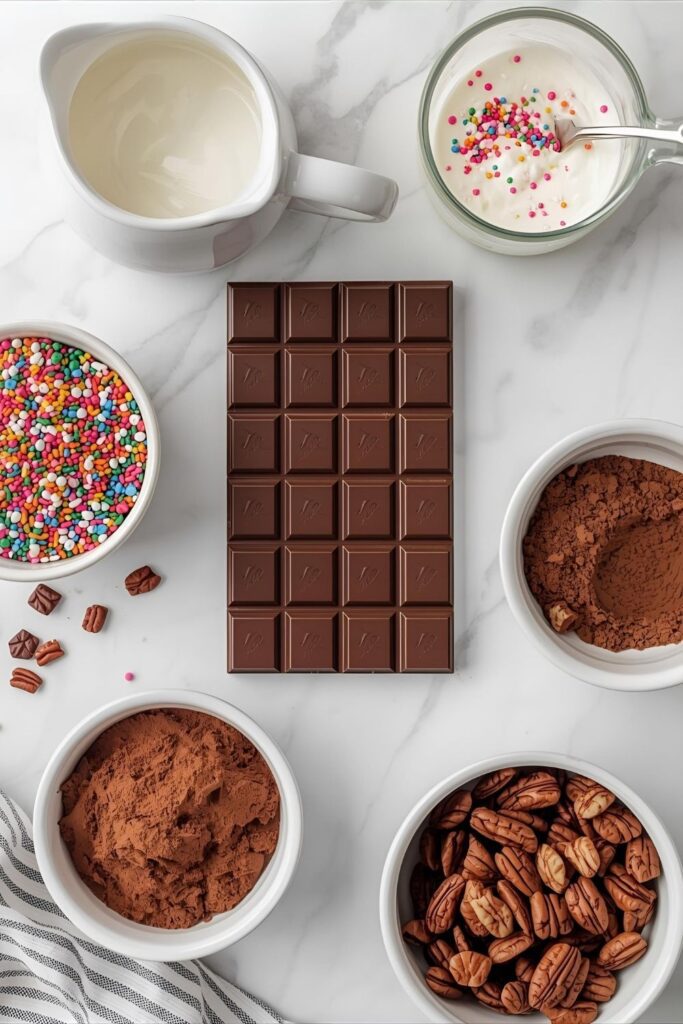
No weird, hard-to-find ingredients here. Just pure, simple goodness.
- High-Quality Semi-Sweet Chocolate: 8 ounces (about 225g), finely chopped. Do not use chocolate chips! They contain stabilizers that will mess with your texture. A good quality chocolate bar is your best friend here.
- Heavy Whipping Cream: 1/2 cup. This is what makes the ganache silky smooth. No substitutions on this one, sorry!
- Unsalted Butter: 1 tablespoon, softened to room temperature. This adds a little extra richness and shine.
- Vanilla Extract: 1 teaspoon. For that classic, warm flavor.
- Pinch of Salt: Just a tiny pinch to balance the sweetness.
- Your Choice of Toppings:
- Unsweetened cocoa powder
- Finely chopped nuts (pecans, walnuts, pistachios)
- Festive sprinkles
- Crushed candy canes
- Shredded coconut
Tools & Kitchen Gadgets Used
You don’t need a professional kitchen for this. Here’s the simple gear that gets the job done.
- Saucepan: A small one for gently heating the cream.
- Heatproof Mixing Bowl: For melting the chocolate and creating the ganache.
- Silicone Spatula: Essential for mixing without scratching your bowl.
- Shallow Dishes or Plates: For holding your various toppings.
- Melon Baller or Small Cookie Scoop: This is the secret to getting perfectly uniform truffles without getting your hands too messy.
- Baking Sheet: Lined with parchment paper for the truffles to chill on.
- Airtight Container: For storing your magnificent creations.
Step-by-Step Instructions: Let’s Make Magic
Ready to feel like a dessert genius? Let’s do this. It’s easier than you think.
Step 1: Make the Ganache
First, place your finely chopped chocolate into a heatproof bowl. I can’t stress the “finely chopped” part enough—it helps everything melt evenly. In a small saucepan, heat the heavy cream over medium heat until it just begins to simmer around the edges. Don’t let it boil, or it might get grumpy and separate.
Step 2: Combine and Emulsify
Pour the hot cream directly over the chopped chocolate. Let it sit, undisturbed, for 5 minutes. Don’t touch it! This time allows the heat from the cream to gently melt the chocolate. After 5 minutes, add the softened butter, vanilla extract, and a pinch of salt. Now, start whisking or stirring with a spatula from the center of the bowl, working your way outwards in small circles. It might look broken or oily at first—don’t panic! Just keep stirring gently, and it will magically transform into a smooth, glossy, beautiful ganache.
Step 3: The Big Chill
Cover the bowl with plastic wrap, pressing it directly onto the surface of the ganache to prevent a skin from forming. Pop it in the refrigerator for at least 1-2 hours, or until it’s firm enough to scoop. It should have a texture similar to play-doh.
Step 4: Scoop and Roll
Line a baking sheet with parchment paper. Use a small cookie scoop or a melon baller to portion out the ganache. This keeps them all roughly the same size. Roll each portion quickly between your palms to form a smooth ball. Try not to handle them for too long, as the heat from your hands will start to melt the chocolate. Place the rolled truffles onto the prepared baking sheet.
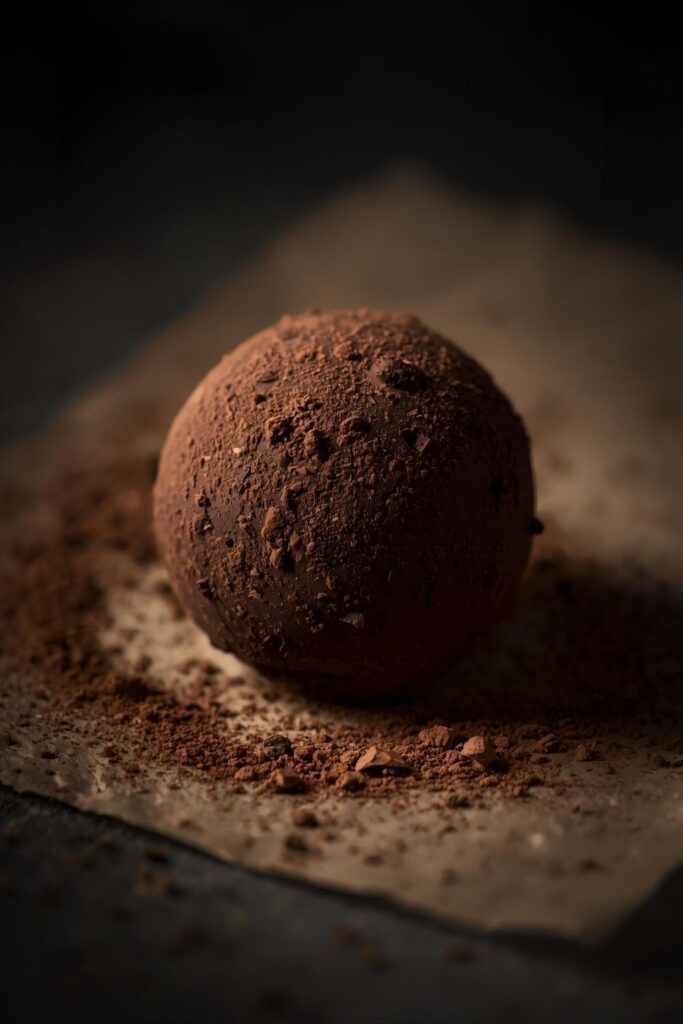
Step 5: Get Your Coat On
Now for the fun part! Pour your desired toppings into shallow dishes. Roll each truffle in the topping of your choice until it’s evenly coated. Get creative! Mix and match. Sprinkles for some, cocoa powder for others.
Step 6: Final Chill
Place the finished truffles back on the baking sheet and refrigerate for another 30 minutes to an hour to fully set. This helps the coating adhere and ensures they are firm. Then, they’re ready to be devoured or packed up as fancy homemade gifts.
Calories & Nutritional Info
Here’s a rough estimate of what you’re getting into. Remember, these are treats, not health food. 🙂
- Serving Size: 1 truffle
- Calories: Approximately 80-100 kcal (varies based on toppings)
- Fat: ~7g
- Carbohydrates: ~5g
- Sugar: ~4g
- Protein: ~1g (Disclaimer: This is an approximation. The actual values will vary depending on the specific ingredients and toppings you use.)
Common Mistakes to Avoid (Because We’ve All Been There)
Save yourself the headache and learn from my past blunders.
- Using Chocolate Chips: I mentioned it before, but it bears repeating. Do not use chocolate chips. They have less cocoa butter and added emulsifiers that prevent them from melting into the silky smooth ganache you want. Stick to good-quality baking bars.
- Boiling the Cream: If your cream gets too hot, it can “break” the ganache, leaving you with a greasy, separated mess. You want gentle simmers, not a rolling boil. If it does break, sometimes a tiny splash of cold cream whisked in vigorously can save it.
- Rushing the Chill Time: I get it, you want truffles NOW. But if you don’t let the ganache chill properly, it will be a sticky, melted disaster when you try to roll it. Patience is a virtue, my friend.
- Overworking the Ganache: When you’re mixing the hot cream and chocolate, be gentle. Over-mixing can also cause the fat to separate. Slow and steady wins the truffle race.
Variations & Customizations
Think of this recipe as a blank canvas for your festive creativity.
1. The Boozy Truffle
Want to make these decidedly adults-only? Add 1 to 2 tablespoons of your favorite liqueur to the ganache along with the vanilla extract. Baileys Irish Cream, Grand Marnier, dark rum, or a raspberry liqueur like Chambord are all fantastic choices.
2. The Spiced Sensation
Infuse your truffles with warm holiday spices. Add 1/2 teaspoon of cinnamon and a pinch of nutmeg or cardamom to the cream while it’s heating. You can even add a tiny pinch of cayenne pepper for a Mexican hot chocolate vibe with a kick.
3. The Nutty Professor
For a textural twist, add 1/4 cup of very finely chopped toasted nuts (like pecans or hazelnuts) into the ganache after it has emulsified. You can also roll the finished truffles in more chopped nuts for a double dose of nutty goodness.
FAQ Section: Your Truffle Troubles, Solved
What is the best chocolate to use for truffles?
A good quality semi-sweet or dark chocolate with a cocoa content between 60% and 72% is ideal. It provides a rich flavor that isn’t overly sweet. Brands like Ghirardelli, Callebaut, or even a high-quality store brand work great.
Why did my ganache turn out oily?
This usually means the emulsion broke. It can happen if the cream was too hot, the ingredients were at drastically different temperatures, or it was over-mixed. Try adding a tablespoon of cold cream and whisking gently to bring it back together.
How long do homemade truffles last?
Stored in an airtight container in the refrigerator, these festive truffles will stay fresh for up to two weeks. That makes them a perfect make-ahead treat for holiday gatherings or gifts.
Can I freeze homemade truffles?
Absolutely! Place them in a single layer in an airtight container and freeze for up to three months. Let them thaw in the refrigerator for a few hours before serving. FYI, some toppings like sprinkles might bleed a little upon thawing.
Do I have to use a double boiler?
Nope! This recipe simplifies things by using hot cream to melt the chocolate, so no double boiler is needed. It’s one less dish to wash, which is always a win in my book.
My ganache is too soft to roll. What did I do wrong?
It probably just needs more time in the fridge. The firmness can depend on the temperature of your fridge and the type of chocolate you used. If it’s still too soft after a couple of hours, it might be an issue with the chocolate-to-cream ratio.
What are the best coatings for truffles?
The possibilities are endless! Unsweetened cocoa powder is classic. Other popular choices include sprinkles, finely chopped nuts, shredded coconut, matcha powder, or even dipping them in melted chocolate (if you’re feeling extra ambitious).
Final Thoughts
So, there you have it. The secret to effortless holiday elegance is officially yours. You can now whip up a batch of these decadent festive truffles and watch as everyone assumes you’re a dessert wizard. Will you ever buy a sad, overpriced box of chocolates again? I think not. Now go forth and conquer that holiday party, one delicious truffle at a time. And if you come up with a wild new flavor combination, be sure to share it!

