

Ditch the Sad Store-Bought Stuff: Your Guide to the Best Garlic Bread (Holiday Version!)
Okay, let’s have a moment of silence for all the bland, dry garlic bread that has graced our holiday tables over the years. You know the kind. It’s barely toasted, has a whisper of garlic flavor, and honestly, you only eat it because it’s there. Well, my friend, that era is OVER. We are leveling up, big time. We’re talking about the garlic bread holiday version – packed with flavor, perfectly golden, and so unbelievably good that it might just steal the spotlight from the turkey. Get ready for some serious carb envy.
Why This Garlic Bread Will Be Your New Holiday Obsession

Why is this not just any garlic bread, but the holiday version? Because it takes all the classic, comforting elements you love and elevates them with fresh herbs and a little extra TLC. We’re talking about a crusty exterior, a soft, pillowy interior, and a butter-garlic-herb mixture that will make your taste buds do a happy dance. It’s incredibly easy to make, pairs perfectly with almost any holiday dish (seriously, try it with gravy!), and makes your kitchen smell like heaven. What’s not to love?
Ingredients: Your Shopping List for Garlicky Goodness
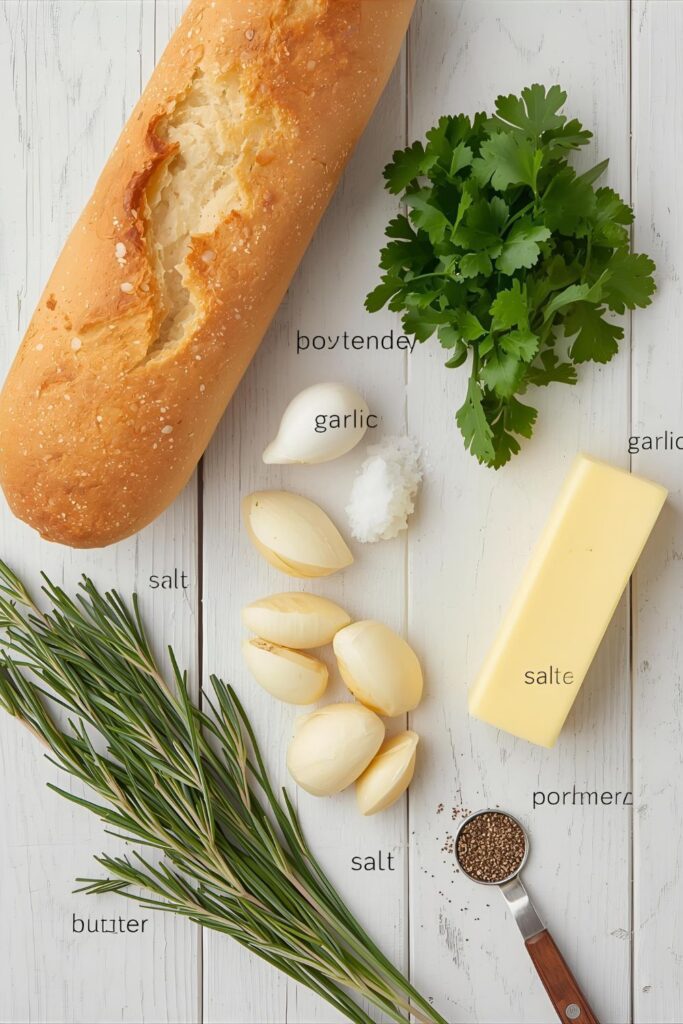
You don’t need a fancy grocery store for these ingredients. Just good, fresh stuff.
- 1 loaf of artisan bread. A good French baguette, Italian loaf, or sourdough works perfectly. Look for something with a crusty exterior and a soft interior.
- ½ cup unsalted butter, softened. Room temperature is key here, so it mixes smoothly.
- 6-8 cloves garlic, minced. Yes, that much. Don’t be shy!
- ¼ cup fresh parsley, chopped. Adds freshness and a beautiful green fleck.
- 2 tablespoons fresh rosemary, chopped. Hello, holiday vibes!
- ½ teaspoon salt.
- ¼ teaspoon black pepper.
- Optional: ½ cup grated Parmesan cheese. For that extra cheesy, savory kick.
Tools & Kitchen Gadgets You’ll Need
- Sharp serrated knife. For slicing that beautiful bread.
- Small mixing bowl. To create your magical garlic butter.
- Spatula or spoon. For mixing.
- Baking sheet. You might need two if your loaf is extra long.
- Aluminum foil. For the initial bake.
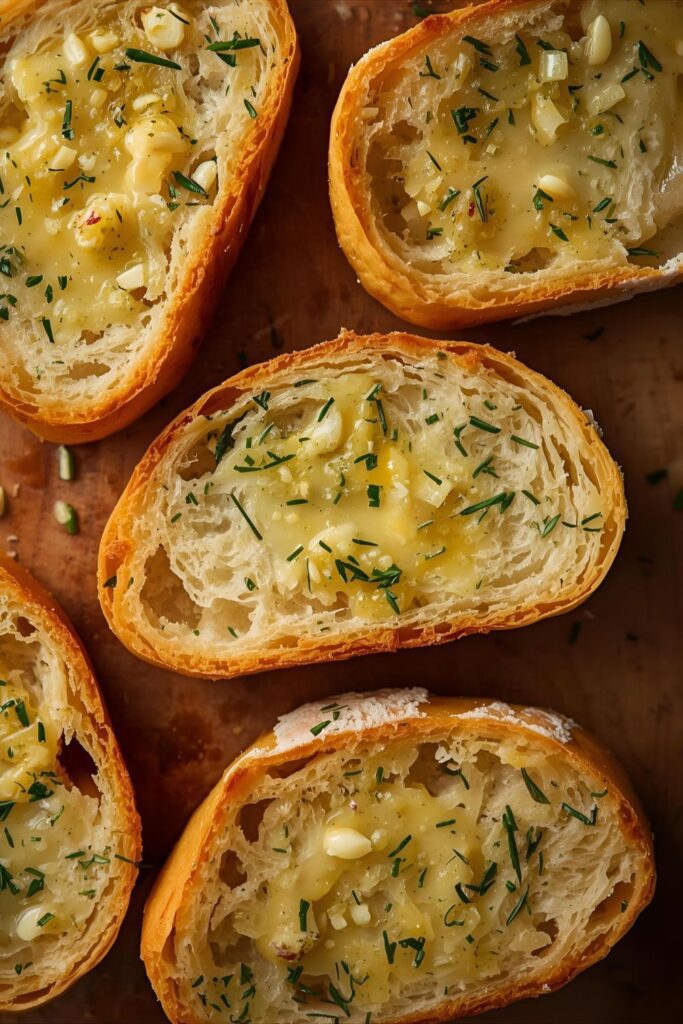
Step-by-Step Instructions: The Path to Perfect Garlic Bread

Ready to make some magic? Follow these steps closely, and prepare for deliciousness.
- Preheat your oven to 400°F (200°C). Get it nice and toasty.
- Prep your bread. Using your serrated knife, slice your bread lengthwise, almost all the way through, but leave the bottom crust intact. You want to create a hinge, so it opens up like a book. You can also slice it into individual slices, still not cutting all the way through, if you prefer pull-apart pieces.
- Make the garlic herb butter. In your small mixing bowl, combine the softened butter, minced garlic, chopped parsley, chopped rosemary, salt, and black pepper. Mix everything together until it is well combined. If you are using Parmesan cheese, mix it in now too.
- Spread the love. Generously spread the garlic herb butter mixture over both cut sides of the bread. Don’t be shy; load it up! Make sure to get it into all the nooks and crannies.
- Wrap it up. Carefully place the bread onto a baking sheet. Loosely wrap the entire loaf in aluminum foil. This steams the bread slightly and ensures the butter melts perfectly into the bread without burning the garlic.
- First bake. Bake the foil-wrapped garlic bread for 15 minutes.
- Second bake (for crunch!). Remove the foil. Increase the oven temperature to 425°F (220°C), if your oven allows. Bake for an additional 5-10 minutes, or until the edges are golden brown and slightly crispy. Keep a close eye on it during this stage to prevent burning.
- Serve immediately. Slice the bread into individual pieces, if you didn’t pre-slice it. Serve it hot and watch it disappear.
Calories & Nutritional Info
Since bread can vary, and your butter spread might be extra generous, these are approximate values per serving (about 1-2 slices).
- Estimated Calories per serving: ~200-300 calories
- Fat: ~15-25g
- Carbs: ~15-25g
- Sodium: ~300-500mg
- Dietary Note: This is an indulgent side dish, perfect for a holiday feast. It’s a fantastic source of joy, TBH.
Common Mistakes to Avoid (Unless You Like Disappointment)
- Using cold butter. Seriously, this is a cardinal sin of garlic bread. Cold butter doesn’t mix well, and you’ll end up with clumps. Let it soften on the counter for a good hour.
- Not enough garlic. Is there such a thing? IMO, no. Don’t skimp on the garlic! Use fresh garlic, not that powdered stuff.
- Overbaking without foil. If you bake it unwrapped the whole time, the garlic will burn, and the bread will dry out. The foil step is crucial for moist, flavorful bread.
- Slicing completely through the bread. If you cut it all the way, all that delicious butter will drip out. Keeping the bottom intact keeps everything contained and makes for easy serving.
Variations & Customizations: Be a Garlic Bread Guru
This recipe is a canvas for your creativity! Here are some ways to switch it up:
- Cheesy Garlic Bread Extravaganza: Add a layer of shredded mozzarella or a mix of Italian cheeses after you remove the foil, then bake until bubbly and golden.
- Spicy Kick: Add a pinch of red pepper flakes to your garlic butter mixture for a subtle heat.
- Sun-Dried Tomato & Basil: Swap the rosemary for fresh basil and add 2 tablespoons of finely chopped sun-dried tomatoes (oil-packed, drained) to the butter mixture.
- Herby Lemon Zest: Add the zest of one lemon to the garlic butter for a bright, zesty flavor that cuts through the richness.
FAQ Section: All Your Garlic Bread Questions Answered
What kind of bread is best for garlic bread? A good quality French baguette, Italian loaf, or sourdough with a sturdy crust and soft interior works best. Avoid super soft sandwich bread.
Can I make garlic bread ahead of time? You can prep the garlic butter mixture up to 2 days in advance and store it in the fridge. You can also spread the butter on the bread, wrap it tightly in foil, and refrigerate it for a few hours. Then, just bake when ready.
How do I store leftover garlic bread? Store leftovers in an airtight container or foil at room temperature for up to 2 days. To reheat, wrap loosely in foil and bake at 350°F for about 10 minutes, or toast in a toaster oven.
Can I use pre-minced garlic? While fresh minced garlic is always superior for flavor, you can use pre-minced garlic in a pinch. Just reduce the amount slightly as it can be more potent.
How do I prevent the garlic from burning? The key is the foil step. Baking it covered first allows the garlic to mellow and cook without burning. Only remove the foil for the last few minutes to get that golden crust.
What is the best way to get crispy edges and a soft interior? The two-step baking process (covered then uncovered) is the secret! The foil locks in moisture, and then the uncovered bake crisps up the exterior.
Can I use salted butter? Yes, but you will need to reduce the amount of added salt in the recipe. Start with ¼ teaspoon and taste before adding more.
Final Thoughts
So there you have it! You are now fully equipped to ditch those sad, pre-packaged bread sticks and elevate your holiday meal with homemade, spectacular garlic bread. This garlic bread holiday version is so good, so easy, and so utterly irresistible that your guests will be begging for the recipe. Go forth and spread the garlicky joy!

