The Ultimate Guide to Rescuing Your Bananas: From Counter Ornament to Gourmet Glory
We have all been there. You walk into the grocery store with the ambition of a fitness influencer, and you buy a pristine bunch of bananas. You tell yourself this is the week you choose potassium over potato chips. Fast forward four days, and those yellow beacons of hope now resemble a collection of bruised, polka-dotted spotted messes. You stare at them, they stare back with their darkening peels, and you wonder: do I throw them out or do I perform a culinary miracle?
Honestly, if you aren’t currently transforming your overripe fruit into a masterpiece, are you even adulting correctly? It is the ultimate kitchen flex. I once served a caramelized banana foster to a group of friends who genuinely thought I’d attended a secret pastry school in Paris. In reality, I was just avoiding a trip to the trash can. Ready to stop being a victim of the ripening process and start winning at dessert? Let’s get mashing. 🙂
Why This Fruit is Actually Awesome
Why should you bother with bananas when you could just eat an apple? First off, the flavor profile is a tactical strike on your sugar cravings. As they ripen, their starches turn to pure sugar, creating a natural sweetness that no artificial sweetener can touch. It is the culinary equivalent of switching from a fuzzy radio station to a high-definition stream—everything just tastes more intense.
TBH, the ease of use is the real hero here. You don’t need a degree from a fancy French school or even a sharp knife half the time. You basically just peel and mash. It impresses guests every single time because people assume that anything with a deep, caramelized banana flavor took twelve hours to prepare, while you secretly know it took less time than boiling a kettle.
Our Top Pick

Papier Herb Garden Recipe Journal - Hardback Design
Capture your culinary ideas and favorite memories with this beautifully designed recipe journal. Organized sections for breakfast, lunch, dinner, and treats make it easy to record recipes, ratings, dietary notes, and cooking tips, along with measurement and conversion guides. Extra pages let you list favorite restaurants, shops, and places to try. Crafted with a premium hardback cover, luxurious 100gsm paper, and a gold foil accent, it’s both durable and stylish. Thoughtfully designed to suit any kitchen, it makes a practical, timeless gift for family, friends, or yourself.
Plus, let’s talk about the versatility. You can bake them, fry them, freeze them, or blend them into a smoothie. It’s efficient, it’s flashy, and it makes you look like a domestic deity who actually has their life together. What more could you want from a curved yellow fruit?
The “Banana Rescue” Shopping List
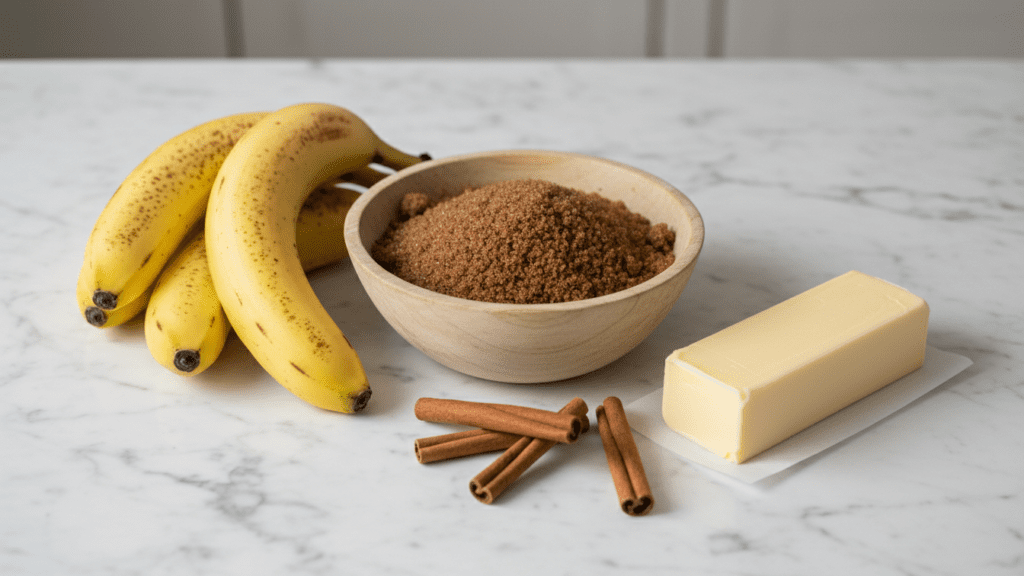
Don’t go hunting for rare organic dust in the deep woods. You just need the essentials, but make sure they are high-quality to avoid a bland disaster.
- Overripe Bananas: Three to four large ones. The more spots, the better the flavor.
- Unsalted Butter: Two tablespoons. It adds that rich, velvety mouthfeel we all crave.
- Brown Sugar: A quarter cup. This is the “glue” for our caramelization dreams.
- Vanilla Extract: Use the real stuff. IMO, imitation vanilla belongs in the bin.
- Cinnamon: A generous pinch. Because we measure cinnamon with our hearts, not spoons.
- Walnuts or Pecans: Half a cup (optional). For that “I’m a sophisticated adult” crunch.
- Sea Salt: Just a tiny pinch to make the sugar pop.
Tools & Kitchen Gadgets You’ll Need
To dominate the bananas game, you need the right hardware. Don’t try to mash these with a flimsy plastic spoon; your forearm will never forgive you.
- Non-Stick Skillet: Essential for browning without the sticky heartbreak.
- Potato Masher or Sturdy Fork: Your primary weapons for the great mushing.
- Silicone Spatula: The MVP of sticky recipes.
- Aesthetic Serving Bowl: Because if you didn’t take a photo of your dessert, did it even happen? 🙂
- Kitchen Scale: If you’re a nerd about your ratios (we love nerds!).
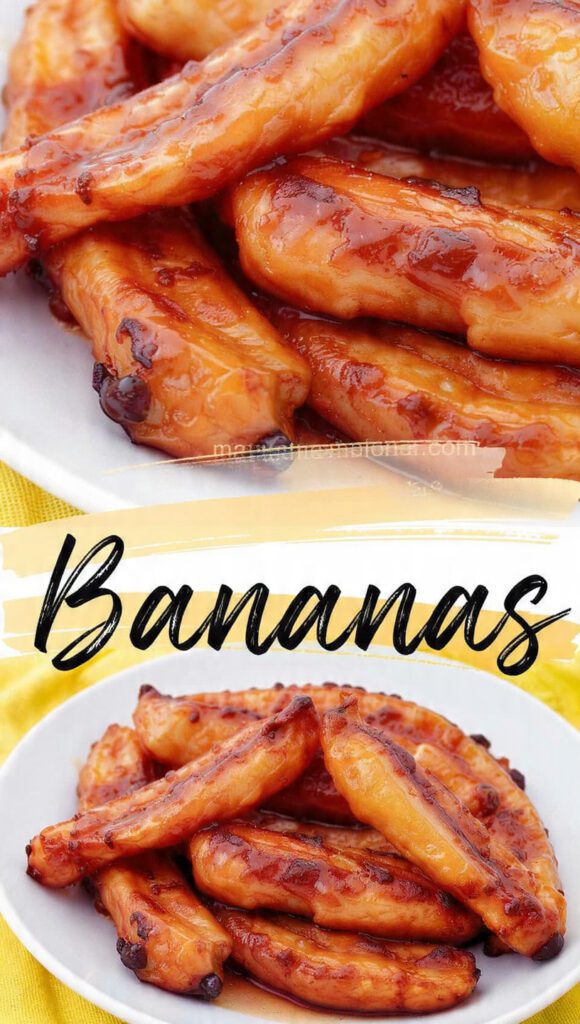
Step-by-Step Instructions: The Caramelized Sizzle
Step 1: The Great Peel
Remove the peels from your spotted bananas. Slice them into thick rounds. Don’t slice them too thin; we want “coins,” not “mush.” FYI, if the banana is so soft it won’t hold a shape, just mash it into a paste—you’re making a sauce now.
Step 2: The Butter Melt
In your non-stick skillet, melt the butter over medium heat. Wait until it starts to foam. This is the sound of happiness beginning. Don’t let it brown yet; we want a gentle sizzle, not a burnt sacrifice.
Step 3: The Sugar Shower

Sprinkle the brown sugar and cinnamon into the butter. Stir with your spatula until it looks like bubbling liquid gold. Add the vanilla extract now. Secure your hair back; the steam from the vanilla is intense but smells like heaven.
Step 4: The Golden Sear
Gently lay your banana slices into the caramel. Leave them alone! Let them develop a deep, dark crust for about two minutes. If you flip them too early, you’re just making warm fruit. We want that “shatter-crisp” sugar edge. :/
Step 5: The Nutty Reunion
Toss in your walnuts or pecans and the tiny pinch of salt. The salt is the secret volume knob for flavor. Swirl the pan to coat everything in the glossy sauce. If the sauce looks too thick, add a tablespoon of water or rum (if you’re feeling spicy).
Our Top Pick

LuBudingJoy Blank Recipe Book
B5 Blank Recipe Book – Create and organize your favorite recipes in one beautiful place. This hardcover recipe book (10" × 7.3") features 150 blank pages and includes DIY category stickers. Designed with conversion charts, content tables, and a back pocket for loose notes.
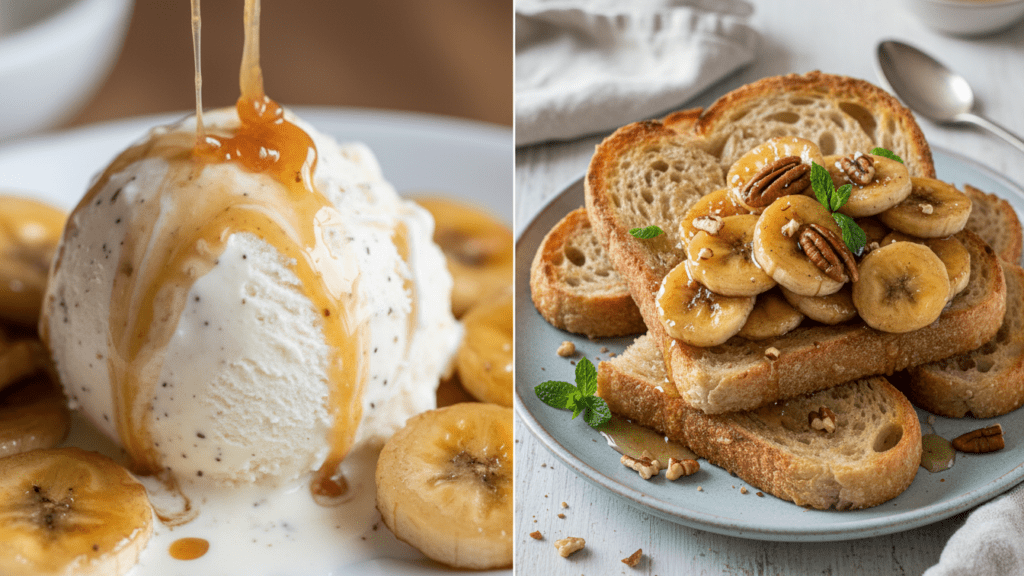
Step 6: The Final Glow-Up
Spoon the glorious mixture over vanilla ice cream, oatmeal, or just eat it directly from the pan. I believe in you, but I also understand the struggle of waiting. Let it cool for a minute—molten sugar is essentially delicious lava. 🙂
Calories & Nutritional Info
You are eating a nutrient-dense powerhouse (with some sugar). Here is the breakdown:
- Calories: Approximately 210 kcal per serving.
- Potassium: High levels to help you recover from that morning workout.
- Fiber: 3g-4g (your gut will literally send you a thank-you note).
- Healthy Fats: From the nuts and butter to keep your brain sharp.
- Vitamin B6: Enough to make you feel like a high-functioning human being.
Common Mistakes to Avoid
- Using Green Bananas: If they aren’t spotted, they won’t caramelize. Wait for the brown dots.
- Crowding the Pan: If the slices are overlapping, they will steam and get soggy. Give them personal space.
- The “Clean-Up Later” Lie: If you don’t rinse the skillet immediately, that caramel residue will turn into brown cement. Rinse it now.
- High Heat: Burning the sugar makes it bitter. Keep it low and slow.
- Ignoring the Salt: Without salt, this is just a pile of sugar. Salt is mandatory. TBH, it’s the difference between “okay” and “extraordinary.”
Variations & Customizations
Feeling adventurous? Try these three spins:
The Keto “Nut-Faux-Nana”
Obviously, bananas have carbs. Swap the fruit for thick-cut zucchini slices sautéed in plenty of cinnamon and monk fruit sweetener. I promise, with enough butter, it’s a surprisingly convincing low-carb miracle!
The Tropical “Island-Kick”
Add a splash of coconut milk and a handful of shredded coconut to the pan. It tastes like a vacation in a glass and is 100% plant-based if you use vegan butter.
The Spicy “Chili-Chocolate”
Stir in a tablespoon of cocoa powder and a tiny pinch of cayenne pepper at the very end. The heat against the sweet fruit is a sophisticated twist that will wake up your soul. IMO, this is the final boss of dessert variants. 🙂
FAQ Section
How do I ripen bananas faster? Put them in a brown paper bag with an apple. The gases from the apple act as a natural ripening accelerator. It’s science, Brenda!
Can I freeze bananas for later? Yes! Peel them first and put them in a Ziploc bag. If you freeze them with the skin on, you will regret it the moment you try to peel them later.
Why are my caramelized bananas mushy? You likely over-cooked them or sliced them too thin. Next time, use a higher heat for a shorter time to get the sear without the mush.
What can I use instead of brown sugar? Maple syrup or honey works beautifully. Just keep in mind that honey can burn faster, so keep a close eye on the pan!
Are bananas actually good for you? Yes! They are a great source of energy, potassium, and vitamins. Just watch the portions if you’re drowning them in caramel.
Can I make this in the oven? Sure! Roast them at 400°F (200°C) with the butter and sugar for 15 minutes. It’s less work but you lose that perfect stovetop sear.
What if I have a nut allergy? Swap the nuts for sunflower seeds or toasted oats! You still get the crunch without the drama.
Final Thoughts
There you have it—a guide to bananas that won’t make you regret your life choices. It’s sweet, it’s glossy, and it’s a brilliant way to trick your brain into thinking you’re a gourmet chef.
Go ahead, give it a shot this weekend. And hey, if you end up eating the entire pan before you even find the ice cream, I won’t tell anyone. We’ve all been there. Tag me in your “glossy” photos, or just sit in your potassium-induced bliss. Happy searing!