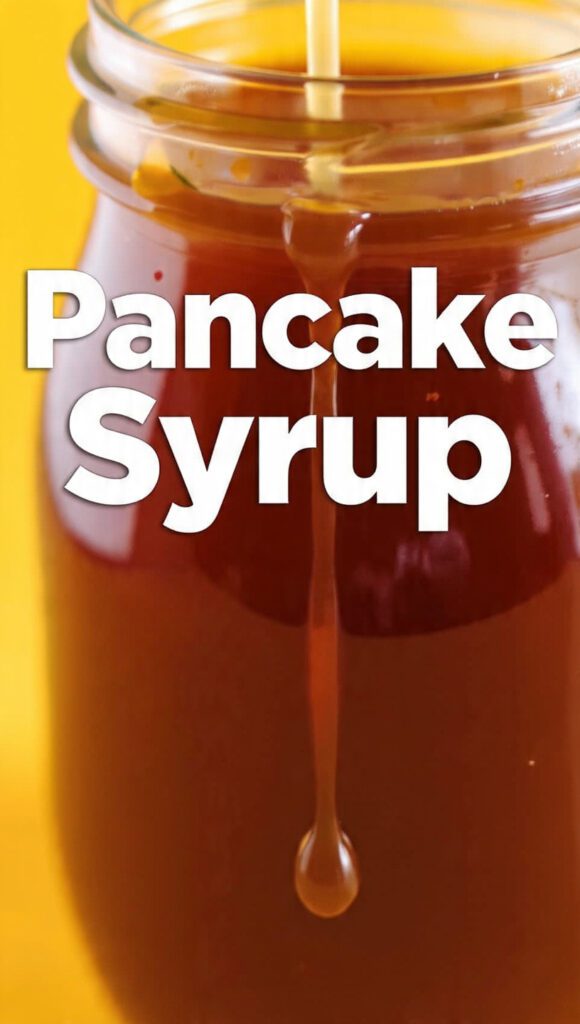
DIY Liquid Gold: How to Make Syrup for Pancakes That Will Humble the Grocery Store
We have all been there. You just spent forty-five minutes perfecting a stack of fluffy, cloud-like flapjacks, only to open the pantry and realize you’re out of the “real” maple stuff. You look at that dusty bottle of corn-syrup-based “imitation” goop and feel a deep sense of culinary betrayal. Why settle for maple-flavored industrial runoff when learning how to make syrup for pancakes is easier than finding a matching pair of socks on a Monday morning?
Honestly, if you aren’t currently boiling sugar and water like a Victorian apothecary, are you even living your best foodie life? I once tried to pass off store-bought high-fructose goo to a group of brunch-obsessed friends, and the silence was deafening. Never again. Ready to stop being a victim of “Big Syrup” and start winning at breakfast? Let’s get sticky. 🙂
Why This Recipe is Actually Awesome
Why should you bother standing over a stove for ten minutes? First off, the flavor profile is infinitely customizable. Unlike that one-size-fits-all plastic bottle, you control the depth, the sweetness, and the “zing.” It is the difference between watching a movie on a flight and seeing it in IMAX.
TBH, the ease of cooking is the real hero here. You basically just melt sugar until it stops being solid and starts being delicious. It impresses guests like crazy because nobody expects you to make your own condiments. Pulling a warm jar of homemade syrup out of the kitchen makes you look like a domestic deity who has mastered the ancient arts.
Our Top Pick

Papier Herb Garden Recipe Journal - Hardback Design
Capture your culinary ideas and favorite memories with this beautifully designed recipe journal. Organized sections for breakfast, lunch, dinner, and treats make it easy to record recipes, ratings, dietary notes, and cooking tips, along with measurement and conversion guides. Extra pages let you list favorite restaurants, shops, and places to try. Crafted with a premium hardback cover, luxurious 100gsm paper, and a gold foil accent, it’s both durable and stylish. Thoughtfully designed to suit any kitchen, it makes a practical, timeless gift for family, friends, or yourself.
Plus, let’s talk about the savings. You can turn fifty cents worth of sugar into a gourmet topping that tastes like it cost fifteen dollars at a boutique farmer’s market. It is efficient, it is flashy, and it makes your kitchen smell like a professional waffle house. What more could you want from a carbohydrate?
The “Pantry Hero” Ingredient List
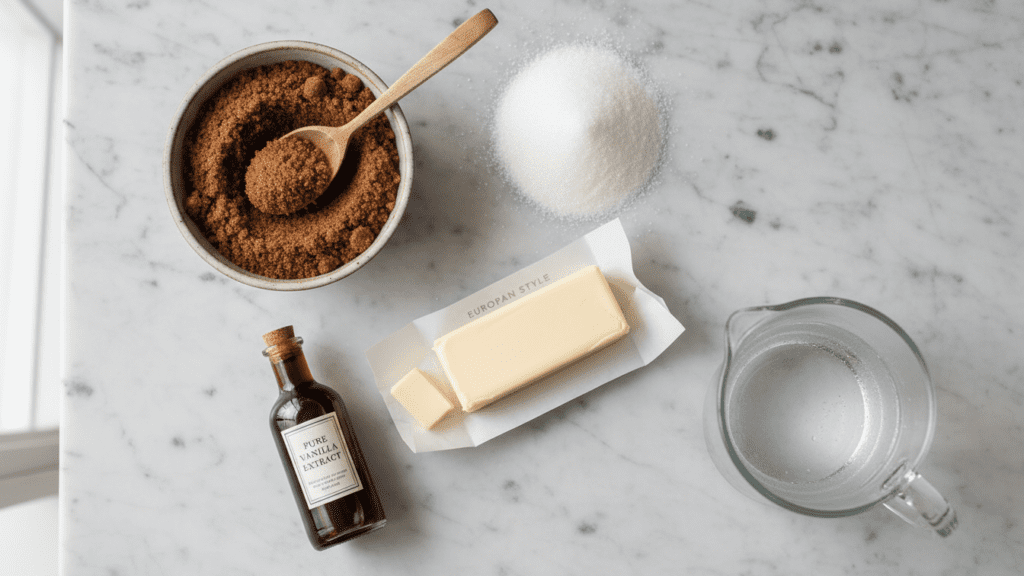
Don’t go hunting for rare sap in the Canadian wilderness. You just need the soldiers who show up for every good bake.
- Granulated White Sugar: The base for that clean sweetness.
- Brown Sugar: Packed! This brings the molasses vibe and that deep, amber glow.
- Filtered Water: Because your syrup shouldn’t taste like the local swimming pool.
- Vanilla Extract: Use the real stuff. IMO, imitation vanilla belongs in the trash.
- Maple Extract: The secret weapon that makes people ask, “Wait, is this from a tree?”
- Unsalted Butter: Just a tablespoon to give it that “silky-smooth” mouthfeel.
- Pinch of Salt: To cut through the sugar madness.
Tools & Kitchen Gadgets You’ll Need
To master how to make syrup for pancakes, you need gear that handles heat without throwing a tantrum.
- Small Heavy-Bottomed Saucepan: To ensure even heat distribution and zero scorching.
- Whisk or Silicone Spatula: Your primary weapon for the battle against sugar clumps.
- Measuring Cups: Accuracy is the difference between syrup and a sugar brick.
- Glass Mason Jar: For final storage and looking very aesthetic on your table.
- Kitchen Scale (Optional): If you want to be a nerd about your ratios (we love nerds!).
Step-by-Step Instructions
Step 1: The Sugar Union
In your saucepan, combine the white sugar, brown sugar, and water. Turn the heat to medium. Don’t go to high heat immediately; sugar is like a moody teenager—if you rush it, it’ll burn you.
Step 2: The Dissolving Act
Stir the mixture gently as it heats. You want the sugar crystals to disappear entirely. Once it starts to simmer, stop stirring. FYI, if you keep stirring once it boils, you might accidentally create rock candy. Great for science fairs, bad for pancakes.
Step 3: The Rolling Simmer

Let the mixture simmer for about 5 to 7 minutes. You are looking for it to thicken slightly. It will still look a bit watery—that’s normal! It thickens up significantly as it cools. If you boil it until it looks like syrup in the pot, you’ll have a jar of concrete by lunchtime. :/
Step 4: The Flavor Infusion
Remove the pot from the heat. Now, stir in the butter, vanilla, maple extract, and that tiny pinch of salt. The butter will melt and create a beautiful gloss. The smell alone will have your neighbors knocking on your door asking for “just a little taste.” 🙂
Step 5: The Cooling Phase
Let the syrup sit in the pot for at least 10 minutes. This allows the flavors to marry and the consistency to settle. Pour it into your glass jar.
Our Top Pick

LuBudingJoy Blank Recipe Book
B5 Blank Recipe Book – Create and organize your favorite recipes in one beautiful place. This hardcover recipe book (10" × 7.3") features 150 blank pages and includes DIY category stickers. Designed with conversion charts, content tables, and a back pocket for loose notes.
Step 6: The Pour
Drench your pancakes. I mean really drench them. If your stack isn’t swimming in homemade liquid gold, you aren’t doing it right. Enjoy the smug feeling of culinary superiority.
Calories & Nutritional Info

Let’s be real: we aren’t eating this for the vitamins. But for the curious:
- Calories: Approximately 50-60 kcal per tablespoon.
- Sugar: High. It’s literally sugar water.
- Fats: About 1g from that tiny bit of butter.
- Happiness Level: 110%.
- Note: It’s a treat, Brenda. Don’t overthink it.
Common Mistakes to Avoid
- Over-boiling: If you boil it for 20 minutes, you’ve made caramel. Stick to the 7-minute rule.
- Stirring the Boil: This causes crystallization. Whisk at the start, then hands off.
- Skipping the Salt: Salt makes sweetness taste sophisticated. Don’t skip the pinch.
- Cold Extraction: If you add the vanilla while it’s at a rolling boil, the flavor evaporates. Take it off the heat first.
- Ignoring the Pan: Sugar goes from “perfect” to “fire hazard” in about thirty seconds. Watch the pot. TBH, your phone can wait. 🙂
Variations & Customizations
Feeling adventurous? Try these three spins:
The Keto “Honey”
Swap the sugars for allulose or monk fruit sweetener and use a dash of xanthan gum to thicken. It’s a low-carb breakfast miracle!
The Spicy Bourbon
Add a tablespoon of bourbon and a pinch of cinnamon at the very end. It creates a “grown-up” syrup that pairs perfectly with bacon.
The Fruit Fusion
Toss a handful of fresh blueberries or raspberries into the pot during the simmer. Strain them out at the end for a vibrant, purple syrup that makes you look like a pro chef. TBH, this is my personal favorite for date-night brunches.
FAQ Section
Why did my pancake syrup turn into crystals in the fridge? You likely stirred it too much while it was boiling or didn’t use enough water. Next time, add a teaspoon of corn syrup or lemon juice to prevent the crystals from forming!
How long does homemade pancake syrup last? In an airtight container in the fridge, it stays delicious for up to one month. Just give it a quick zap in the microwave to make it pourable again.
Can I make this without maple extract? Yes! You can use honey or even a bit of molasses for flavor, though the “maple” vibe won’t be as strong.
Is this healthier than store-bought syrup? While it’s still sugar, it contains zero preservatives or weird stabilizers. You know exactly what’s in it, which is a health win in my book.
Why is my syrup too thin? Syrup is a liar—it thickens as it cools. If it’s still too thin after an hour, you can put it back on the stove for 2 more minutes.
Can I use white sugar only? You can, but it will be very “flat.” The brown sugar adds the depth and color that makes it feel like real syrup.
What is the best container for storage? A glass mason jar or a recycled syrup bottle. Just make sure it’s clean and has a tight seal!
Final Thoughts
There you have it—a bowl-licking good guide on how to make syrup for pancakes that won’t make you regret your life choices. It’s fresh, it’s fast, and it’s a brilliant way to trick your brain into thinking you’re a culinary mastermind.
Go ahead, give it a shot. And hey, if you end up eating a spoonful directly from the jar while standing over the sink, I won’t judge you. We’ve all been there. Tag me in your sticky pancake photos, or just sit in your sugar-induced bliss. Happy pouring!