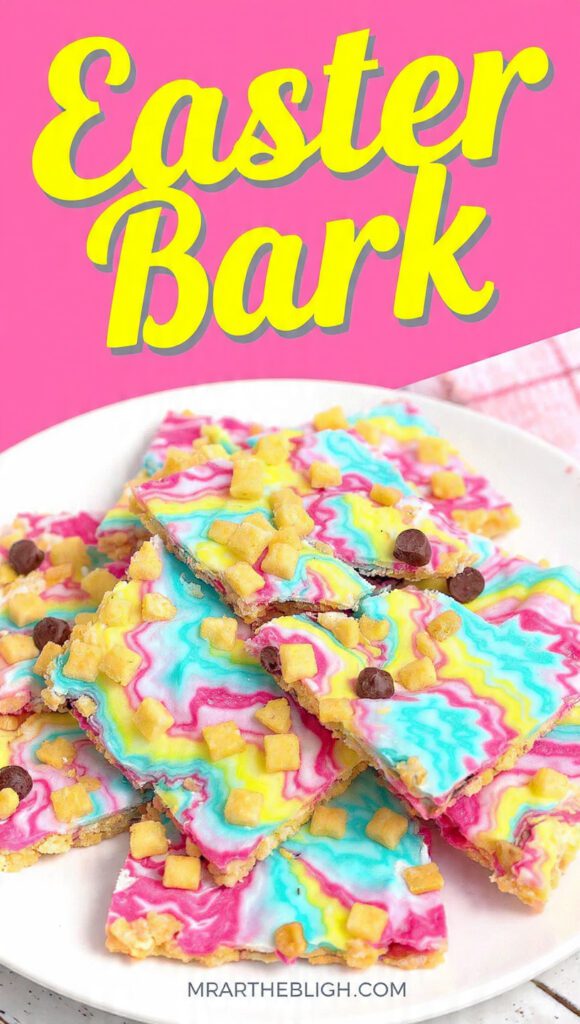
The Ultimate Easter Bark: A Candy-Coated Masterpiece for the Lazy Perfectionist
We have all been there. You scroll through Instagram and see those impossibly intricate Easter desserts that look like they were sculpted by a team of miniature woodland creatures. You think to yourself, “I should make that for the family brunch,” before remembering you have the patience of a caffeinated toddler and a kitchen the size of a shoebox. Why do we torture ourselves with multi-layered cakes when the easter bark exists to save our collective reputation?
Honestly, if you aren’t serving a slab of chocolate covered in enough pastel candy to be seen from space, are you even celebrating? I once tried to make a complex meringue bunny that ended up looking more like a depressed cloud. Now, I stick to this recipe because it is physically impossible to mess up and it makes me look like a festive genius. Ready to reclaim your weekend and still win the “Best Dessert” award? 🙂
Why This Recipe is Actually Awesome
Why should you bother making this specific treat? First off, it is a visual showstopper. There is something about swirled chocolate and candy eggs that triggers a primal “ooh, shiny” response in humans. It impresses guests every single time, yet it requires about as much skill as making a piece of toast.
TBH, the ease of cooking—or rather, “assembling”—is the real hero here. You don’t even have to turn on the oven. You just melt things and throw other things on top. It’s the perfect recipe for people who love eating but hate washing sixteen different mixing bowls.
Our Top Pick

Papier Herb Garden Recipe Journal - Hardback Design
Capture your culinary ideas and favorite memories with this beautifully designed recipe journal. Organized sections for breakfast, lunch, dinner, and treats make it easy to record recipes, ratings, dietary notes, and cooking tips, along with measurement and conversion guides. Extra pages let you list favorite restaurants, shops, and places to try. Crafted with a premium hardback cover, luxurious 100gsm paper, and a gold foil accent, it’s both durable and stylish. Thoughtfully designed to suit any kitchen, it makes a practical, timeless gift for family, friends, or yourself.
Plus, let’s talk about the flavor. You get that rich, velvety chocolate hit paired with the salty crunch of pretzels or the creamy snap of malted milk eggs. It’s a tactical strike on your taste buds. It’s customizable, it’s portable, and it makes you look like a domestic deity with minimal effort. What else do you want from a holiday snack?
The “Sugar Rush” Shopping List
You don’t need a pantry full of specialized flours for this one. These are the ingredients you need to gather:
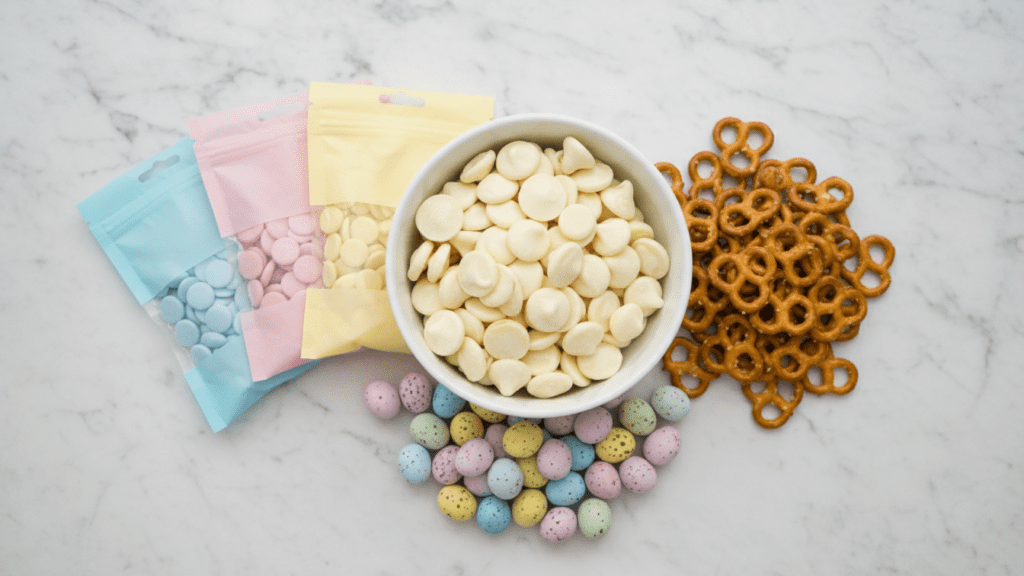
- White Chocolate Chips: Use high-quality white chocolate for the base. Cheap stuff tastes like sweetened candle wax.
- Pastel Candy Melts: Pick two or three colors (pink, blue, or yellow) to create that viral marbled look.
- Malted Milk Eggs: Robin eggs are the gold standard for easter bark aesthetics.
- Pretzels: Mini twists or sticks add that essential salty crunch.
- Sprinkles: Go for a mix of pastel pearls and “bunny” shapes.
- Food Coloring: Ensure you use oil-based coloring if you aren’t using pre-colored candy melts.
Tools & Kitchen Gadgets You’ll Need
To dominate the candy game, you need a few trusty tools. Using your hands to swirl hot chocolate is a bold choice, but I wouldn’t recommend it.
- Large Baking Sheet: A standard 13×18 pan works perfectly for a big batch.
- Parchment Paper: If you skip this, you will be chiseling chocolate off your pans for three business days.
- Microwave-Safe Bowls: Glass is better for even melting without burning.
- Silicone Spatula: Nothing sticks to silicone, making it the MVP of chocolate-melting scenarios.
- Toothpicks or Skewers: These are your brushes for the “marble” art.
- A Fridge: Essential for speeding up the hardening process when you’re in a hurry.
Step-by-Step Instructions
Step 1: The Foundation
Line your baking sheet with parchment paper. Don’t be “that person” who thinks they can grease the pan instead. Melt your white chocolate chips in the microwave in 30-second intervals. Stir them vigorously between zaps until they are smooth and glossy.
Step 2: Add Some Color
In separate smaller bowls, melt your pastel candy melts. If the mixture feels too thick, add a tiny drop of coconut oil to help it flow. Pour the white chocolate onto the baking sheet and spread it out into a rectangular slab. Don’t worry about making it a perfect shape; rustic is “in” right now.
Step 3: The Artistic Swirl

Drop spoonfuls of your colored candy melts onto the white chocolate. Take a toothpick or skewer and drag it through the puddles of color in a figure-eight motion. Do not over-swirl! If you go too far, you’ll end up with a muddy gray mess instead of a beautiful pastel marble.
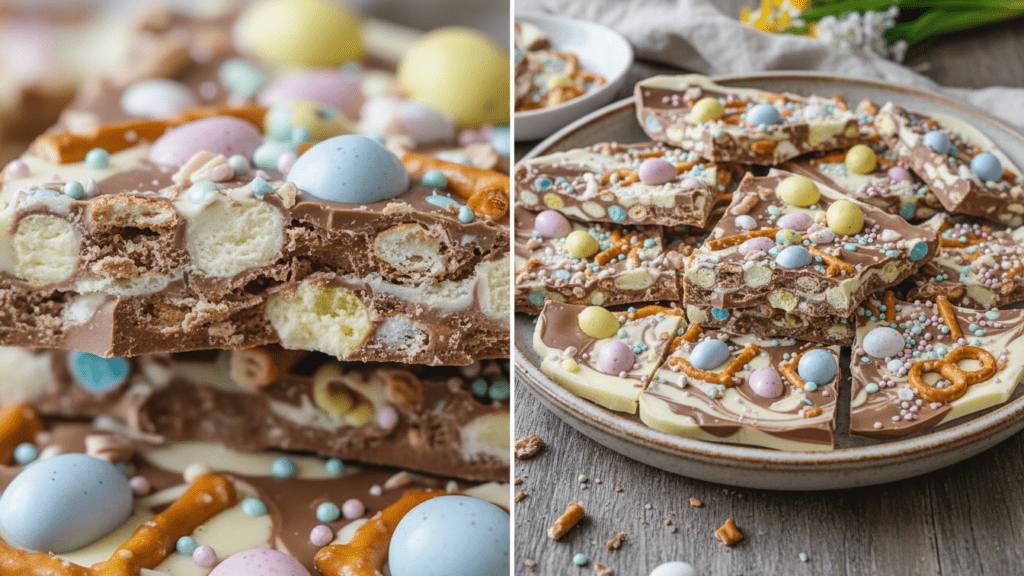
Step 4: The Rain of Candy
While the chocolate is still tacky and warm, start throwing your toppings. Press the malted milk eggs and pretzels lightly into the chocolate so they don’t fall off later. Finish with a heavy-handed layer of sprinkles. IMO, there is no such thing as too many sprinkles on Easter. 🙂
Step 5: The Big Chill
Slide the tray into the fridge for at least 30 to 45 minutes. You want the bark to be rock-hard before you try to handle it. Once it’s set, peel it off the parchment paper and break it into irregular, jagged chunks. This is the part where you get to release all your seasonal stress!
Our Top Pick

LuBudingJoy Blank Recipe Book
B5 Blank Recipe Book – Create and organize your favorite recipes in one beautiful place. This hardcover recipe book (10" × 7.3") features 150 blank pages and includes DIY category stickers. Designed with conversion charts, content tables, and a back pocket for loose notes.
Calories & Nutritional Info
Here is the “just for your info” section. We are eating candy slabs, so let’s manage our expectations.
- Calories: Approximately 180-220 kcal per medium chunk.
- Fats: About 12g from the cocoa butter and milk solids.
- Sugars: High. It’s a literal tray of chocolate. Let’s not pretend otherwise.
- Sodium: A surprising 80mg if you added those salty pretzels.
- Fun Factor: 10/10.
Common Mistakes to Avoid
- Overheating the Chocolate: White chocolate is finicky. If you zap it too long, it will “seize” into a grainy, dry clump. Use low power and stir often.
- Using Water-Based Coloring: If you add standard water-based food coloring to melted chocolate, it will instantly turn into a brick. Only use oil-based colors.
- Forgetting the Parchment: I mentioned this, but it bears repeating. Unless you want to buy new pans, use the paper.
- Waiting Too Long to Top: If the chocolate sets before you add the eggs, they won’t stick. Work fast once the chocolate is spread.
- Over-Swirling: Keep your swirls intentional. Too much mixing ruins the marbled effect. TBH, three or four passes with the toothpick is usually enough. :/
Variations & Customizations
Feeling a bit adventurous? Try these three spins on the classic:
The Keto Carrot
Swap the white chocolate for sugar-free white baking chips. Use sugar-free candy-coated nuts and omit the pretzels. It’s a low-carb Easter miracle!
The Spicy Spring
Add a tiny pinch of cayenne pepper to the white chocolate base. The heat against the sweet chocolate is a sophisticated twist for the “adults-only” dessert table.
The Cookie Monster Variant
Crush up some chocolate sandwich cookies and fold them into the white chocolate before swirling. It adds a dark, crunchy contrast to the pastel colors and tastes like a dream.
FAQ Section
How do I store easter bark so it stays crunchy? Store your bark in an airtight container in the refrigerator. If you leave it on the counter in a warm room, the chocolate might bloom or soften, losing that satisfying “snap.”
Can I make this with dark chocolate instead? Absolutely! Dark chocolate works as a great base, but you might lose some of the pastel color vibrancy. Try a base of dark chocolate with white chocolate swirls on top for a high-contrast look.

Why did my chocolate turn white and chalky? That is called chocolate bloom. It happens when the fat or sugar separates due to temperature changes. It’s still safe to eat, it just looks a little less “Instagram-ready.”
How long does it take for the bark to set? In a cold fridge, it takes about 30 to 45 minutes. If you are in a massive hurry, 15 minutes in the freezer usually does the trick—just don’t forget it in there!
Can I freeze easter bark for later? Yes! You can freeze it for up to 3 months. Wrap it tightly in plastic wrap and then foil to prevent it from picking up any “freezer flavors.”
Is white chocolate real chocolate? Technically, no, because it doesn’t contain cocoa solids. It’s made of cocoa butter, sugar, and milk. But for the purposes of deliciousness, we treat it like the real deal!
What are the best candies for easter bark? Anything with a crunchy shell works best. M&Ms, Robin eggs, and even crushed-up toffee bits are all excellent choices for texture.
Final Thoughts
There you have it—the easiest, most festive easter bark you’ll ever make. No ovens, no complicated flour ratios, just pure candy-coated bliss. This year, leave the complicated pastries to the professionals and embrace the “melt and throw” method.
Go ahead, get your kitchen a little messy. If you end up eating more candy eggs during assembly than actually make it onto the bark, I won’t tell anyone. We’ve all been there. Tag me in your bark-breaking photos, or just sit in your sugar-induced coma and enjoy the holiday. Happy Easter!