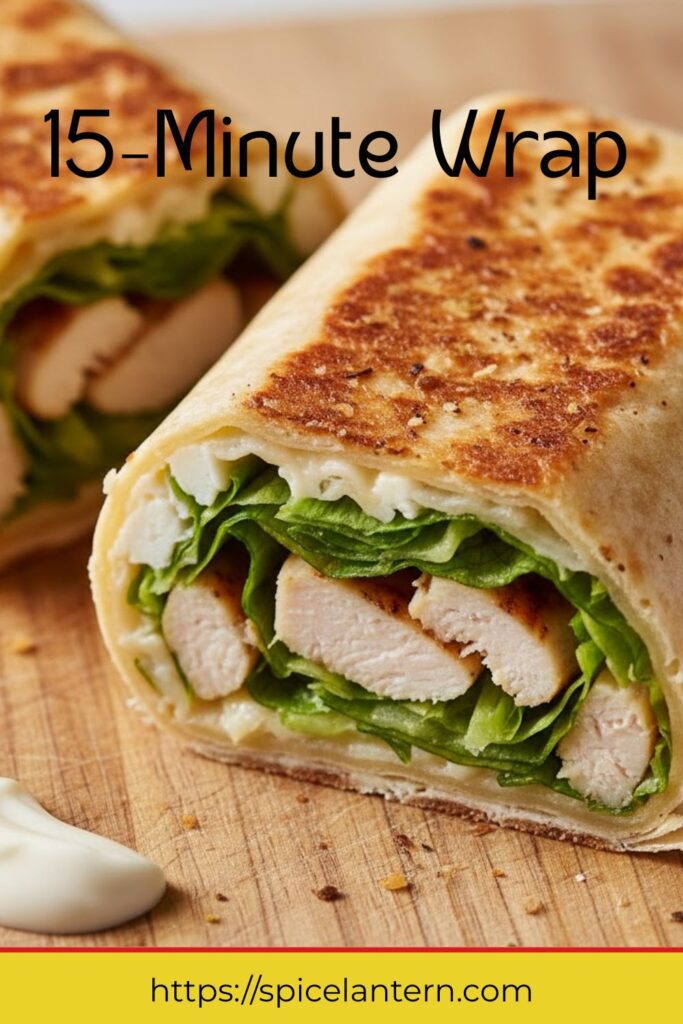
Stop Making Sad Sandwiches: Your Guide to the 15-Minute Wrap Masterpiece
Let’s talk lunch. Or dinner. Or that desperate moment when you’re 80% hangry and 20% motivated. You usually default to a sandwich—a beige, sad slab of bread with fillings that inevitably slide out. Sound familiar? Stop accepting mediocrity! I present the 15-Minute Wrap: the culinary equivalent of an efficient hug. It’s neat, portable, infinitely customizable, and achieves peak flavor in minimal time. This isn’t just about assembly; it’s about the magic of layered ingredients and a perfect toast that turns a flimsy tortilla into a crispy, flavor-sealed package. Why wrestle with sliding sandwich layers when you can achieve wrap perfection faster than the time it takes to find your keys?
Why This Recipe Is Awesome (It’s the Ultimate Leftover Hero)

You need this recipe because it solves the eternal dilemma of “what to eat right now” with flair.
- Actual 15-Minute Speed: We are using pre-cooked protein (rotisserie chicken, deli meat, canned beans, or scrambled eggs) and minimal chopping. The only cooking required is a quick toast for texture. Maximum return on minimal effort, IMO.
- Neatness Guarantee: The beauty of the wrap is that it seals all the ingredients inside. No more fillings escaping your first bite! It’s the perfect portable meal for work, picnics, or eating over your keyboard.
- The Crunch Factor: We don’t just wrap and serve. We give the entire wrap a quick pan-sear to warm the fillings and achieve a crispy, golden exterior. That satisfying crunch is non-negotiable.
Ingredients: The Core Four for Success

Keep these four categories stocked, and you’re always 15 minutes away from a great meal.
- 1 Large Flour Tortilla (Burrito size): The canvas. Choose a pliable, fresh one. Whole wheat works great!
- The Spread (2 Tablespoons): Cream cheese, hummus, Greek yogurt, or mayonnaise. This acts as the glue and the flavor base.
- The Protein (½ cup, Pre-cooked): Shredded rotisserie chicken, sliced deli turkey, canned tuna/salmon, cold cuts, or quick-cooking scrambled eggs.
- The Veggies/Crunch (½ cup, Thinly sliced): Shredded lettuce, spinach, cucumber sticks, or pre-shredded carrots. Thinly sliced is key for easy rolling!
- The Flavor Boost (Optional but recommended): A sprinkle of cheese, hot sauce, or a pinch of dried herbs.

Key Substitutions:
- Flour Tortilla: Use a large rice paper wrap (spritzed with water) for a lighter, gluten-free version. You won’t be able to pan-sear it, though.
- Protein: Use cubed, seasoned firm tofu or canned chickpeas (smashed) for a vegetarian swap.
- Spread: Guacamole or smashed avocado makes an excellent, healthy, creamy base.
Tools & Kitchen Gadgets Used: Your Assembly Line
You won’t need a lot of high-powered gear for this, just a couple of essentials for the final, crucial step.
- Cutting Board and Sharp Knife: For quick chopping/shredding.
- Small Bowl and Fork: For mixing the spread (if customizing).
- Large Skillet, Griddle, or Panini Press: CRITICAL for the final crisp. A non-stick skillet or a clean cast iron pan is perfect.
- Spatula: For easy flipping and pressing.
- Ruler or Measuring Tape (Sarcasm!): Just be generous with the ingredients, okay?
Step-by-Step Instructions: The Art of the Fold
The secret to a great wrap isn’t the fillings—it’s the structure. Follow the folding technique closely!
Step 1: Prep and Lay Flat (3 Minutes)
- Gather Everything: Place your tortilla flat on your cutting board. Have all your pre-cooked proteins, veggies, and spreads ready and waiting.
- Make the Spread: If using cream cheese or yogurt, mix in any desired seasonings (like garlic powder or dried dill).
- Spread the Base: Spread your chosen sauce or spread in a thin layer over the entire surface of the tortilla. This is your flavor barrier and glue.
Step 2: Strategic Layering (4 Minutes)
- The Protein Line: Place the majority of your protein in a thick, organized line just off-center, leaving at least 1-2 inches of space at the top and bottom edge.
- The Crunch: Layer your veggies (shredded lettuce, carrots) directly on top of the protein.
- The Boost: Add your flavor boosts now—cheese, a few drops of hot sauce, or a sprinkle of flaky salt. Crucial rule: Keep all fillings away from the outer edges.
Step 3: The Perfect Fold (3 Minutes)
- Fold the Sides: Fold the top and bottom edges (the short sides) inward over the fillings, like an envelope. This seals the ends.
- The Tuck and Roll: Grasp the edge closest to you. Tuck it tightly over the fillings, then pull back gently on the filling while rolling the wrap forward tightly away from you. This creates the necessary tension for a neat, compact cylinder. Roll it as tightly as you can!
Step 4: The Crisping Finish (4 Minutes)
- Heat your skillet or panini press over medium-high heat. No oil needed!
- Place the wrap seam-side down in the hot, dry pan.
- Cook for 2 minutes, pressing down firmly with a spatula. This seals the seam and creates a perfect golden-brown crust.
- Flip the wrap and cook the other side for another 1-2 minutes until it is evenly toasted and the fillings are warm.
Step 5: Slice and Admire (1 Minute)
- Transfer the wrap to the cutting board.
- Slice it diagonally through the center. Slicing diagonally is key—it reveals the beautiful layers.
- Admire your perfect, handheld meal. Serve with a side of chips or a giant wave of self-satisfaction.
Calories & Nutritional Info: The Delicious Details (Estimated)

These estimates are for one standard chicken/turkey wrap with light mayo and veggies.
- Calories per serving (1 large wrap): ~400-550 calories
- Protein: ~25-35g (Excellent high-protein lunch option!)
- Carbohydrates: ~35-45g (Varies based on tortilla size/type.)
- Fat: ~15-25g
- Fiber Note: Use whole wheat tortillas and load up on fresh veggies for a major fiber boost.
Common Mistakes to Avoid: The Soggy, Exploding Mess
Avoid these simple blunders, or your wrap will literally explode.
- Overfilling Syndrome: The cardinal sin. Overfilling makes the wrap impossible to seal and prone to tearing. Stick to a maximum of 1 cup of total filling, layered thinly!
- Ignoring the Folding Rules: If you don’t fold in the top and bottom edges (the envelope sides) before rolling, all your precious fillings will shoot out the ends. Fold first!
- Wet Fillings: Using watery ingredients like fresh tomato slices or wet coleslaw will make the tortilla soggy and cause it to tear. Use shredded lettuce, sun-dried tomatoes, or blot wet fillings with a paper towel.
- The Cold Wrap Crime: Skipping the pan-sear. A cold wrap is flimsy and bland. The sear seals the wrap, warms the center, and adds that glorious, indispensable crunch. Don’t skip the heat!
- Spreading Too Close to the Edge: The tortilla needs a dry edge to adhere to itself. Keep all fillings and spreads at least ½ inch away from the outer rim.
Variations & Customizations: Your Lunchtime Remix
The possibilities are endless once you master the fold.
- Spicy Tuna Meltdown (Hot): Use canned tuna mixed with a scoop of Greek yogurt and Sriracha. Fill, fold, and sprinkle cheese on the outside before searing. The cheese melts and crisps against the pan.
- Mediterranean Feta & Hummus (Vegetarian): Spread hummus as the base. Fill with cucumber, spinach, feta crumbles, and sun-dried tomatoes (blotted dry!).
- Pizza Wrap (Kids’ Choice): Use pizza sauce as the base spread. Fill with shredded mozzarella and mini pepperonis. Sear on the pan until the cheese is melted and gooey.
FAQ Section: The Wrap Wisdom
You’ve got questions about this cylindrical superstar. We have answers.
Q1: How do I get my wrap to stay closed without tearing?
A: Don’t overfill it! The key is tight rolling (Step 3) and then immediately placing it seam-side down on the hot, dry pan for 2 minutes. The heat slightly cooks the tortilla, welding the seam shut.
Q2: Is a wrap healthier than a sandwich?
A: It depends entirely on the size of the tortilla and the fillings. A large wrap can contain the same amount of carbs as two slices of bread. Focus on lean protein and lots of veggies regardless of your bread choice!
Q3: How do I warm the tortillas so they don’t crack when I roll them?
A: Stack your tortillas and microwave them for about 15-20 seconds. This makes them pliable and prevents cracking during the tight roll.
Q4: Can I use corn tortillas for a wrap?
A: Corn tortillas are too small and delicate for a full wrap. They are better suited for tacos or quesadillas. Stick to large, sturdy flour tortillas for a seamless roll.
Q5: Can I make these wraps ahead of time for lunch prep?
A: Yes, but with caveats! Assemble the wraps, but do not add wet ingredients (like tomatoes, guacamole, or dressing) until just before eating. Skip the final sear and store them tightly wrapped in foil in the fridge for up to 2 days.
Q6: How should I reheat a cold wrap?
A: Reheat it on a panini press or a dry skillet over medium heat for 2-3 minutes per side. This re-crisps the exterior, which is crucial for texture. Avoid the microwave!
Q7: What are the best ingredients to put on the outer layer?
A: Place your wet ingredients (spreads, creamy sauces) closest to the tortilla. Place your crunchy, sturdy ingredients (lettuce, cheese, sliced meat) last, just before rolling.
Final Thoughts: The Folded Future of Food
You are officially a wrap wizard. You mastered the fold, the layer, and the essential crisp—all in 15 minutes. Say goodbye to sad, messy sandwiches forever. Go ahead, take that beautiful, crispy, handheld meal and show your friends the power of efficient, delicious food.