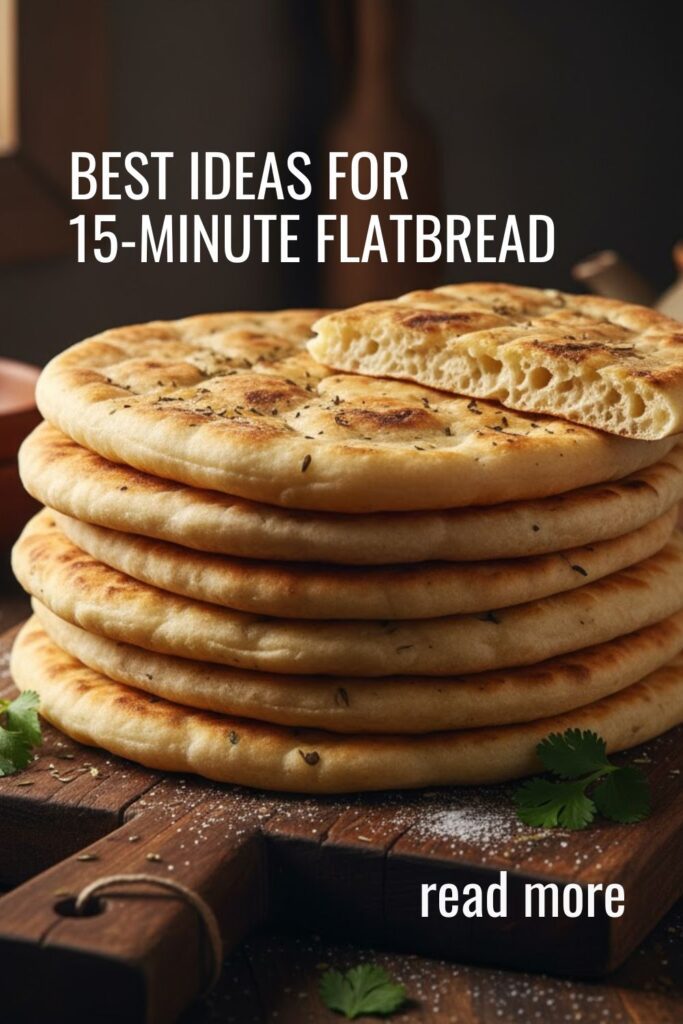
The Best 15-Minute Flatbread: So Easy You’ll Never Buy Store-Bought Again
It’s 5:03 PM. You’re staring into the fridge. You have some leftover curry, but no rice. You have hummus, but the last pita bread looks… fuzzy. This is the moment, right? The moment you give up and order a $30 pizza that will arrive cold in an hour.
Stop. Put the phone down.

What if I told you that you could have warm, fluffy, delicious bread on your table in the time it’t takes to decide on toppings? Yes, I’m talking about this magical 15-minute flatbread.
I know, “15-minute” anything sounds like a marketing lie, right up there with “beach body in 6 days.” But this is the real deal. No yeast, no proofing, no waiting eight hours for a sourdough starter to bubble. Just mix, knead (barely), cook, and achieve carb-fueled glory.
Why This Recipe Is Your New Best Friend

Still skeptical? I get it. You’ve been hurt by “quick” recipes before. But this one is different.
- It’s ACTUALLY 15 Minutes: I’ve timed it. From grabbing the flour to sliding that first golden-brown disc onto a plate, you’re looking at 15-20 minutes, tops.
- It Has 4 Ingredients: Well, 3 if you don’t count salt, which I don’t. It’s flour, Greek yogurt, baking powder, and salt. You probably have all of this right now.
- It’s a “Hero” Recipe: This is the recipe you whip out when guests come over unexpectedly. “Oh this? Just some fresh flatbread I made.” They will think you are a wizard. A delicious, carby wizard.
- It’s a Blank Canvas: This is the little black dress of bread. It can be a pizza base. It can be a gyro wrap. It can be a dipper for hummus, baba ganoush, or that curry you forgot about. It can be breakfast, lunch, and dinner.
Ingredients (Yes, It’s Really This Short)

This recipe is beautifully simple, which means the quality of your ingredients matters a little more.
- 1 1/2 cups All-Purpose Flour: Plus more for dusting. Don’t get fancy here; regular ol’ AP flour is perfect.
- 1 cup Full-Fat Greek Yogurt: This is the secret weapon. The acid in the yogurt reacts with the baking powder to create lift, and the fat keeps it tender and flavorful.
- 1 1/2 tsp Baking Powder: Make sure it’s fresh! If your baking powder has been in the pantry since you moved in, it’s probably dead.
- 3/4 tsp Kosher Salt: If you only have table salt, use a little less (about 1/2 tsp).
Key Substitutions
- For the Yogurt: You can use low-fat Greek yogurt, but full-fat is better. You can also use a vegan Greek-style yogurt (like coconut or soy) to make this vegan. In a real pinch, you can sub half sour cream and half milk, but the texture will be slightly different.
- For the Flour: You can sub half whole-wheat flour for a nuttier, healthier vibe. To make it gluten-free, use a 1:1 gluten-free all-purpose blend that contains xanthan gum.
Tools & Kitchen Gadgets Used
You don’t need a professional bakery, but a few key tools make this infinitely easier.
- Large Mixing Bowl: To contain the flour explosion.
- Measuring Cups & Spoons: Obvious, but necessary.
- Silicone Spatula or Wooden Spoon: For the initial mixing.
- A Clean Countertop: Or a large pastry mat for kneading.
- Bench Scraper: Not essential, but so satisfying for dividing the dough and cleaning your counter.
- Rolling Pin: A simple wooden one is perfect. (No rolling pin? A wine bottle works just fine. You’re welcome.)
- Cast Iron Skillet (10 or 12-inch): This is the most important tool. A heavy-bottomed cast iron pan holds high, even heat, which is a must for getting those beautiful golden-brown blisters. A good non-stick skillet will work, but it won’t be as good.
- Tongs or a Spatula: For flipping the hot bread.
- Pastry Brush: Optional, but nice for brushing on melted butter or garlic oil at the end.
Step-by-Step Instructions (Don’t Blink)
This goes fast. Read the steps, get your stuff, and then go.
- Mix the Dry Stuff: In your large mixing bowl, whisk together the 1 1/2 cups flour, 1 1/2 tsp baking powder, and 3/4 tsp salt. Get it nice and combined.
- Add the Wet Stuff: Plop the 1 cup of Greek yogurt right into the middle of the dry ingredients.
- Get Shaggy: Using your spatula, start to mix the yogurt into the flour. It will look like a total mess. It’ll be shaggy, clumpy, and you’ll think, “This is wrong.” It’s not. This is the awkward teenage phase of dough.
- Dump and Knead (Briefly!): Dust your clean counter with a good amount of flour. Dump the shaggy mess onto it. Start to knead the dough, bringing all the dry bits together. Do not over-knead! We are not making artisan sourdough. You want to knead it for just 1-2 minutes, until it forms a smooth, slightly tacky ball. If it’s hopelessly sticky, add a tiny bit more flour.
- Divide and Conquer: Use your bench scraper or a knife to divide the dough into 6 or 8 equal pieces (8 for smaller, taco-sized flatbreads; 6 for larger, gyro-sized ones). Roll each piece into a little ball.
- Get Your Pan HOT: Place your cast iron skillet over medium-high heat. Let it get hot. Like, really hot. You want it smoking just a tiny bit. Do not add any oil. We are cooking these in a dry pan.
- Roll ‘Em Out: While the pan heats, take one dough ball and put it on your floured surface. Dust the top with more flour and roll it out thin—about 1/8-inch thick. It won’t be a perfect circle. Who cares? Rustic is charming.
- The Sizzle: Gently place your rolled-out dough onto the hot, dry skillet. Let it cook for 60-90 seconds. You’ll see bubbles start to form on the surface. This is the magic.
- Flip and Finish: Use your tongs to peek underneath. Once it has beautiful golden-brown and charred spots, flip it. Cook the other side for another 45-60 seconds.
- Stack ‘Em: Transfer the finished flatbread to a plate. You can cover the stack with a clean kitchen towel to keep them warm and soft while you repeat the process with the remaining dough balls.
- Get Fancy (Optional): After each one comes off the pan, I like to brush it with a little melted butter or garlic-infused olive oil. This is not required, but it is highly, highly recommended.
Calories & Nutritional Info (Aka, the Fine Print)

Disclaimer: I’m just a food-obsessed person, not a nutritionist. This is a solid guesstimate based on 8 flatbreads per batch.
- Calories per flatbread: Approximately 110-130
- Carbohydrates: Approximately 20g
- Protein: Approximately 4g (Thanks, Greek yogurt!)
- Fat: Approximately 1g (This is before you add that glorious butter)
- Good Stuff: This is a great source of protein (for a bread, anyway) and is way more satisfying than most store-bought options.
Common Mistakes to Avoid (Please Read This)
I want you to win the flatbread game. So please, don’t do these things.
- The “Tough Puck” Mistake: You over-kneaded the dough. I told you! 1-2 minutes! You’re just trying to combine it, not develop a ton of gluten. Over-kneading = tough, chewy, sad flatbread.
- The “Pale & Limp” Mistake: Your pan wasn’t hot enough. A medium-low pan will just steam the bread, making it pale and doughy. You need medium-high heat to get that fast puff and those beautiful charred blisters. Be brave.
- The “Cracker” Mistake: You rolled it too thin. 1/8-inch is the sweet spot. If you go paper-thin, you’re just making a tortilla chip. Which is also delicious, but it’s not a flatbread.
- The “Sticky Situation”: You were afraid of flour. This is a tacky dough. You must flour your work surface, the dough ball, and your rolling pin. Don’t go crazy and add a whole cup, but be generous.
- The “Old Leavener” Flop: Your baking powder was from 2018. Baking powder loses its oomph over time. If your bread doesn’t puff at all, your leavener is probably dead. FYI, you can test it by dropping a pinch in hot water. If it fizzes, you’re good.
Variations & Customizations (Get Creative)
This basic recipe is just a starting point.
H3: The Garlic-Herb Dream
This is my go-to. Add 1 tsp of garlic powder and 1 tbsp of dried Italian herbs (or finely chopped fresh rosemary) into the flour at the beginning. When they come off the skillet, brush them with melted butter mixed with a crushed garlic clove.
H3: The Cheesy Boy
Finely grate about 1/2 cup of parmesan or sharp cheddar cheese. Knead this into the dough along with a good crack of black pepper. The cheese will get crispy and toasty in the hot pan. It’s ridiculous.
H3: The Spicy One
Add 1/2 tsp of cayenne pepper or 1 tsp of red pepper flakes to the dry ingredients. This gives a lovely, subtle warmth that’s amazing with curry or a cool yogurt dip.
FAQ Section (Answering Your Panic-Questions)
1. Why is my flatbread tough and chewy? You almost certainly over-kneaded it. Remember, 1-2 minutes max. Just until it comes together. We are not looking for a windowpane effect here.
2. Can I make this vegan? Totally. Just use a plain, unsweetened vegan Greek-style yogurt. A thick coconut or soy-based one works best. And obviously, brush with vegan butter or olive oil at the end.
3. Can I make this gluten-free? Yes. Use a good 1:1 gluten-free all-purpose flour blend. Make sure it’s a blend that already contains xanthan gum, as you’ll need it for structure. The texture will be slightly different—a bit more delicate—but still delicious.
4. Do I have to use Greek yogurt? It’s highly recommended. It’s the “magic” ingredient. But if you’re truly desperate, you can sub plain (non-Greek) yogurt, but the dough will be wetter, so you’ll need more flour. Some people also make a version with just oil and water, but TBH, it’s just not as tender or flavorful.
5. How do I store leftovers? Leftovers? Ha! That’s cute. If you somehow have extras, store them in an airtight container or ziplock bag at room temperature for up to 2 days. They get a little stiff, so…
6. How do I reheat flatbread? Do not microwave them unless you want a rubbery frisbee. The best way is to pop them back into a hot, dry skillet for 20-30 seconds per side. Or, wrap a stack in foil and put them in a 350°F (175°C) oven for 5 minutes.
7. Can I freeze the dough or the cooked flatbread? Yes to both!
- To freeze dough: After dividing into balls, place them on a tray to flash-freeze, then toss them in a freezer bag. Thaw in the fridge overnight before rolling.
- To freeze cooked flatbread: Stack them with a small piece of parchment paper between each one (this is crucial!). Put the stack in a freezer bag. They’ll last for 3 months. Reheat from frozen in a hot skillet.
Final Thoughts
That’s it. You are now officially a person who can make bread from scratch in 15 minutes. This is a superpower.
Think of the possibilities! Emergency mini-pizzas for the kids. A last-minute, impressive side for your dinner party. A delicious, warm vehicle for a mountain of hummus when you’re watching a movie.
You’ll never look at that sad, plastic-wrapped bread in the store the same way again. Go on. You’re a bread-maker now. Act like it.