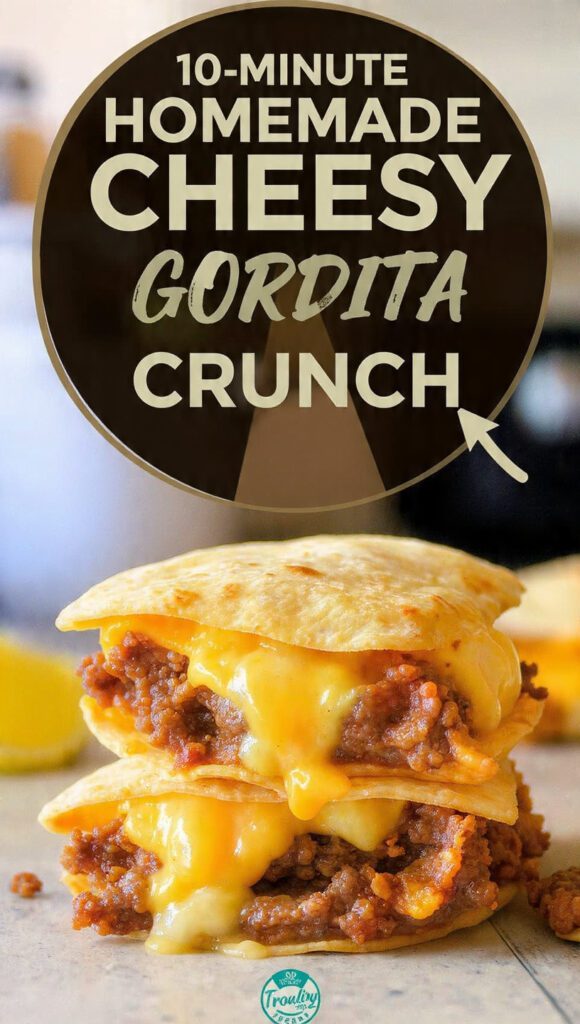
10-Minute Homemade Cheesy Gordita Crunch: The Fast Food Hack You Need
Let’s be honest, the Cheesy Gordita Crunch is a masterpiece of fast-food engineering. It’s crunchy, chewy, cheesy, spicy, and somehow holds itself together (usually). But driving there? That takes more time than it takes to actually build the thing. That’s why the 10-minute homemade cheesy gordita crunch is the ultimate weeknight indulgence hack.
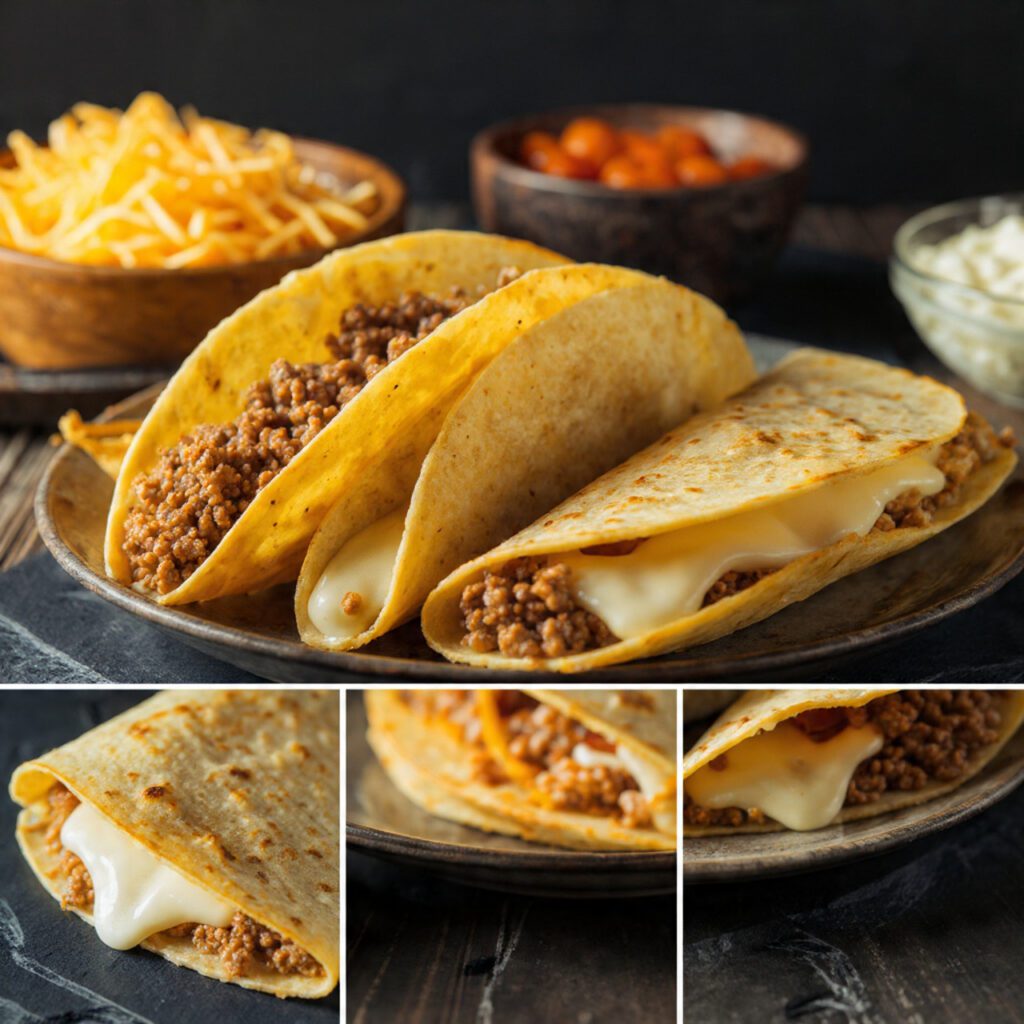
This isn’t cheating; it’s optimization. We ditch the deep fryer, use a pan to melt the cheese directly onto the flour shell, and load it up with seasoned beef and a killer spicy ranch sauce. The result is a savory, satisfying, multi-layered taco that is ready in 10 minutes flat. Get ready to banish the drive-thru and embrace the superior homemade version. Seriously, why wait in line when crunchy, cheesy perfection is ready instantly?
Why This Homemade Cheesy Gordita Crunch Is Awesome (Speed, Crunch, and Customization)
This recipe is the ultimate late-night or weeknight comfort food that relies on smart assembly and speed hacks.

First, Unbeatable 10-Minute Speed. The key is using pre-cooked ground beef (leftovers or a quick 5-minute sear) and the genius hack of melting the cheese between the tortillas in a skillet. This eliminates all deep-frying and excessive assembly time. Why spend an hour on taco night when 10 minutes delivers peak flavor?
Second, The Triple-Texture Thrill. You get three perfect textures: the crunchy interior shell, the soft, chewy exterior flour tortilla, and the gooey, melted cheese holding them together. This layered approach is what makes the Gordita Crunch so addictive. IMO, a taco should always offer some resistance.
Third, The Killer Sauce. We replicate the essential “Spicy Ranch” or “Baja Sauce” using basic pantry ingredients. The tangy, cool, spicy sauce is mandatory for moisture and flavor. TBH, the sauce is the secret that makes this taste authentic.
The Goods: Ingredients You Need
This recipe relies on pre-made shells and a few key dairy products for maximum cheesiness and speed.
- The Shells (The Crunch & Chew):
- 4 Hard Taco Shells (store-bought).
- 4 Small/Medium Flour Tortillas (soft taco size).
- The Filling:
- 1 cup Cooked Ground Beef (seasoned with taco seasoning).
- Lettuce, shredded.
- Tomato, diced.
- The Cheese Layer (The Glue):
- 1/2 cup Shredded Cheddar/Monterey Jack Cheese blend (low-moisture).
- The Spicy Ranch Sauce (The Magic):
- 1/4 cup Mayonnaise or Sour Cream.
- 1 tablespoon Ranch Dressing Mix (dry packet).
- 1 teaspoon Sriracha or Hot Sauce (to taste).
H3 Key Substitutions (The Taco Swap Guide)
- Meat Substitute: Use pre-cooked shredded chicken, ground turkey, or black beans (sautéed with taco seasoning) for the filling.
- Hard Shell Substitute: Use Tostada shells cut in half for a larger, flatter crunch surface.
- Cheese Substitute: Use Pepper Jack cheese for the inner layer for an extra spicy kick, or vegan shredded cheese for a dairy-free option.
- Sauce Substitute: Mix Greek yogurt with lime juice and smoked paprika for a healthier, tangy sauce.
Tools & Kitchen Gadgets Used (The Assembly Line)
You need a heat source for the cheese and a solid surface for quick assembly.
- Large Non-Stick Skillet: CRUCIAL! For quickly melting the cheese layer.
- Tongs: For handling the hot tortillas.
- Small Bowl and Whisk: For blending the spicy ranch sauce.
- Microwave: For quickly warming the cooked ground beef (if using leftovers).
- Serving Platter: For arranging the finished, glorious taco wraps.
Step-by-Step Instructions (Melt, Stack, Load, and Crunch)
The total time is 10 minutes, so make sure your meat is cooked and your veggies are chopped before you start.
H3 Step 1: Prep the Sauce and Filling (4 mins)
- In a small bowl, whisk together the mayonnaise/sour cream, dry ranch mix, and Sriracha until smooth. Adjust heat to taste. Set aside.
- Warm the cooked ground beef (or substitute) in a pan or microwave.
H3 Step 2: The Cheese Glue Layer (4 mins)
- Heat your large non-stick skillet over medium-low heat.
- Lay one soft flour tortilla in the skillet. Immediately sprinkle 1/8 cup of the shredded cheese blend evenly over the surface.
- Place one hard taco shell directly on top of the melting cheese.
- Cook for 1–2 minutes until the cheese is fully melted and acts as a cheesy glue binding the hard shell to the soft tortilla.
- Use tongs to remove the double-layered shell and repeat the process for the remaining three.
H3 Step 3: Load and Wrap (2 mins)
- Place the cheesy, double-layered shell (hard shell facing up) onto your clean cutting board.
- Fill the hard shell with a generous scoop of the warm seasoned ground beef.
- Top the beef with a drizzle of the homemade Spicy Ranch Sauce.
- Add a layer of shredded lettuce and diced tomatoes.
- Carefully fold the soft flour tortilla up and around the hard shell to secure the filling.
H3 Step 4: Serve and Crunch
- Place the 10-minute homemade cheesy gordita crunch neatly on a platter (folded-side down to keep the filling secure).
- Serve immediately! The contrast of the warm cheese and crunchy shell must be experienced fresh.
Calories & Nutritional Info (The Comfort Calculation)
This is an indulgent, high-protein comfort meal. This estimate is for one fully loaded Cheesy Gordita Crunch.
- Estimated Calories Per Serving (1 Taco): ~450–600 calories (depending on filling fat content).
- High in Protein: Ground beef/chicken and cheese provide a significant protein boost.
- Carbohydrates: From the two shells (hard and soft).
- Customizable: Easily made healthier by using low-fat Greek yogurt instead of mayo/sour cream in the sauce.
- Satiety Factor: The dense layers and protein keep you full for hours.
Common Mistakes to Avoid (The Soggy Shell Syndrome)
Achieving that signature crunch and preventing the soft shell from tearing are the biggest hurdles.
- Skipping the Cheese Glue: The cheese is mandatory! It binds the soft and hard shells together. Without it, the shells separate, and the whole thing collapses.
- Overheating the Skillet: If the skillet is too hot, the soft tortilla will scorch before the cheese melts. Use medium-low heat for the melting process.
- Overfilling: Too much meat and too many wet fillings (like watery tomatoes) will tear the hard shell and make the soft shell impossible to fold. Drain your meat and use minimal wet toppings.
- Adding Condiments Before Reheating (If prepping ahead): Condiments make the taco soggy. Always add the Spicy Ranch and any sour cream after the taco is assembled.
Variations & Customizations (The Cheesy Fusion)
Use the cheesy double-shell method for endless flavor possibilities beyond the classic ground beef.
- Chipotle Pulled Chicken Crunch (Spicy Version): Use shredded chicken (slow cooker leftovers are great!) mixed with smoky Chipotle BBQ sauce. Top with pickled red onions and Cotija cheese.
- Keto/Low-Carb Crunch Wrap: Skip the flour tortilla. Use a cheese wrap (melted cheese sheet) for the exterior and a low-carb hard shell inside. Fill with ground beef and avocado.
- Spicy Black Bean Crunch (Vegetarian Swap): Use mashed black beans seasoned with cumin and chili powder for the filling. Mix corn and salsa into the beans. Top with shredded lettuce and avocado slices.
FAQ Section (The Fast Food Secrets)
People always wonder how to replicate this fast-food classic efficiently at home.
- Q: Is it okay to use pre-seasoned ground beef?
- A: Yes! Using pre-cooked, pre-seasoned ground beef (leftovers are best!) is the number one secret to achieving the 10-minute time frame.
- Q: How can I keep the hard taco shells from breaking?
- A: Be gentle! The shells are fragile. Do not overfill them, and ensure the cheese glue holds the hard shell firmly to the soft tortilla before loading.
- Q: How long do leftovers last?
- A: These are best eaten immediately. If you have leftovers, store the filling and sauce separately from the shells in the refrigerator for 2-3 days.
- Q: Why should I melt the cheese on the outside of the soft tortilla?
- A: Melting the cheese between the shells creates a gooey, savory barrier that seals the shells and prevents the moisture from the filling from making the soft tortilla soggy.
- Q: Can I use Greek yogurt instead of mayonnaise/sour cream in the sauce?
- A: Yes! Use plain Greek yogurt for a tangier, high-protein, lower-fat sauce base.
- Q: How should I fold the soft tortilla around the hard shell?
- A: Lay the soft tortilla flat (cheese-side up), center the hard taco on it, load the filling, and then gently fold the soft tortilla up and around the hard shell, pulling it tight around the base.
- Q: Can I make these in a large batch for a party?
- A: Yes! Prep all the fillings ahead of time. Do the cheese glue step (Step 2) just before the party, and set up a taco bar for guests to load and fold their own Gordita Crunches.
Final Thoughts (The Taco Titan)
You bypassed the drive-thru, conquered the multi-layer crunch, and created the ultimate 10-minute comfort food fusion. That gooey, crunchy 10-minute homemade cheesy gordita crunch is proof that minimal effort can yield maximum satisfaction. You are officially the Taco Titan.
Go ahead, enjoy that last savory, spicy crunch. Did you realize fast-food indulgence could be this easy and customizable? I bet you’ll be making that Spicy Ranch sauce by the quart now. Now, are you adding bacon or guacamole next time?